HyundaiBook.ru
Repair Chevrolet Repair Honda Repair Toyota Repair Land Rover Repair VAZ Repair Renault Repair Nissan
English Русский
Български
Беларускі
Український
Српски
Hrvatski
Română
Polski
Slovenský
Magyar
ArticlesSitemapContacts  


  Accent   Elantra   Getz   Grandeur   Sonata   Santa Fe   Tucson   Others
Accent 1 (1994-1999) Accent 2 (1999-2005) Accent 3 (2005-2010)
  • Main
  • Accent
  • MC (2005-2010)
  • Transmission
  • Clutch
  • Removal and installation the clutch assembly

Removal and installation the clutch assembly (Hyundai Accent MC)

0
Contents: Removal ⇓ Checking the condition of clutch…⇓ Installation ⇓
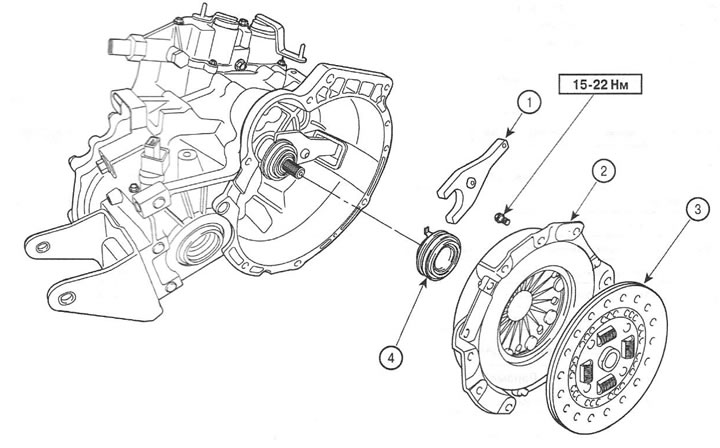
1. Clutch release fork
2. Casing and pressure plate
3. Slave disk
4. Clutch release bearing


Removal


1. Remove the manual transmission

2. Install the centering mandrel into the front bearing of the manual transmission input shaft (installed in the crankshaft).

2. Install the centering mandrel into…


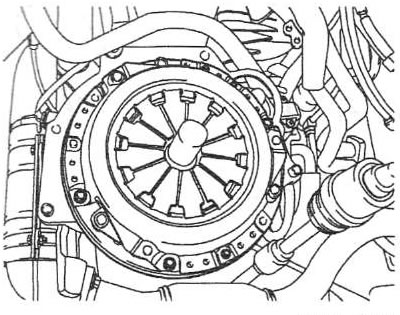
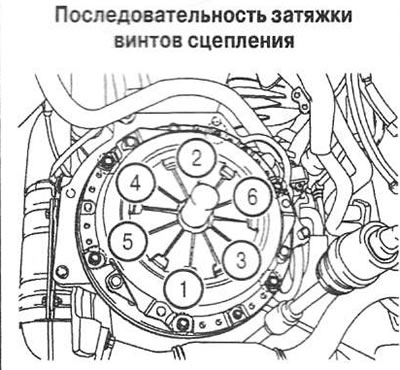
3. Loosen the screws that secure the casing to the flywheel, loosening them gradually in a certain order. This means that the screws should be loosened in pairs, loosening the opposite screws by 2-3 turns for each stage of loosening in order to prevent the casing from becoming distorted.

Caution: Do not use paint thinners to clean the driven disc or bearing.


Checking the condition of clutch components


4. Check the surface of the pressure plate for damage.

5. Check the damper springs and the working surface of the driven disk for damage, weakening and fatigue failure.

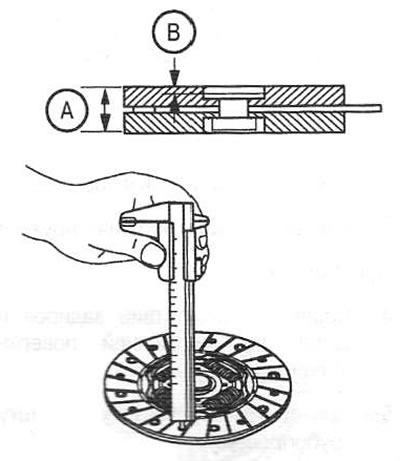
6. Using a caliper, measure the depth of the rivet heads (B) and the thickness (A) of the driven disc.

Minimum permissible values: A= 8.5±0.3 mm; B = 0.3 mm.

If these dimensions are less than the minimum permissible values, replace the driven disk.

Limit values of sizes:
A = 8.5 ±0.3 mm
B = 0.3 mm


7. Check the bearing for damage, wear and noise.

Installation


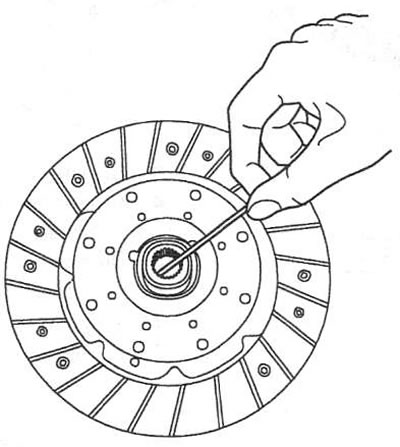
8. Apply grease to the splines of the driven disk.

Caution: Do not apply too much grease, as this may result in grease being forced onto the working surface of the driven disc by centrifugal force.


Caution: Do not apply too much grease,…


9. Using a centering mandrel, install the driven disk onto the flywheel.


10. Install the cover on the flywheel and tighten the mounting screws in the specified sequence in several stages. Tightening torque: 15-22 Nm.

10. Install the cover on the flywheel…


11. Apply grease to the fork support (4), to the spherical tip of the rod at the point of contact (6) with the clutch release fork, to the ends of the fork at the point of contact (5) with the clutch release bearing.

12. Install the gearbox.

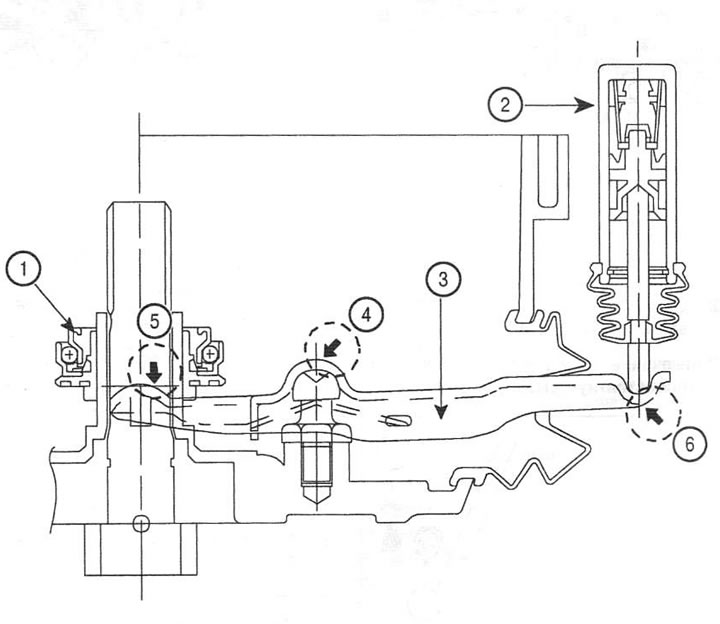
1. Clutch release bearing
2. Working cylinder
3. Clutch release fork
4. Spherical fork support
5. The place where the fork rests against the clutch release bearing housing
6. Contact point of the clutch release rod and fork
This article is available at russian, bulgarian, belarusian, ukrainian, serbian, croatian, romanian, polish, slovak, hungarian
This article has been reviewed by: Konstantin Smirnov
Add to social network:

Previous
Accent 3: Clutch
Next

Bleeding air from the hydraulic clutch drive
Clutch specifications
Clutch device
Removal and installation the clutch master cylinder
Disassembly and assembly of the clutch master cylinder
Removal and installation the clutch pedal
Removal and disassembling the clutch slave cylinder
Possible clutch malfunctions and their causes
We recommend other articles on the topic of Hyundai manuals:

Clutch operation Hyundai Elantra 1 (1990-1995, petrol)
Checking the free travel of the clutch pedal Hyundai Getz (2002-2011)
Checking and adjusting the clutch pedal Hyundai Sonata 3 (1993-1998)
Clutch — device and repair Hyundai Santa Fe 2 (2007-2012, petrol)
Clutch specifications Hyundai Tucson 1 (2005-2010)
Checking the free travel of the clutch pedal Hyundai Matrix (2001-2010, petrol)

Link in different formats to this article

Visitor comments
No comments yet


How much will 45 + 28 ?


Accent 3 (2005-2010) 
  • General information
  • User manual
  • Maintenance
  • Power unit
  • Engine repair
  • Cooling and lubrication system
  • Power and exhaust system
  • Engine electrical equipment
  • Engine management
  • Transmission
  • Clutch
  • Mechanical gearbox
  • Automatic gearbox
  • Chassis
  • Front suspension
  • Rear suspension
  • Wheels and tires
  • Steering
  • Brake system
  • Body
  • Exterior (external elements)
  • Interior (internal elements)
  • Heating and ventilation
  • Electrical equipment
  • Equipment and devices
  • Electrical circuits
Accent 2 (1999-2005) 
  • User manual
  • Control devices
  • Starting engine and driving
  • Troubleshooting
  • Power unit
  • SOHC engines
  • DOHC engines
  • Lubrication system
  • Cooling system
  • Decreased toxicity
  • Fuel system
  • Ignition system
  • Transmission
  • Clutch
  • Mechanical gearbox
  • Automatic gearbox
  • Axles and drive shafts
  • Chassis
  • Car suspension
  • Steering
  • Brake system
  • Body
  • Exterior (external elements)
  • Interior (internal elements)
  • Air conditioning system
  • Electrical equipment
  • Equipment and devices
  • Power devices
Accent 1 (1994-1999) 
  • General information
  • Maintenance
  • Power unit
  • SOHC engines
  • DOHC engines
  • Cooling system
  • Intake and exhaust systems
  • Fuel supply (1.3 l, injection)
  • Fuel supply (1.5 l, injection)
  • Fuel supply (carburetor)
  • Transmission
  • Clutch
  • Manual gearbox
  • Automatic gearbox
  • Drive shafts
  • Chassis
  • Car suspension
  • Steering
  • Brake system
  • Body
  • Body elements
  • Electrical equipment
  • Equipment and devices
  • Electrical circuits
HyundaiBook.ru © 2018-2026 · Mobile version · Sitemap: EN BG BY UA RS HR RO PL SK HU · Administration · Site search · Hyundai owners Accent 1 · Accent 2 · Accent 3 · Elantra 1 · Elantra 2 · Elantra 3 · Getz · Sonata 3 · Sonata 4 · Santa Fe 2 · Tucson 1 · Tucson 2 · Matrix ·
This site uses cookies to optimize its functionality. By continuing, you agree to our terms.