
Contents: Flywheel ⇓ Slave and pressure disks ⇓ Clutch release bearing ⇓ Bleeding the hydraulic clutch…⇓ Checking the clutch release ⇓
Hyundai vehicles with manual transmissions are equipped with a single-plate dry clutch with asbestos-free linings and a dual-mass flywheel. The clutch is controlled by a hydraulic drive. Vehicles with automatic transmissions are equipped with a hydraulic multi-plate clutch.
During operation, no clutch maintenance is required: during operation, worn parts of the linings align themselves. The driven clutch disc should be replaced after approximately 100,000 km, but this largely depends on the vehicle's load conditions.
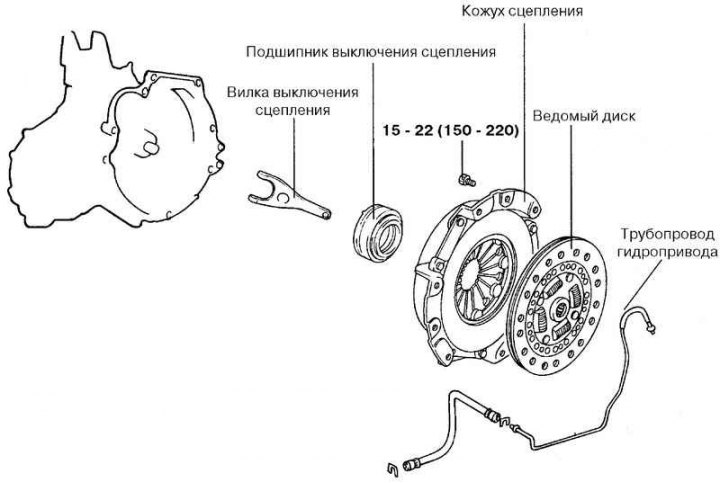
Fig. 3.1. Clutch components
Depending on the engine model and gearbox type, the clutch design may vary slightly (Fig. 3.1).
Flywheel
The flywheel is rigidly connected to the engine crankshaft. The dual-mass flywheel, using a spring-damper system, provides maximum damping of torsional vibrations.
Slave and pressure disks
The driven disk is mounted on the primary shaft of the gearbox. Linings are riveted to it on both sides.
The pressure plate is rigidly connected to the flywheel via a diaphragm spring and clutch housing. The pressure plate serves to press the driven disk to the flywheel. The surface of the pressure plate is treated with an anti-corrosion compound. When cleaning the pressure plate, only its working surface should be treated - this will extend the service life of the clutch.
Clutch release bearing
The clutch release bearing ensures that the driven disc is released from the driving disc when the clutch pedal is pressed.
Bleeding the hydraulic clutch release drive
Any hydraulic system will operate properly if the air is removed from it.
Caution! Be careful not to spill clutch fluid on painted surfaces. If this happens, wash off the fluid immediately with water.
Note: Do not mix different brands of clutch fluid.
Note: Do not reuse drained clutch fluid.
When bleeding, add only clean fluid recommended by the manufacturer. Never reuse fluid that has leaked from the hydraulic clutch release system.
If fluids of different grades are accidentally mixed in the hydraulic system, remove the fluid, flush with clean fluid of the required grade and install new O-rings.
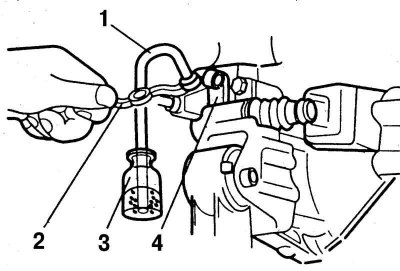
Fig. 3.2. Bleeding the hydraulic clutch release drive: 1 – transparent tube; 2 – open-end wrench; 3 – glass container with brake fluid; 4 – working cylinder
If there are constant fluid leaks from the hydraulic drive or air gets into it, determine the cause and location of the leak and eliminate the damage (Fig. 3.2).
Before bleeding, remove the clutch hydraulic fluid reservoir cap.
Use a suction pump to suck the liquid out of the tank.
Remove the clutch slave cylinder bleeder cap and install a vinyl hose over the bleeder.
Place the other end of the vinyl hose into the container.
Pump the clutch pedal slowly several times.
With the clutch pedal depressed, loosen the nipple using a special tool to release the fluid.
Tighten the bleed screw to stop fluid from escaping.
Repeat the bleeding procedure several times until only clear liquid comes out of the tube.
Tighten the bleed screw.
Add fluid to the tank up to the MAX mark.
Install the lid.
Check that the clutch is working properly.
Checking the clutch release
If you hear noise and grinding noise when disengaging the clutch, the clutch is not disengaging normally. Check with the reverse gear, as it is not equipped with synchronizers:
- set the engine to idle mode;
- press the clutch pedal all the way down and wait 3 seconds;
- engage reverse gear. If noise is heard, the driven disk is not released completely. Therefore, the clutch is faulty.
In this case, check the hydraulic clutch drive components. Air may have entered the system. Also check the tightness of all hydraulic drive connections.