


Car manual transmission Hyundai Santa Fe 2

Clutch — device and repair
Hyundai vehicles with manual transmissions are equipped with a single-plate dry clutch with asbestos-free linings and a dual-mass flywheel. The clutch is controlled by a...
Hyundai vehicles with manual transmissions are equipped with a single-plate dry clutch with asbestos-free linings and a dual-mass flywheel. The clutch is controlled by a...

Technical operations on the car
Checking the gearbox oil level Check the gearbox for oil leaks. Check the gearbox oil level by removing the speedometer driven gear. If the oil is contaminated, drain...
Checking the gearbox oil level Check the gearbox for oil leaks. Check the gearbox oil level by removing the speedometer driven gear. If the oil is contaminated, drain...

Removal and installation of a manual gearbox
Removal Disconnect the cable from the negative (–) battery terminal. Remove the air filter duct. Remove the air cleaner assembly and engine air intake duct. Disconnect...
Removal Disconnect the cable from the negative (–) battery terminal. Remove the air filter duct. Remove the air cleaner assembly and engine air intake duct. Disconnect...

Disassembly and assembly of a manual gearbox
Fig. 3.8. Components of a manual transmission: 1 – back cover; 2 – lock nut; 3 – retaining ring; 4 – gearbox housing; 5 – retainer plug, spring and ball; 6 – reverse...
Fig. 3.8. Components of a manual transmission: 1 – back cover; 2 – lock nut; 3 – retaining ring; 4 – gearbox housing; 5 – retainer plug, spring and ball; 6 – reverse...

Checking, disassembling and assembling the input shaft
Fig. 3.30. Input shaft: 1 – retaining ring; 2 – washer; 3 – bearing; 4 – intermediate conical sleeve; 5 – intermediate inner ring; 6 – synchronizer ring; 7 –...
Fig. 3.30. Input shaft: 1 – retaining ring; 2 – washer; 3 – bearing; 4 – intermediate conical sleeve; 5 – intermediate inner ring; 6 – synchronizer ring; 7 –...

Checking, disassembling and assembling the output shaft
Fig. 3.36. Output shaft: 1 – spacer sleeve; 2 – retaining ring; 3 – intermediate gear of the fifth gear; 4 – fourth gear intermediate gear; 5 – intermediate gear of the...
Fig. 3.36. Output shaft: 1 – spacer sleeve; 2 – retaining ring; 3 – intermediate gear of the fifth gear; 4 – fourth gear intermediate gear; 5 – intermediate gear of the...
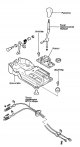
Removal, inspection and assembly of the manual transmission gear shift mechanism
Fig. 3.43. Components of the gear shift mechanism Removal Remove the floor console assembly. Remove the cotter pins and the transmission control cable clamps from the...
Fig. 3.43. Components of the gear shift mechanism Removal Remove the floor console assembly. Remove the cotter pins and the transmission control cable clamps from the...
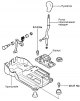
Checking and assembling the gear shift lever
Fig. 3.45. Gear shift lever Examination Check the bushings for wear or damage. Check the lever return spring for wear, damage or deterioration. Assembly Apply general...
Fig. 3.45. Gear shift lever Examination Check the bushings for wear or damage. Check the lever return spring for wear, damage or deterioration. Assembly Apply general...

Checking the oil level in the transfer case
Check the oil level in the transfer case by unscrewing the filler plug. If the oil is contaminated, drain the oil and fill it with new oil. Fig. 3.46. Transfer case...
Check the oil level in the transfer case by unscrewing the filler plug. If the oil is contaminated, drain the oil and fill it with new oil. Fig. 3.46. Transfer case...

Changing the oil in the transfer case
Recommended transmission oil SHELL SPIRAX AX (GL-5 according to API classification, viscosity SAE80W-90). With the vehicle parked on a level, horizontal surface, remove...
Recommended transmission oil SHELL SPIRAX AX (GL-5 according to API classification, viscosity SAE80W-90). With the vehicle parked on a level, horizontal surface, remove...

Transfer case assembly — removal and installation
Fig. 3.48. External view of the transfer case Removal Secure the engine to the special fixture (crossbar 09200-38001) using the mounting brackets (if necessary). Remove...
Fig. 3.48. External view of the transfer case Removal Secure the engine to the special fixture (crossbar 09200-38001) using the mounting brackets (if necessary). Remove...
This section is available on russian, bulgarian, belarusian, ukrainian, serbian, croatian, romanian, polish, slovak, hungarian
We recommend other sections on the topic of Hyundai manuals:
Transmission: Mechanical gearbox Hyundai Accent 2 (1999-2005)
Transmission: Mechanical gearbox Hyundai Elantra 3 (2000-2006)
Transmission: Mechanical gearbox Hyundai Getz (2002-2011)
Transmission: Mechanical gearbox Hyundai Sonata 3 (1993-1998)
Transmission: Car gearbox Hyundai Tucson 1 (2005-2010)
Transmission: Mechanical gearbox Hyundai Matrix (2001-2010, petrol)
Link in different formats to this section
TextHTMLBB Code
- User manual
- Control devices
- Heating and ventilation
- Seat control
- Car driving
- Maintenance and care
- Vehicle Specifications
- Engine 2.0 and 2.4 liters
- Engine specifications
- Engine maintenance
- Engine repair
- Cooling system
- Intake and exhaust system
- Fuel system
- Engine 2.7 liter
- Engine maintenance
- Engine repair
- Cooling system
- Intake and exhaust system
- Transmission
- Transmission specifications
- Mechanical gearbox
- Automatic gearbox
- Drive shafts
- Chassis
- Suspension and wheels
- Steering
- Brake system
- Body
- Exterior (external elements)
- Electrical equipment
- Equipment and devices
- Power devices
- Specifications