
Contents: Jack and tools ⇓ Jack Operating Instructions ⇓ Removal and storing the spare tire ⇓ Tire replacement ⇓ Wheel nut tightening torque ⇓
Jack and tools
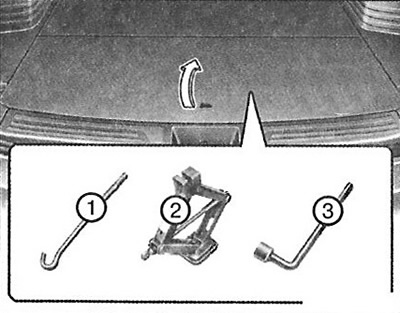
1. Jack handle.
2. Jack.
3. Wheel wrench.
The jack, jack handle and wheel lug wrench are stored in the trunk. To access the equipment, lift the trunk lid.
Jack Operating Instructions
The jack is intended for emergency wheel replacement only. To prevent the jack from making noise when the vehicle is moving, it must be properly packed and securely fixed with the lead screw. Following the jack operating instructions will reduce the risk of injury.
Attention: Tire change.
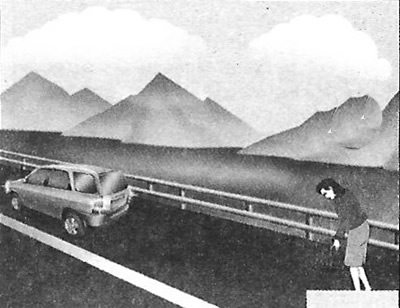
- Never perform vehicle repairs on a roadway or highway.
- Always pull off the road to the side of the road to change a tire. The jack can be used on level, solid ground. If there is no solid, level place on the side of the road, call a towing service for assistance.
- Use the designated jacking points at the front and rear of the vehicle; never rest the jack against the bumpers or any other parts of the vehicle.
- The vehicle can easily roll off the jack, causing serious injury or death. Do not place any part of your body under the vehicle while it is jacked up; use support stands.
- You must not turn on the ignition or start the engine while the car is on the jack.
- Make sure all children are in a safe place away from the road and the vehicle being jacked up.
Removal and storing the spare tire
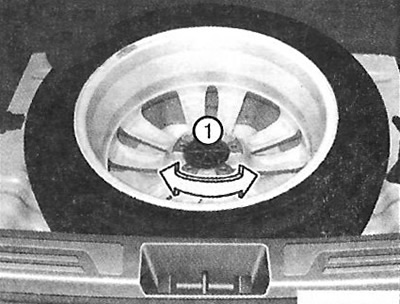
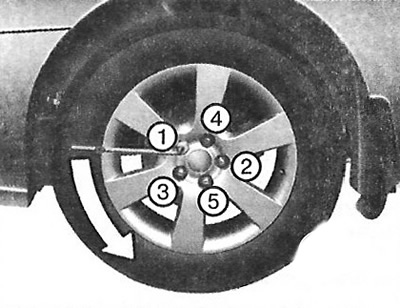
1. Turn the wing bolt (1) of the wheel fastening counterclockwise.
Install the tire in the reverse order of removal. To prevent noise from coming into contact with the tools and the spare tire while the vehicle is moving, store them properly.
Tire replacement
1. Park on a level surface and apply the parking brake securely.
2. Move the gear shift lever to the R (Reverse) position for a manual transmission or P (Park) for an automatic transmission.
3. Turn on the hazard warning lights.
4. Remove the wheel lug nut, jack, jack handle and spare tire from the vehicle.
5. Block the front and rear wheel diagonally opposite the jack location.
Attention: Tire change.
- To prevent the vehicle from moving while changing a wheel, always apply the handbrake fully and block the wheel diagonally opposite the wheel being changed.
- It is recommended to support the car wheels with brake pads and not to leave anyone in the car when lifting it with a jack.
6. Loosen each wheel nut one turn counterclockwise, but do not loosen them completely until the wheel is off the ground.
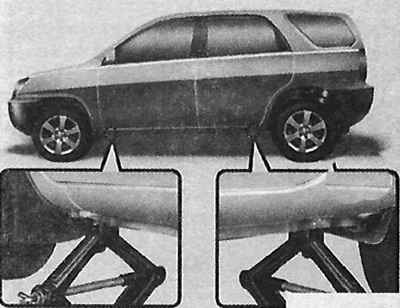
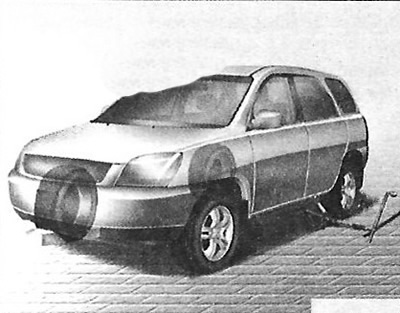
7. Position the jack at the front or rear jacking point closest to the wheel being replaced. Position the jack at the designated jacking points under the frame. The jacking points are plates welded to the frame with two protrusions and a raised edge for contact with the jack.
Caution: Jack Location: To reduce the risk of injury, do not use anything other than the jack provided with the vehicle in its designated location; never place the jack under any other part of the vehicle.
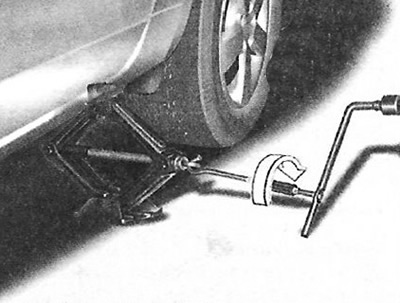
8. Insert the jack handle and turn it clockwise to raise the car until the wheel is off the ground. This distance is approximately 30 mm. Before unscrewing the wheel nuts, make sure that the car is stable and that there is no possibility of it moving or slipping.
9. Loosen the wheel nuts and unscrew them by hand. Slowly remove the wheel from the studs and lay it flat to prevent it from rolling away. To install the wheel on the hub, take the spare tire, align the holes with the studs and slide the wheel onto them. If you have difficulty, tilt the wheel slightly and align the top hole in the wheel with the top stud. Then rock the wheel from side to side and slide it onto the other studs.
Warning: Wheels and hubcaps may have sharp edges. Handle them with care to avoid serious injury. Before installing, make sure there are no foreign objects that could prevent the wheel from being firmly connected to the hub (e.g. dirt, resin, gravel, etc.). If there are any, remove them. If the mounting surfaces of the wheel and hub do not make good contact, the wheel nuts may become loose, resulting in the loss of the wheel. This could result in serious injury or death.
10. To reinstall the wheel, hold it on the studs, screw the wheel nuts onto them and tighten them by hand. The nuts should be screwed on with the small diameter side inward. To ensure a tight fit, tug on the wheels, then tighten the nuts by hand as much as possible again.
11. Lower the vehicle to the ground by turning the wheel lug wrench counterclockwise.
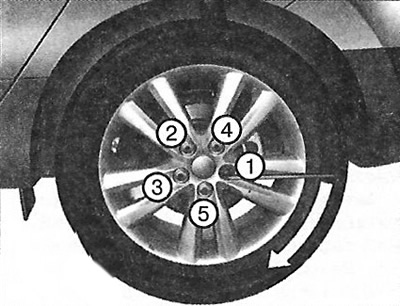
Then position the wrench as shown in the illustration and tighten the lug nuts. Make sure the socket fits snugly around the nut. Do not stand on the wrench handle or extend it with a pipe. Go around the circumference of the wheel, tightening each nut until all are tight. Then double-check the tightness of each nut. After replacing the wheels, contact an authorized Hyundai dealer as soon as possible to tighten the lug nuts to the correct torque.
Wheel nut tightening torque
Steel and aluminum alloy wheel: 9-11 kgf m.
If you have a pressure gauge, remove the valve cap and check the tire pressure. If the pressure is too low, drive slowly to the nearest service station and inflate the tire to the correct pressure. If it is too high, inflate it to the correct pressure. After checking and adjusting the tire pressure, do not forget to replace the valve cap. Without the cap, the tire may leak air. If you lose the valve cap, buy a new one and replace it as soon as possible. After changing the tire, secure the flat tire in its designated place and put the jack and tools back in their places.
Caution: Your vehicle's wheel studs and nuts have metric threads. When removing a wheel, make sure to install the same nuts, or when replacing them, use nuts with metric threads and the same chamfer type. Installing a nut with a non-metric thread on a stud with a metric thread, or vice versa, will not provide a secure connection between the wheel and the hub and will damage the stud so that it will need to be replaced. Keep in mind that most wheel nuts have non-metric threads. Use extreme caution before installing subsequently purchased wheel nuts or wheels. If in doubt, consult an authorized Hyundai dealer.
Caution: Wheel studs: Damage to studs may result in loss of wheel retention, which may result in loss of wheel, collision and serious injury.
To prevent the jack, jack handle, wheel lug nut and spare tire from rattling, store them properly.
Attention.
- Spare tire pressure does not meet requirements.
- Check the tire pressure as soon as possible after installing the spare tire. If necessary, adjust it to the specified value.