
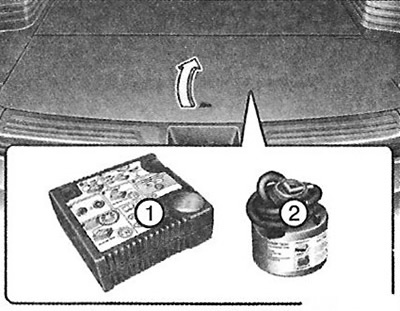
1. Compressor.
2. Bottle with sealant.
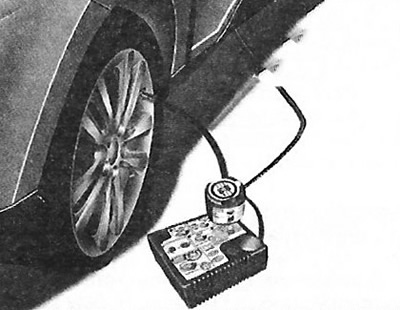
With the TireMobilityKit, you can continue driving even after a flat tire. The system of compressor and sealant allows you to effectively and conveniently seal most punctures in passenger car tires caused by nails or similar objects and re-inflate the tire.
Once you are sure that the tire is securely sealed, you can carefully continue to drive the plates welded to the frame with two protrusions and a raised edge for contact with the jack.
Caution: Jack Location: To reduce the risk of injury, do not use anything other than the jack provided with the vehicle in its designated location; never place the jack under any other part of the vehicle.
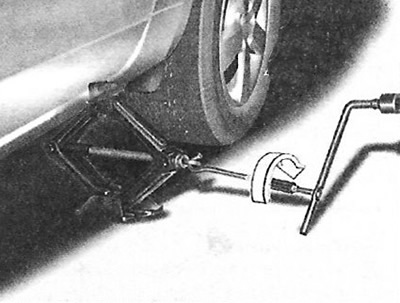
8. Insert the jack handle and turn it clockwise to raise the car until the wheel is off the ground. This distance is approximately 30 mm. Before unscrewing the wheel nuts, make sure that the car is stable and that there is no possibility of it moving or slipping.
9. Loosen the wheel nuts and unscrew them by hand. Slowly remove the wheel from the studs and lay it flat to prevent it from rolling away. To install the wheel on the hub, take the spare tire, align the holes with the studs and slide the wheel onto them. If you have difficulty, tilt the wheel slightly and align the top hole in the wheel with the top stud. Then rock the wheel from side to side and slide it onto the other studs.
Warning: Wheels and hubcaps may have sharp edges. Handle them with care to avoid serious injury. Before installing, make sure there are no foreign objects that could prevent the wheel from being firmly connected to the hub (e.g. dirt, resin, gravel, etc.). If there are any, remove them. If the mounting surfaces of the wheel and hub do not make good contact, the wheel nuts may become loose, resulting in the loss of the wheel. This could result in serious injury or death.
10. To reinstall the wheel, hold it on the studs, screw the wheel nuts onto them and tighten them by hand. The nuts should be screwed on with the small diameter side inward. To ensure a tight fit, tug on the wheels, then tighten the nuts by hand as much as possible again.
11. Lower the vehicle to the ground by turning the wheel lug wrench counterclockwise.
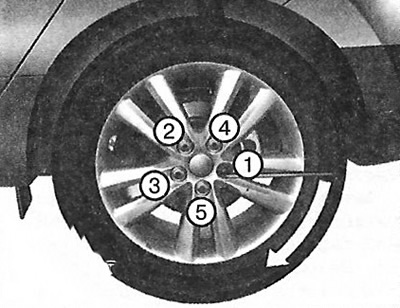
Then position the wrench as shown in the illustration and tighten the lug nuts. Make sure the socket fits snugly around the nut. Do not stand on the wrench handle or extend it with a pipe. Go around the circumference of the wheel, tightening each nut until all are tight. Then double-check the tightness of each nut. After replacing the wheels, contact an authorized Hyundai dealer as soon as possible to tighten the lug nuts to the correct torque.
Wheel nut tightening torque
Steel and aluminum alloy wheel: 9-11 kgf m.
If you have a pressure gauge, remove the valve cap and check the tire pressure. If the pressure is too low, drive slowly to the nearest service station and inflate the tire to the correct pressure. If it is too high, inflate it to the correct pressure. After checking and adjusting the tire pressure, do not forget to replace the valve cap. Without the cap, the tire may leak air. If you lose the valve cap, buy a new one and replace it as soon as possible. After changing the tire, secure the flat tire in its designated place and put the jack and tools back in their places.
Caution: Your vehicle's wheel studs and nuts have metric threads. When removing a wheel, make sure to install the same nuts, or when replacing them, use nuts with metric threads and the same chamfer type. Installing a nut with a non-metric thread on a stud with a metric thread, or vice versa, will not provide a secure connection between the wheel and the hub and will damage the stud so that it will need to be replaced. Keep in mind that most wheel nuts have non-metric threads. Use extreme caution before installing subsequently purchased wheel nuts or wheels. If in doubt, consult an authorized Hyundai dealer.
Caution: Wheel studs: Damage to studs may result in loss of wheel retention, which may result in loss of wheel, collision and serious injury.
To prevent the jack, jack handle, wheel lug nut and spare tire from rattling, store them properly.
Attention.
- Spare tire pressure does not meet requirements.
- Check the tire pressure as soon as possible after installing the spare tire. If necessary, adjust it to the specified value.
Safety Instructions for Using the TireMobilityKit
- Stop your car at the edge of the road so that you can work with the TireMobilityKit away from traffic. Set up a warning triangle at the appropriate distance so that passing cars can go around where you are stopping.
- To prevent the vehicle from moving, even if the stopping place is fairly level, always use the parking brake.
- Use the TireMobilityKit to seal/inflate passenger vehicle tires only. Do not use on motorcycle, scooter or any other type of tire.
- Do not remove any foreign objects such as nails or screws that have punctured the tire.
- Before using the TireMobilityKit, read the safety precautions on the sealant bottle label!
- Work on the car must be done outdoors with the engine running. Otherwise, the compressor operation may eventually discharge the car battery.
- When using the TireMobilityKit, never leave it unattended.
- Do not leave the compressor on for more than 10 minutes at a time or it will overheat.
- If the ambient temperature is below 30°C, the TireMobilityKit cannot be used.
- Do not use the sealant after the expiration date printed on the bottle label.
- Keep out of reach of children.
Technical data
- System voltage: 12V.
- Working voltage: 10-15V.
- Current consumption: 15 A maximum.
- Suitable for use in the temperature range: -30 ~ +70°C.
- Maximum working pressure: 6 Bar.
Dimensions:
- Compressor: 168x150x68 mm.
- Bottle with sealant: 104x85 mm.
- Compressor weight: 1.05 kg.
- Volume of sealant: 300 ml.
Note: Sealant and replacement parts can be purchased and replaced at an authorized auto or tire dealer. Empty sealant bottles can be disposed of as household waste. Liquid sealant residue should be disposed of by an auto or tire dealer or in accordance with local waste disposal regulations.
The original can be read on the resource hyundaibook.ru