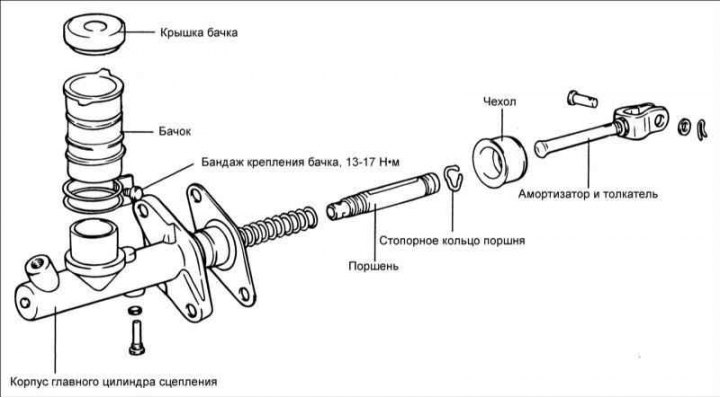
HyundaiBook.ru
Repair Chevrolet Repair Honda Repair Toyota Repair Land Rover Repair VAZ Repair Renault Repair Nissan
English Русский
Български
Беларускі
Український
Српски
Hrvatski
Română
Polski
Slovenský
Magyar
ArticlesSitemapContacts  


  Accent   Elantra   Getz   Grandeur   Sonata   Santa Fe   Tucson   Others
Elantra 1 (1990-1995, petrol) Elantra 2 (1995-2000, petrol) Elantra 3 (2000-2006)
  • Main
  • Elantra
  • XD (2000-2006)
  • Transmission
  • Clutch
  • Clutch master cylinder

Clutch master cylinder (Hyundai Elantra XD)

0
Contents: Disassembly ⇓ Examination ⇓ Assembly ⇓
Disassembly


Disassembly


1. Remove the refill tank mounting band, tank and lid.

2. Remove the piston retaining ring.

3. Remove the pusher and piston.

Caution: Do not damage the push rod or the surface of the clutch master cylinder that contacts the piston.


Examination


1. Clean the dismantled parts in solvent and blow out all parts and channels with compressed air.

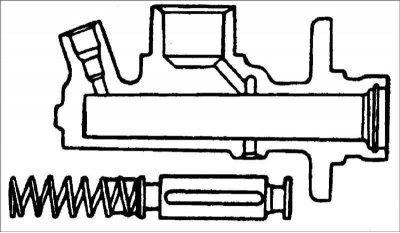
2. Check the inside of the cylinder body for rust, pitting or wear.

3. Check the piston seal for wear.

4. Check the piston for rust, pitting or wear.

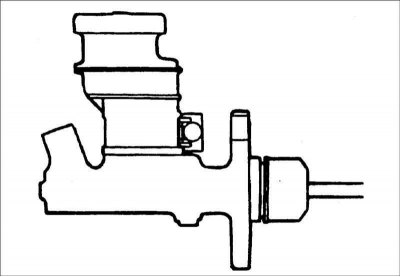
5. Check the clutch hydraulic line for damage.

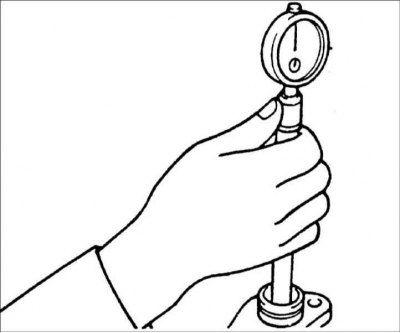
6. Measure the inside diameter of the clutch master cylinder.

Attention! Measure the inner diameter of the clutch master cylinder in three sections (at the base, center and top) in two perpendicular directions.


7. If the clearance between the piston…


7. If the clearance between the piston and cylinder exceeds the permissible value, replace the master cylinder and/or piston assembly. Gap: 0.15 mm.


Assembly


1. Before assembly, lubricate the piston and cylinder bore diameter with clutch fluid. Fluid: DOT 3 or DOT 4 brake fluid.

2. Install the piston assembly.

3. Install the piston retaining ring.

4. Install the pusher.


4. Install the pusher.

5. Install the refill tank retaining…


5. Install the refill tank retaining strap, tank and lid.
This article is available at russian, bulgarian, belarusian, ukrainian, serbian, croatian, romanian, polish, slovak, hungarian
This article has been reviewed by: Konstantin Smirnov
Add to social network:

Previous
Elantra 3: Clutch
Next

Slave and pressure plates of the clutch
Bleeding the hydraulic clutch drive system
Adjusting the clutch pedal
Clutch technical data
Clutch pedal — removal and installation
Clutch slave cylinder
Troubleshooting Clutch Problems
We recommend other articles on the topic of Hyundai manuals:

Clutch Master Cylinder — Disassembly, Inspection and Assembly Hyundai Accent 1 (1994-1999)
Clutch Master Cylinder — Removal and Installation Hyundai Getz (2002-2011)
Clutch Master Cylinder and Line — Removal, Check and Installation Hyundai Sonata 3 (1993-1998)
Disassembly, inspection, assembly and installation of the master… Hyundai Santa Fe 2 (2007-2012, petrol)
Clutch master cylinder — device Hyundai Tucson 1 (2005-2010)
Removal and installation the clutch master cylinder Hyundai Matrix (2001-2010, petrol)

Link in different formats to this article

Visitor comments
No comments yet


How much will 12 + 20 ?


Elantra 3 (2000-2006) 
  • User manual
  • Control devices
  • Audio system
  • Starting the engine and driving
  • Faults en route
  • Maintenance and care
  • Technical information
  • Power unit
  • Gasoline engines
  • Diesel engines
  • Lubrication system
  • Cooling system
  • Fuel system (gasoline)
  • Fuel system (diesel)
  • Decreased toxicity
  • Ignition system
  • Transmission
  • Clutch
  • Mechanical gearbox
  • Automatic gearbox
  • Drive shafts and axles
  • Chassis
  • Car suspension
  • Steering
  • Brake system
  • Body
  • Exterior (external elements)
  • Interior (internal elements)
  • Air conditioning system
  • Electrical equipment
  • Equipment and devices
  • Headlights and lighting
  • Power devices
  • Electrical circuits
Elantra 2 (1995-2000, petrol) 
  • General information
  • Maintenance
  • Power unit
  • Engine repair
  • Cooling system
  • Intake and exhaust system
  • Fuel system
  • Transmission
  • Clutch
  • Manual gearbox
  • Automatic gearbox
  • Drive shafts and axles
  • Chassis
  • Front suspension
  • Rear suspension
  • Steering
  • Brake system
  • Body
  • Body elements
  • Electrical equipment
  • Equipment and devices
  • Electrical diagrams
Elantra 1 (1990-1995, petrol) 
  • General information
  • Introduction to the guide
  • Maintenance
  • Power unit
  • Minor engine repair
  • Engine overhaul
  • Lubrication system
  • Cooling system
  • Fuel injection system
  • Ignition system
  • Exhaust system
  • Transmission
  • Clutch
  • Manual gearbox
  • Automatic gearbox
  • Drive shafts
  • Chassis
  • Front suspension
  • Rear suspension
  • Steering
  • Wheels and tires
  • Troubleshooting
  • Brake system
  • Body
  • Body elements
  • Electrical equipment
  • Equipment and devices
  • Power devices
  • Heating and air conditioning
  • Electrical circuits
HyundaiBook.ru © 2018-2026 · Mobile version · Sitemap: EN BG BY UA RS HR RO PL SK HU · Administration · Site search · Hyundai owners Accent 1 · Accent 2 · Accent 3 · Elantra 1 · Elantra 2 · Elantra 3 · Getz · Sonata 3 · Sonata 4 · Santa Fe 2 · Tucson 1 · Tucson 2 · Matrix ·
This site uses cookies to optimize its functionality. By continuing, you agree to our terms.