HyundaiBook.ru
Repair Chevrolet Repair Honda Repair Toyota Repair Land Rover Repair VAZ Repair Renault Repair Nissan
English Русский
Български
Беларускі
Український
Српски
Hrvatski
Română
Polski
Slovenský
Magyar
ArticlesSitemapContacts  


  Accent   Elantra   Getz   Grandeur   Sonata   Santa Fe   Tucson   Others
Getz (2002-2011)
  • Main
  • Getz
  • 1 (2002-2011)
  • Transmission
  • Clutch
  • Clutch Master Cylinder — Removal and Installation

Clutch Master Cylinder — Removal and Installation (Hyundai Getz 1)

0
Contents: Removal ⇓ Examination ⇓ Disassembly ⇓ Examination ⇓ Assembly ⇓ Installation ⇓

Removal


1. Drain the working fluid through the bleed nipple.

1. Drain the working fluid through the…


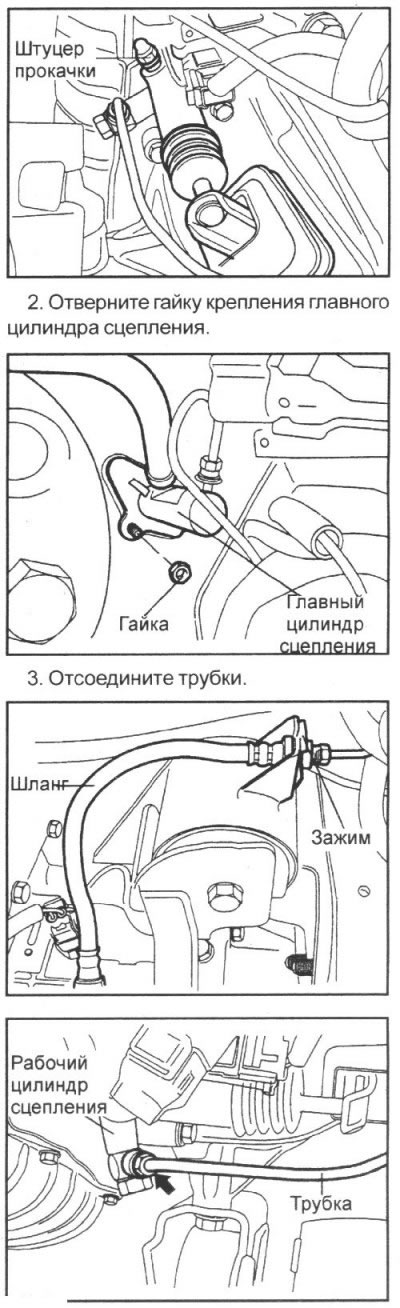
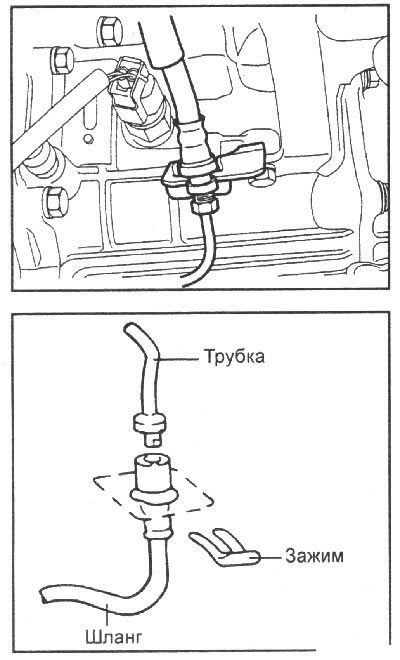
4. Remove the clamp securing the tube to the gearbox.

Examination


Check the hose and tube for rust, pitting and scoring.
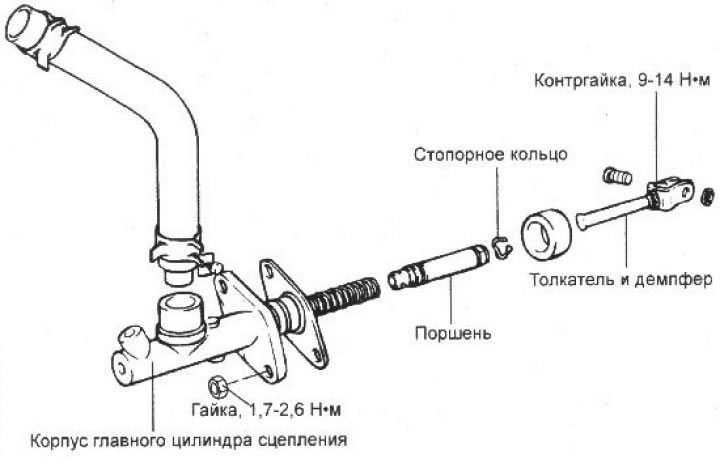
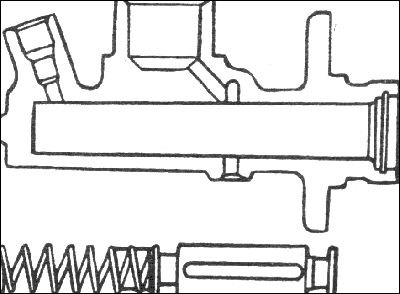
Check the hose and tube for rust,…


Check the hose and tube for rust,…


Disassembly


1. Remove the piston retaining ring.

2. Remove the pusher and piston.

Note: Do not damage the push rod or the surface of the clutch master cylinder that contacts the piston.


Examination


1. Check the inside of the cylinder body for rust, pitting or wear.

2. Check the piston seal for wear.

3. Check the piston for rust, pitting or wear.

4. Check the clutch hydraulic tube for damage.

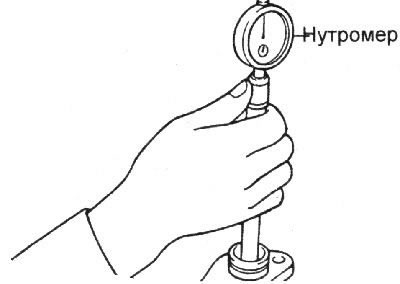
5. Use a bore gauge to measure the inner diameter of the clutch master cylinder and a micrometer to measure the outer diameter of the piston.

Note: Measure the inner diameter of the clutch master cylinder in three sections (base, center and top) in two perpendicular directions.


Note: Measure the inner diameter of the…


6. If the clearance between the piston and cylinder exceeds the permissible value, replace the master cylinder and/or piston assembly.

Gap: 0.15 mm

Assembly


1. Before assembly, lubricate the piston and cylinder bore diameter with DOT3 or DOT4 clutch fluid.

1. Before assembly, lubricate the…


2. Install the piston assembly into the cylinder.


3. Install the piston retaining ring.

4. Install the pusher.

5. Connect the hose to the clutch master cylinder housing.
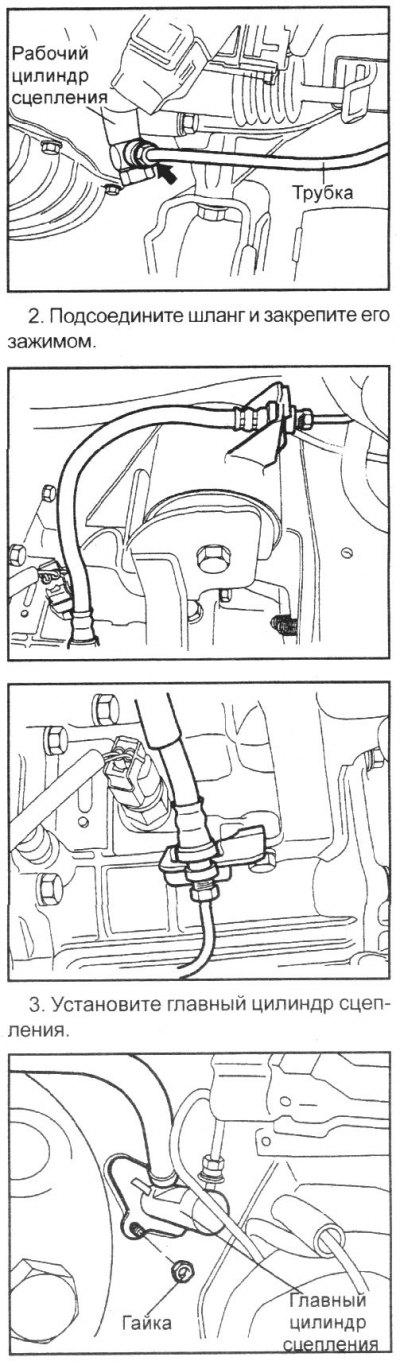
Installation


1. Connect the tube to the clutch slave cylinder.

1. Connect the tube to the clutch slave…


4. Connect the push rod to the clutch pedal.

5. Bleed the clutch hydraulic drive.
This article is available at russian, bulgarian, belarusian, ukrainian, serbian, croatian, romanian, polish, slovak, hungarian
This article has been reviewed by: Konstantin Smirnov
Add to social network:

Previous
Getz: Clutch
Next

Bleeding the clutch hydraulics
Removal and installation the clutch and its drive
Causes of Clutch Failure
Clutch specifications
Clutch pedal — removal and installation
Slave and pressure plates of the clutch — removal and installation
Clutch slave cylinder
Troubleshooting Clutch Problems
We recommend other articles on the topic of Hyundai manuals:

Clutch Master Cylinder — Disassembly, Inspection and Assembly Hyundai Accent 1 (1994-1999)
Clutch Master Cylinder — Removal, Installation and Repair Hyundai Elantra 1 (1990-1995, petrol)
Clutch Master Cylinder and Line — Removal, Check and Installation Hyundai Sonata 3 (1993-1998)
Disassembly, inspection, assembly and installation of the master… Hyundai Santa Fe 2 (2007-2012, petrol)
Clutch master cylinder — device Hyundai Tucson 1 (2005-2010)
Removal and installation the clutch master cylinder Hyundai Matrix (2001-2010, petrol)

Link in different formats to this article

Visitor comments
No comments yet


How much will 32 + 35 ?


Getz (2002-2011) 
  • User manual
  • Control devices
  • Heating and ventilation
  • Audio system
  • Car driving
  • Faults en route
  • Maintenance
  • Technical information
  • Power unit
  • Engine repair 1.1/1.3 l
  • Engine repair 1.5/1.6 l
  • Lubrication system
  • Cooling system
  • Fuel system
  • Exhaust system
  • Ignition system
  • Transmission
  • Clutch
  • Mechanical gearbox
  • Automatic gearbox
  • Drive shafts and axles
  • Chassis
  • Suspension and wheels
  • Steering
  • Brake system
  • Body
  • Exterior (external elements)
  • Interior (internal elements)
  • Air conditioning and heater
  • Electrical equipment
  • Equipment and devices
  • Power devices
  • Electrical circuits
HyundaiBook.ru © 2018-2026 · Mobile version · Sitemap: EN BG BY UA RS HR RO PL SK HU · Administration · Site search · Hyundai owners Accent 1 · Accent 2 · Accent 3 · Elantra 1 · Elantra 2 · Elantra 3 · Getz · Sonata 3 · Sonata 4 · Santa Fe 2 · Tucson 1 · Tucson 2 · Matrix ·
This site uses cookies to optimize its functionality. By continuing, you agree to our terms.