
HyundaiBook.ru
Repair Chevrolet Repair Honda Repair Toyota Repair Land Rover Repair VAZ Repair Renault Repair Nissan
English Русский
Български
Беларускі
Український
Српски
Hrvatski
Română
Polski
Slovenský
Magyar
ArticlesSitemapContacts  


  Accent   Elantra   Getz   Grandeur   Sonata   Santa Fe   Tucson   Others
Santa Fe 2 (2007-2012, petrol)
  • Main
  • Santa Fe
  • CM (2007-2012)
  • Chassis
  • Brake system
  • Disassembly, inspection, assembly and installation of the master brake cylinder

Disassembly, inspection, assembly and installation of the master brake cylinder (Hyundai Santa Fe CM)

0
Contents: Removal ⇓ Disassembly ⇓ Examination ⇓ Assembly ⇓ Installation ⇓
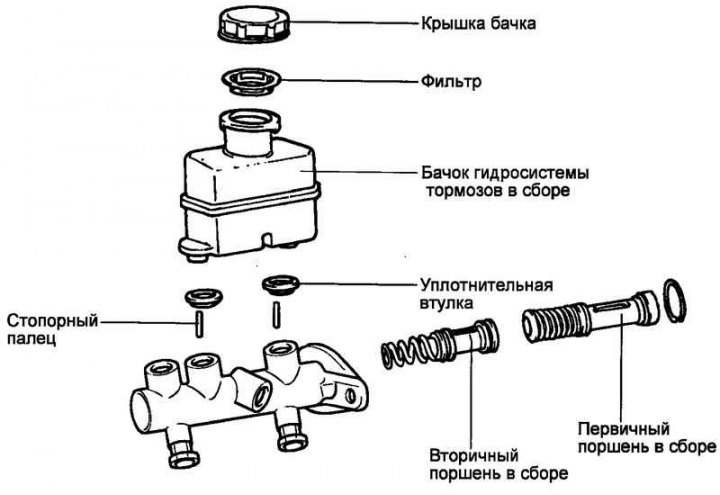
Fig. 6.11. Master brake cylinder

Fig. 6.11. Master brake cylinder


Removal


Disconnect the brake fluid level sensor connector.

Disconnect the brake pipes from the master cylinder. Install plugs on the open holes.

Caution: Remove any spilled brake fluid from painted surfaces immediately.
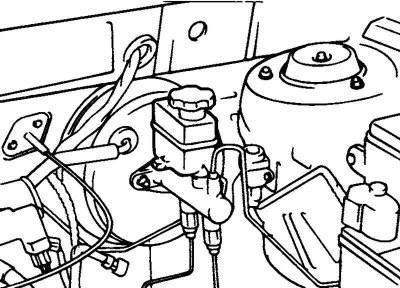

Fig. 6.12. Location of the master brake cylinder

Fig. 6.12. Location of the master brake cylinder


Loosen the mounting nuts and remove the brake cylinder (Fig. 6.12).

Disassembly


Remove the reservoir cap and drain the brake fluid.
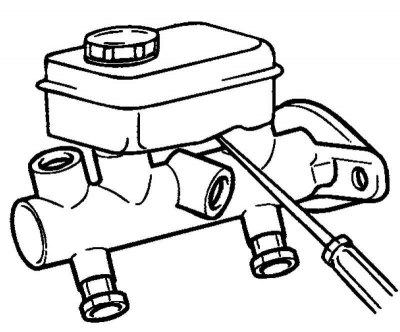
Fig. 6.13. Removing the tank

Fig. 6.13. Removing the tank


Loosen the reservoir mounting screws and use a screwdriver to remove the reservoir from the brake cylinder seals (Fig. 6.13).
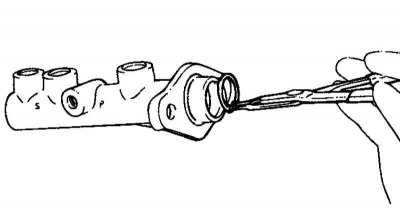
Fig. 6.14. Removing the retaining ring

Fig. 6.14. Removing the retaining ring


Remove the retaining ring (Fig. 6.14).
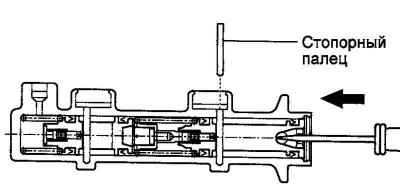
Fig. 6.15. Removing the primary piston limiting pin

Fig. 6.15. Removing the primary piston limiting pin


Remove the primary piston limit pin by pressing on the piston with a screwdriver. Remove the primary piston (Fig. 6.15).
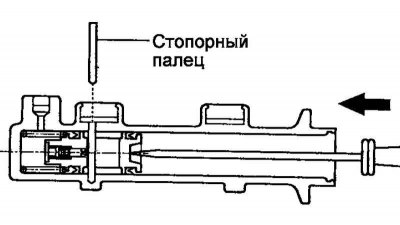
Fig. 6.16. Removing the secondary piston limiting pin

Fig. 6.16. Removing the secondary piston limiting pin


Remove the secondary piston limiting pin by pressing on the piston with a screwdriver. Remove the secondary piston (Fig. 6.16).

Note: The primary and secondary pistons cannot be disassembled.


Examination


Check the condition of the cylinder mirror (scoring, rust).

Assess the degree of wear of the cylinder and replace it if necessary.

Note: If the cylinder surface is damaged, replace the brake master cylinder assembly.


Note: Wash the master cylinder parts with alcohol.


Assembly


When installing, lubricate all parts with clean brake fluid.
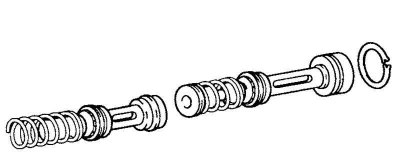
Fig. 6.17. Sequence of piston and spring installation

Fig. 6.17. Sequence of piston and spring installation


The original material is located on the website: hyundaibook.ru

Carefully install the springs and pistons into the cylinder, making sure that the parts are positioned correctly (Fig. 6.17).
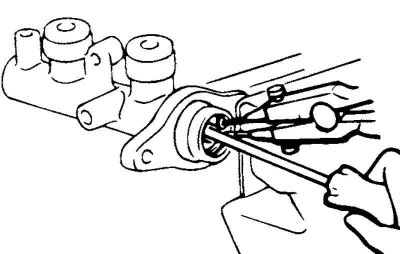
Fig. 6.18. Installing the retaining ring

Fig. 6.18. Installing the retaining ring


Press the piston with a screwdriver and install the retaining ring (Fig. 6.18).

Press the piston until the spring is fully compressed and install the stop pin.

Install the tank seals.
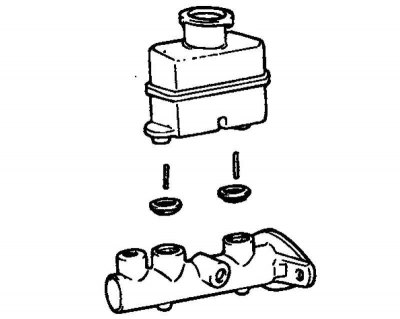
Fig. 6.19. Master brake cylinder reservoir

Fig. 6.19. Master brake cylinder reservoir


Install the master cylinder reservoir (Fig. 6.19).

Installation


Install the master cylinder to the brake booster.

Install the booster and cylinder onto the engine compartment bulkhead.

Connect the brake pipes to the master cylinder.

Connect the vacuum hose to the booster.

Connect the booster rod to the brake pedal.

Fill the master cylinder reservoir with brake fluid. Bleed the brake system.

Attention! The brake booster cannot be disassembled.
This article is available at russian, bulgarian, belarusian, ukrainian, serbian, croatian, romanian, polish, slovak, hungarian
This article has been reviewed by: Konstantin Smirnov
Add to social network:

Previous
Santa Fe 2: Brake system
Next

Removal, checking and installation the brake pedal
Bleeding the brake hydraulic system
Checking the operation of the brake booster without a tester
Checking and adjusting the brake pedal
Rear brake pressure regulator
Removal, checking and installation front brake pads
Disassembly and assembly of front disc brakes
Disassembly and assembly of rear disc brakes
Removal, checking and installation rear drum brakes
We recommend other articles on the topic of Hyundai manuals:

Master brake cylinder — device Hyundai Accent 1 (1994-1999)
Brake Master Cylinder/Vacuum Booster — Removal and Installation Hyundai Elantra 1 (1990-1995, petrol)
Master brake cylinder Hyundai Getz (2002-2011)
Master brake cylinder Hyundai Sonata 3 (1993-1998)
Master brake cylinder Hyundai Tucson 2 (2009-2015)
Disassembly, inspection, assembly and installation of the master… Hyundai Matrix (2001-2010, petrol)

Link in different formats to this article

Visitor comments
No comments yet


How much will 44 + 43 ?


Santa Fe 2 (2007-2012, petrol) 
  • User manual
  • Control devices
  • Heating and ventilation
  • Seat control
  • Car driving
  • Maintenance and care
  • Vehicle Specifications
  • Engine 2.0 and 2.4 liters
  • Engine specifications
  • Engine maintenance
  • Engine repair
  • Cooling system
  • Intake and exhaust system
  • Fuel system
  • Engine 2.7 liter
  • Engine maintenance
  • Engine repair
  • Cooling system
  • Intake and exhaust system
  • Transmission
  • Transmission specifications
  • Mechanical gearbox
  • Automatic gearbox
  • Drive shafts
  • Chassis
  • Suspension and wheels
  • Steering
  • Brake system
  • Body
  • Exterior (external elements)
  • Electrical equipment
  • Equipment and devices
  • Power devices
  • Specifications
HyundaiBook.ru © 2018-2026 · Mobile version · Sitemap: EN BG BY UA RS HR RO PL SK HU · Administration · Site search · Hyundai owners Accent 1 · Accent 2 · Accent 3 · Elantra 1 · Elantra 2 · Elantra 3 · Getz · Sonata 3 · Sonata 4 · Santa Fe 2 · Tucson 1 · Tucson 2 · Matrix ·
This site uses cookies to optimize its functionality. By continuing, you agree to our terms.