HyundaiBook.ru
Repair Chevrolet Repair Honda Repair Toyota Repair Land Rover Repair VAZ Repair Renault Repair Nissan
English Русский
Български
Беларускі
Український
Српски
Hrvatski
Română
Polski
Slovenský
Magyar
ArticlesSitemapContacts  


  Accent   Elantra   Getz   Grandeur   Sonata   Santa Fe   Tucson   Others
Elantra 1 (1990-1995, petrol) Elantra 2 (1995-2000, petrol) Elantra 3 (2000-2006)
  • Main
  • Elantra
  • J1 (1990-1995)
  • Power unit
  • Cooling system
  • Radiator — removal, cleaning and installation

Radiator — removal, cleaning and installation (Hyundai Elantra J1)

0
Contents: Removal ⇓ Flushing ⇓ Installation ⇓
The only reason to remove the radiator is to replace it with a new one or to repair a leak. If the radiator requires constant fluid top-up and the leak cannot be found in either the hoses or the radiator, the radiator cap may be the culprit. However, if the cap was faulty and you replaced it, continue to monitor the fluid level. The system is again under pressure and leaks can occur quite suddenly, so it is necessary to periodically test the system under pressure. The figure shows one of the verification methods.

The only reason to remove the radiator…


If the radiator cap is in good condition and the coolant is still being lost without any visible leaks from the outside, the problem is indeed serious. This could be caused by a defective cylinder head gasket. At this stage, you should consult a specialist.

If the radiator is leaking, replace it with a new or reconditioned one. If the radiator has been repaired by the owner or in a workshop, it should be tested under a pressure of at least 1.4 kg/cm². To do this, close the outlet channel with a suitable plug and supply compressed air to the radiator through another channel at a pressure of 1.4 kg/cm². Immerse the radiator in a bath of water at a temperature of 90°C. Leave it for 15 minutes and apply a pressure of 1.4 kg/cm² again. Watch for bubbles indicating leaks. If the radiator has not been pressure tested after repair, it should be monitored very carefully for several weeks after installation to detect any leaks in time.


Radiator mounting elements (models…

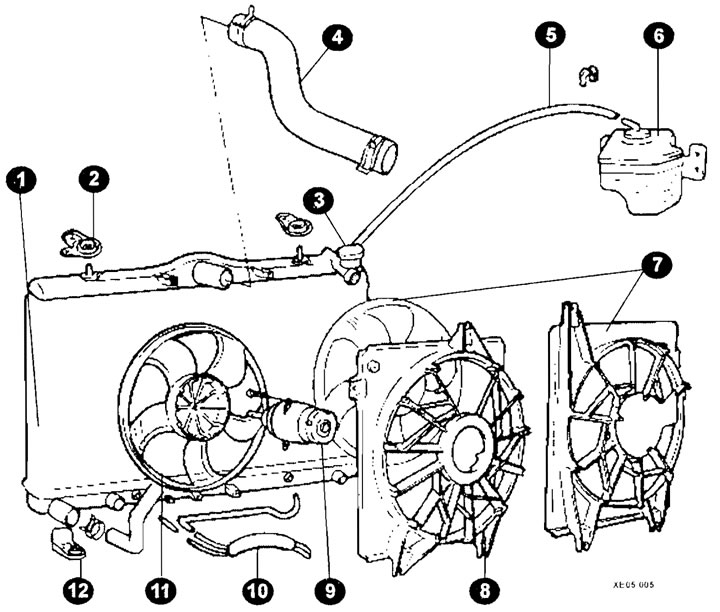
Radiator mounting elements (models 1998-2002.)
1 - radiator;
2 - Upper radiator mount;
3 - radiator cap;
4 - Upper radiator hose;
3 - expansion tank hose;
6 - expansion tank;
7 - elements of the air conditioning system condenser fan;
8 - casing;
9 - Fan motor;
10 - radiator pipe (models with automatic transmission only);
11 - fan;
12 - lower mount.


Radiator mounting elements (models…

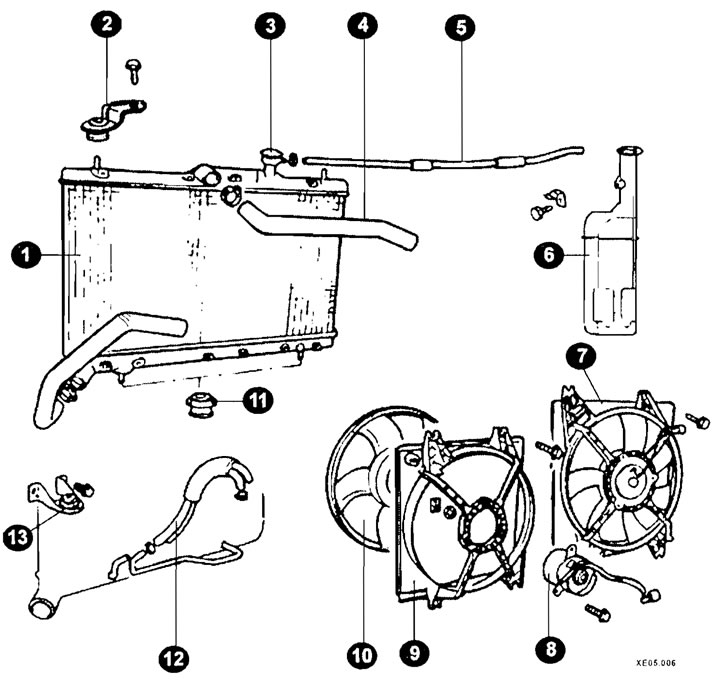
Radiator mounting elements (models 2002-2004.)
1 - radiator;
2 - Upper radiator mount;
3 - radiator cap;
4 - Upper radiator hose;
5 - expansion tank hose;
6 - expansion tank;
7 - air conditioning condenser fan;
8 - fan electric motor;
9 - casing;
10 - fan;
11 - lower radiator mount;
12 - radiator pipe (models with automatic transmission only);
13 - Upper radiator mount (models with automatic transmission only).


Removal


Drain the coolant as described above.

Loosen the upper radiator hose and lower radiator hose clamps and remove them.

[The article is based on information website: hyundaibook]

Disconnect the hose from the expansion tank.

Disconnect all electrical wires from the radiator fan and fan switch

Disconnect any cooling system lines that prevent the radiator from being removed from the vehicle.

After unscrewing the upper mounting bolts, remove the radiator together with the radiator fan (not all models).

Remove the radiator from the engine compartment, first removing it from the lower radiator mounting supports.

Flushing


Flush the radiator. If the radiator is removed from the vehicle, flush it in the opposite direction as well. Rinse the outside of the radiator with a strong stream of water from a hose. If you suspect that the radiator is partially clogged, flush it with a chemical solution before removing it from the vehicle. If nothing has changed, check if water flows through the radiator normally. 20-25 liters should pass in half a minute.

Leaks can be temporarily eliminated by using special additives to the coolant or by covering part of the radiator with a special mastic. However, it is better to replace the radiator.

Installation


The radiator is installed in the reverse order of removal.

Check the hoses for cracks and replace them if necessary.
This article is available at russian, bulgarian, belarusian, ukrainian, serbian, croatian, romanian, polish, slovak, hungarian
This article has been reviewed by: Konstantin Smirnov
Add to social network:

Previous
Elantra 1: Cooling system
Next

Draining, flushing and filling the cooling system
Checking/topping up coolant
General description of the cooling system
Air conditioning condenser — removal and installation
Thermostat — Removal, Checking and Installation
Coolant pump — removal and installation
Electric Fan — Removal, Checking
Coolant Temperature Sensor — Removal, Installation and Testing
We recommend other articles on the topic of Hyundai manuals:

Radiator Cap Test Hyundai Accent 1 (1994-1999)
Cleaning the inside of the car Hyundai Getz (2002-2011)
Radiator — removal and installation Hyundai Sonata 3 (1993-1998)
Checking the radiator cap valves Hyundai Santa Fe 2 (2007-2012, petrol)
Checking the radiator cap Hyundai Tucson 1 (2005-2010)
Checking the radiator cap valves Hyundai Matrix (2001-2010, petrol)

Link in different formats to this article

Visitor comments
No comments yet


How much will 41 + 17 ?


Elantra 3 (2000-2006) 
  • User manual
  • Control devices
  • Audio system
  • Starting the engine and driving
  • Faults en route
  • Maintenance and care
  • Technical information
  • Power unit
  • Gasoline engines
  • Diesel engines
  • Lubrication system
  • Cooling system
  • Fuel system (gasoline)
  • Fuel system (diesel)
  • Decreased toxicity
  • Ignition system
  • Transmission
  • Clutch
  • Mechanical gearbox
  • Automatic gearbox
  • Drive shafts and axles
  • Chassis
  • Car suspension
  • Steering
  • Brake system
  • Body
  • Exterior (external elements)
  • Interior (internal elements)
  • Air conditioning system
  • Electrical equipment
  • Equipment and devices
  • Headlights and lighting
  • Power devices
  • Electrical circuits
Elantra 2 (1995-2000, petrol) 
  • General information
  • Maintenance
  • Power unit
  • Engine repair
  • Cooling system
  • Intake and exhaust system
  • Fuel system
  • Transmission
  • Clutch
  • Manual gearbox
  • Automatic gearbox
  • Drive shafts and axles
  • Chassis
  • Front suspension
  • Rear suspension
  • Steering
  • Brake system
  • Body
  • Body elements
  • Electrical equipment
  • Equipment and devices
  • Electrical diagrams
Elantra 1 (1990-1995, petrol) 
  • General information
  • Introduction to the guide
  • Maintenance
  • Power unit
  • Minor engine repair
  • Engine overhaul
  • Lubrication system
  • Cooling system
  • Fuel injection system
  • Ignition system
  • Exhaust system
  • Transmission
  • Clutch
  • Manual gearbox
  • Automatic gearbox
  • Drive shafts
  • Chassis
  • Front suspension
  • Rear suspension
  • Steering
  • Wheels and tires
  • Troubleshooting
  • Brake system
  • Body
  • Body elements
  • Electrical equipment
  • Equipment and devices
  • Power devices
  • Heating and air conditioning
  • Electrical circuits
HyundaiBook.ru © 2018-2026 · Mobile version · Sitemap: EN BG BY UA RS HR RO PL SK HU · Administration · Site search · Hyundai owners Accent 1 · Accent 2 · Accent 3 · Elantra 1 · Elantra 2 · Elantra 3 · Getz · Sonata 3 · Sonata 4 · Santa Fe 2 · Tucson 1 · Tucson 2 · Matrix ·
This site uses cookies to optimize its functionality. By continuing, you agree to our terms.