HyundaiBook.ru
Repair Chevrolet Repair Honda Repair Toyota Repair Land Rover Repair VAZ Repair Renault Repair Nissan
English Русский
Български
Беларускі
Український
Српски
Hrvatski
Română
Polski
Slovenský
Magyar
ArticlesSitemapContacts  


  Accent   Elantra   Getz   Grandeur   Sonata   Santa Fe   Tucson   Others
Elantra 1 (1990-1995, petrol) Elantra 2 (1995-2000, petrol) Elantra 3 (2000-2006)
  • Main
  • Elantra
  • J1 (1990-1995)
  • Electrical equipment
  • Power devices
  • Maintenance and testing of the battery

Maintenance and testing of the battery (Hyundai Elantra J1)

0
Weekly battery maintenance includes checking the electrolyte level in each cell (can) to ensure that the separator plates are covered with electrolyte to a depth of 6 mm above their top edge.

Weekly battery maintenance includes…


If the electrolyte level drops, add only distilled water. Avoid overfilling. If this does happen or some electrolyte spills out, wipe it off immediately and rinse the area with water and soda, as the electrolyte is very aggressive and corrodes heavily when in contact with metal.

In addition to keeping the battery contacts clean and coated with petroleum jelly, the top of the battery, especially the top of the cans (cells), must be kept clean and dry. This prevents corrosion and partial self-discharge of the battery due to moisture and dirt.

Every three months, remove the battery and inspect the battery mounting bolts, mounting plate, tray and cables for corrosion (white fluffy deposit on metal, brittle to the touch). If corrosion is found, clean off the deposits with ammonia and coat the cleaned metal with a rust remover or primer.

If there is excessive deposits on the top of the battery, this may be due to cracks in the case causing electrolyte leakage or overcharging of the battery, indicating the need to have the voltage regulator checked by a workshop.


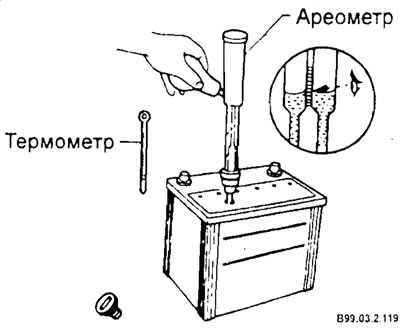
When checking the battery every three months, check the density of the electrolyte using a hydrometer to determine the degree of charge of the battery and the condition of the electrolyte.
  • Fill the hydrometer with electrolyte through a special hole on the battery case. At the same time, measure the temperature of the electrolyte. If the electrolyte level is low, tilt the battery to make it easier to measure.

Fill the hydrometer with electrolyte…

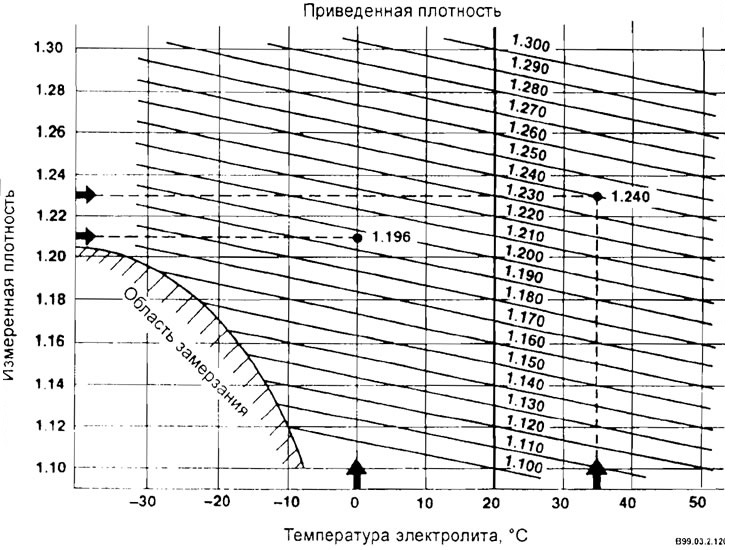
  • Convert the density of the electrolyte at a given temperature to the density at a standard temperature of 20°C.

Example. electrolyte temperature 35°C, measured density 1.230. Reduced density will be 1.240.

Example. electrolyte temperature 35°C,…


There should be a very small difference between different cans, and if the difference exceeds 0.025 g/cm³, the reasons for this may be the following:


  • loss of electrolyte from a battery caused by splashing or leakage, which can lead to a decrease in the specific gravity of the electrolyte when the lack of electrolyte is compensated for by adding distilled water instead of fresh electrolyte.
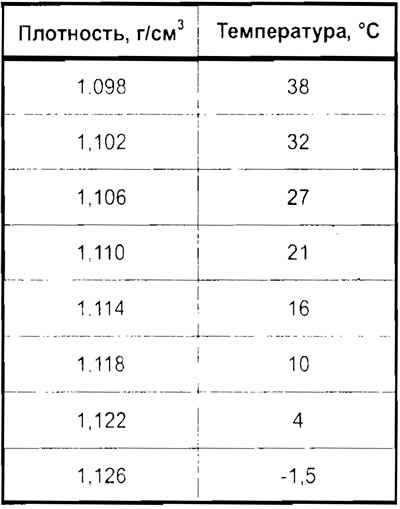
  • an internal short circuit caused by bending of the plates or something similar will result in the entire battery failing and inevitably causing it to fail soon. The density of the electrolyte at different temperatures for a fully charged battery is shown in Table A. The density of the electrolyte of a fully discharged battery at different temperatures is shown in Table B.

Elements of the device for…

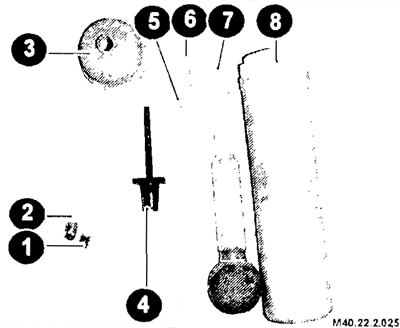
Elements of the device for checking/correcting the density of the battery electrolyte and the density of the coolant (antifreeze)
1 - hydrometer for checking the density of battery electrolyte;
2 - hydrometer for checking the density of the coolant;
3 - funnel;
4 - extension cord;
5 - glass tube;
6 - glass rod;
7 - container with a rubber bulb;
8 - case.


Table A. Electrolyte density (the battery is fully charged)

Table A. Electrolyte density (the…

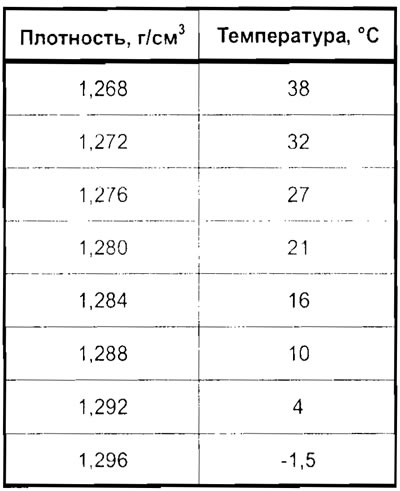
Table B. Electrolyte Density (the battery is completely discharged)

Table B. Electrolyte Density (the…
This article is available at russian, bulgarian, belarusian, ukrainian, serbian, croatian, romanian, polish, slovak, hungarian
This article has been reviewed by: Konstantin Smirnov
Add to social network:

Previous
Elantra 1: Power devices
Next

General description of the battery
Filling with electrolyte, checking and charging the battery
Battery fault diagnostics
General description of the generator
Generator — removal and installation
Generator — disassembly, replacement of needle brushes
We recommend other articles on the topic of Hyundai manuals:

Scheduled maintenance Hyundai Accent 1 (1994-1999)
Maintenance of the additional passive restraint system SRS Hyundai Getz (2002-2011)
Scheduled maintenance Hyundai Sonata 3 (1993-1998)
Air Conditioner Maintenance Hyundai Santa Fe 2 (2007-2012, petrol)
Maintenance requirements Hyundai Tucson 1 (2005-2010)
Air Conditioner Maintenance Hyundai Matrix (2001-2010, petrol)

Link in different formats to this article

Visitor comments
No comments yet


How much will 46 + 16 ?


Elantra 3 (2000-2006) 
  • User manual
  • Control devices
  • Audio system
  • Starting the engine and driving
  • Faults en route
  • Maintenance and care
  • Technical information
  • Power unit
  • Gasoline engines
  • Diesel engines
  • Lubrication system
  • Cooling system
  • Fuel system (gasoline)
  • Fuel system (diesel)
  • Decreased toxicity
  • Ignition system
  • Transmission
  • Clutch
  • Mechanical gearbox
  • Automatic gearbox
  • Drive shafts and axles
  • Chassis
  • Car suspension
  • Steering
  • Brake system
  • Body
  • Exterior (external elements)
  • Interior (internal elements)
  • Air conditioning system
  • Electrical equipment
  • Equipment and devices
  • Headlights and lighting
  • Power devices
  • Electrical circuits
Elantra 2 (1995-2000, petrol) 
  • General information
  • Maintenance
  • Power unit
  • Engine repair
  • Cooling system
  • Intake and exhaust system
  • Fuel system
  • Transmission
  • Clutch
  • Manual gearbox
  • Automatic gearbox
  • Drive shafts and axles
  • Chassis
  • Front suspension
  • Rear suspension
  • Steering
  • Brake system
  • Body
  • Body elements
  • Electrical equipment
  • Equipment and devices
  • Electrical diagrams
Elantra 1 (1990-1995, petrol) 
  • General information
  • Introduction to the guide
  • Maintenance
  • Power unit
  • Minor engine repair
  • Engine overhaul
  • Lubrication system
  • Cooling system
  • Fuel injection system
  • Ignition system
  • Exhaust system
  • Transmission
  • Clutch
  • Manual gearbox
  • Automatic gearbox
  • Drive shafts
  • Chassis
  • Front suspension
  • Rear suspension
  • Steering
  • Wheels and tires
  • Troubleshooting
  • Brake system
  • Body
  • Body elements
  • Electrical equipment
  • Equipment and devices
  • Power devices
  • Heating and air conditioning
  • Electrical circuits
HyundaiBook.ru © 2018-2026 · Mobile version · Sitemap: EN BG BY UA RS HR RO PL SK HU · Administration · Site search · Hyundai owners Accent 1 · Accent 2 · Accent 3 · Elantra 1 · Elantra 2 · Elantra 3 · Getz · Sonata 3 · Sonata 4 · Santa Fe 2 · Tucson 1 · Tucson 2 · Matrix ·
This site uses cookies to optimize its functionality. By continuing, you agree to our terms.