


Contents: Removal ⇓ Installation ⇓
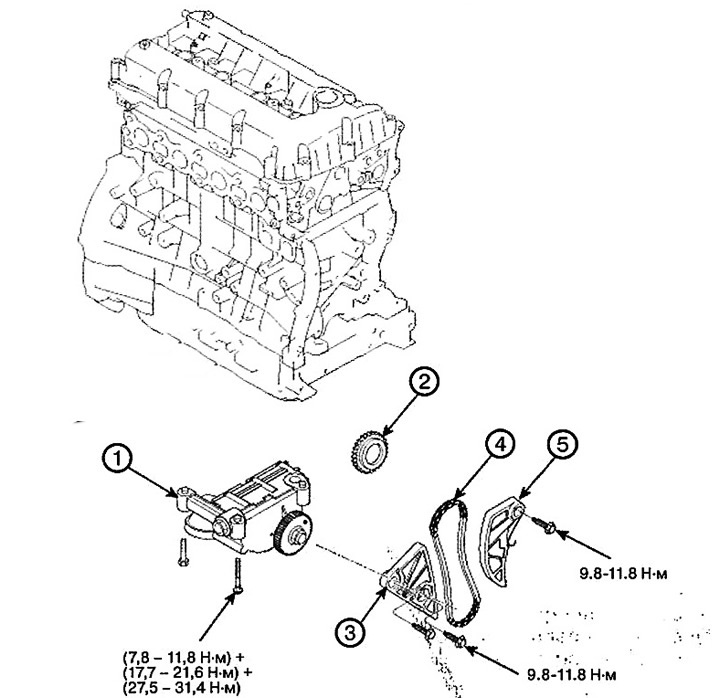
2.0L engines (with oil pump)
1. Oil pump
2. Oil pump drive chain sprocket
3. Oil pump drive chain guide
4. Oil pump drive chain
5. Mechanical tensioner of the oil pump drive chain
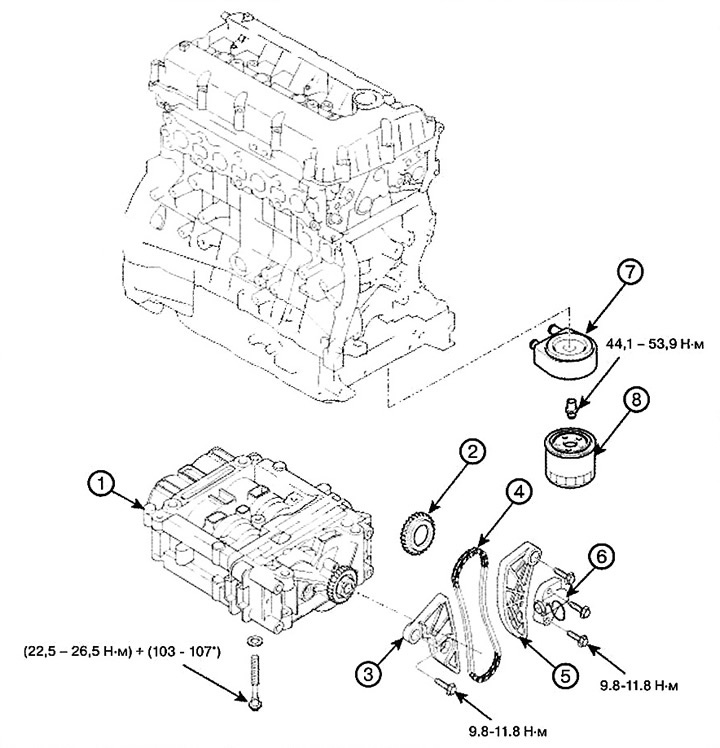
2.4L Engines (with Balance Shaft)
1. Balance shaft and oil pump assembly
2. Balance shaft drive chain sprocket
3. Balance shaft drive chain guide
4. Balance shaft drive chain
5. Balance shaft drive chain tensioner lever
6. Balance shaft drive chain tensioner
7. Oil cooler
8. Oil filter
Removal
For 2.4L engines only
1. Remove the timing chain.
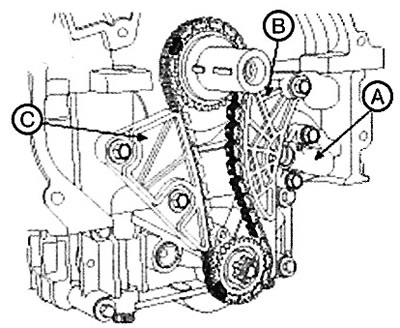
2. Compress the balance shaft drive chain tensioner and insert the dowel pin.
3. Remove the balance shaft drive chain hydraulic tensioner (A).
4. Remove the balance shaft drive chain tensioner lever (B).
5. Remove the balance shaft drive chain guide (C).
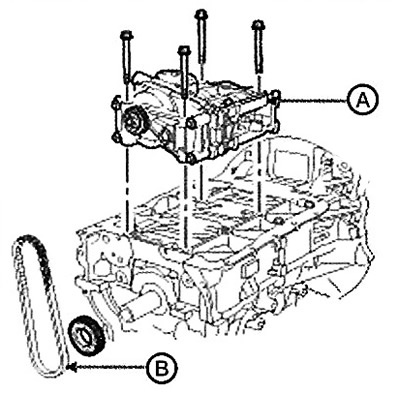
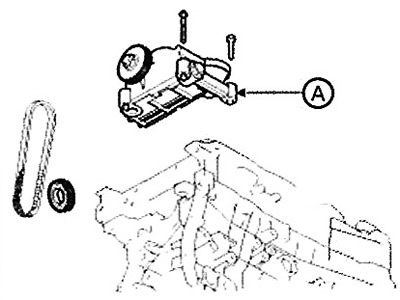
6. Remove the oil pump and balance shaft assembly (A). Then remove the balance shaft drive chain (B).
Caution: Do not disassemble the oil pump and balance shaft assembly.
For 2.0L engines only
1. Remove the timing chain.
2. Remove the mechanical tensioner (B) of the oil pump drive chain.
3. Remove the oil pump drive chain guide (D).
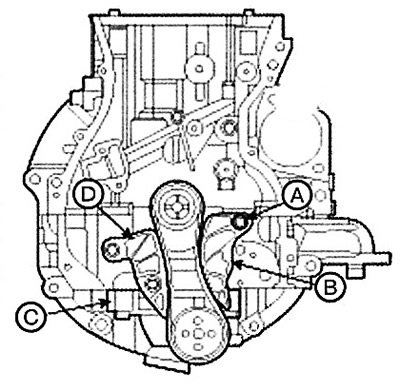
4. Remove the oil pump (A) and chain.
Installation
For 2.4L engines only
1. The crankshaft sprocket key must be aligned with the mating surface of the main bearing cap. In this case, the piston of cylinder No.1 will be set to the TDC (top dead center) position of the compression stroke.
2. Check the alignment mark of the balance shaft module. The alignment marks should be centered in the adjacent alignment grooves.
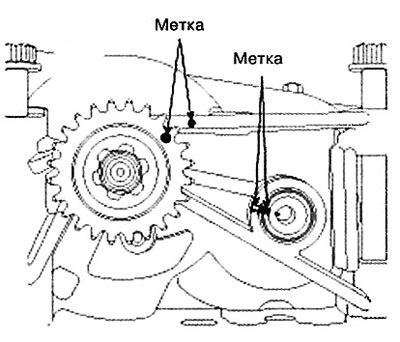
3. Install the balance shaft module so that the timing mark on the balance shaft sprocket aligns with the timing mark (colored link) on the balance shaft drive chain.
Note: Tightening torque: (22.5-26.5 Nm) + (103-107°).
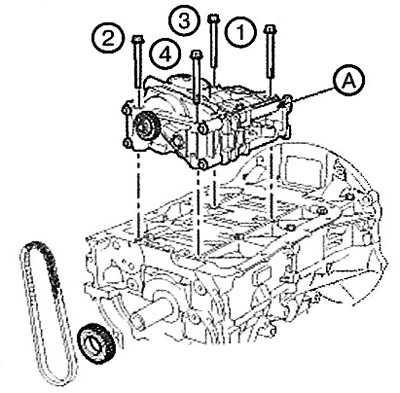
Bolt tightening order
A. Tighten the bolts in the order shown to 25.5 Nm.
B. Loosen the bolts in the reverse order of tightening. (4-3-2-1)
C. Tighten the bolts evenly in the order shown in several steps.
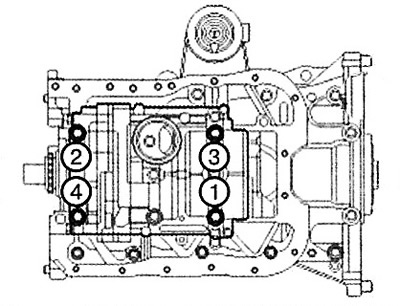
4. Remove the balance shaft drive chain guide (C).
Note: Tightening torque: 9.8-11.8 Nm.
5. Install the balance shaft drive chain tensioner lever (B).
Note: Tightening torque: 9.8 - 11.8 Nm.
6. Install the balance shaft drive chain hydraulic tensioner (A) and remove the lock pin.
Note: Tightening torque: 9.8-11.8 Nm.
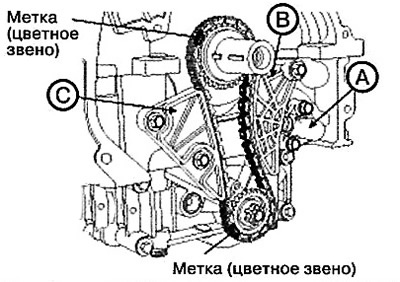
7. Check the alignment marks.
8. Install the timing chain.
For 2.0L engines only
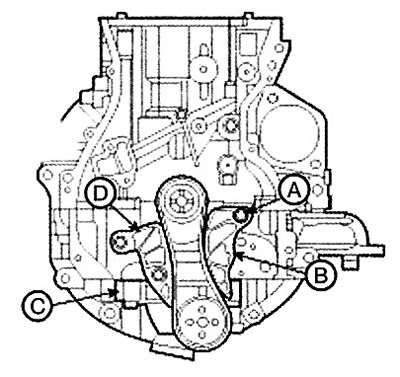
1. The crankshaft sprocket key must be aligned with the mating surface of the main bearing cap. In this case, the piston of cylinder No.1 will be set to the TDC (top dead center) position of the compression stroke.
2. Install the sprocket onto the crankshaft so that the front mark on the sprocket faces outward.
3. Replace the tensioner spring on the installation pin located in the crankcase, tighten the oil pump drive chain tensioner bolt (A), then insert the tensioner lock pin (B).
Note: Tightening torque: 9.8-11.8 Nm.
4. Install the oil pump drive chain onto the crankshaft sprocket.
5. Install the oil pump assembly (C) into the crankcase and install the sprocket onto the oil pump.
Note: Tightening torque: (7.8-11.8 Nm) + (17.7-21.6 Nm) + (27.5-31.4 Nm).
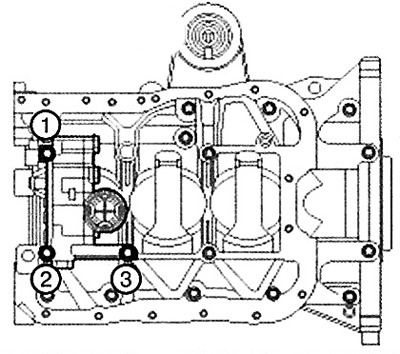
Bolt tightening order:
A. Tighten the bolts in the order shown to 25.5 Nm.
B. Loosen the bolts in the reverse order of tightening. (3-2-1)
C. Tighten the bolts evenly in the order shown in several steps.
6. Install the oil pump drive chain guide (D), then remove the lock pin.
Note: Tightening torque: 9.8 - 11.8 Nm.