HyundaiBook.ru
Repair Chevrolet Repair Honda Repair Toyota Repair Land Rover Repair VAZ Repair Renault Repair Nissan
English Русский
Български
Беларускі
Український
Српски
Hrvatski
Română
Polski
Slovenský
Magyar
ArticlesSitemapContacts  


  Accent   Elantra   Getz   Grandeur   Sonata   Santa Fe   Tucson   Others
Elantra 1 (1990-1995, petrol) Elantra 2 (1995-2000, petrol) Elantra 3 (2000-2006)
  • Main
  • Elantra
  • XD (2000-2006)
  • Electrical equipment
  • Equipment and devices
  • Rear window defroster

Rear window defroster (Hyundai Elantra XD)

0
Contents: Examination ⇓ Repair of the heater conductive strip ⇓
Defrosting of the rear window is carried out by a heater, which is a series of parallel conductors sprayed onto the glass. When an electric current is passed through, the conductors heat up and defrost and clean the rear window from moisture. Current is supplied from a relay located in the engine compartment fuse box. If the glass is not clear after 15 minutes, you need to turn the heater on again for a second cycle, i.e. for another 15 minutes.

Examination


Warning: When testing the rear window…


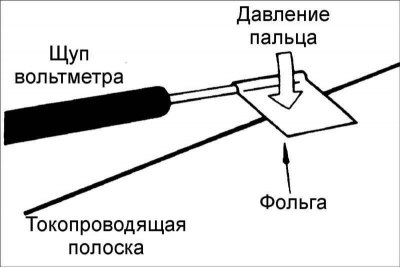
Warning: When testing the rear window defroster, wrap the voltmeter probe in aluminum or tin foil to prevent damage to the defroster conductive strip. To determine the break, you need to press the foil with your finger and move it along the conductive strip.


1. Start the engine and turn on the…


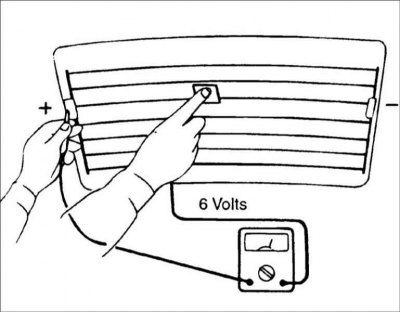
1. Start the engine and turn on the rear window defroster. Connect the negative probe of the voltmeter to the vehicle ground. Connect the voltmeter probe to the center of each rear window defroster strip in turn. The voltmeter should show a voltage of about 6 V.


2. If the voltmeter shows a voltage of…


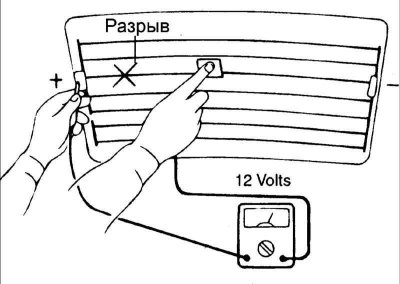
2. If the voltmeter shows a voltage of 12 V, then the heater's conductive strip has a break on the side between the voltmeter connection point and the side of the heater connected to ground.

[Information is taken from a thematic website: www.HyundaiBook.ru]

3. If the voltmeter shows a voltage…


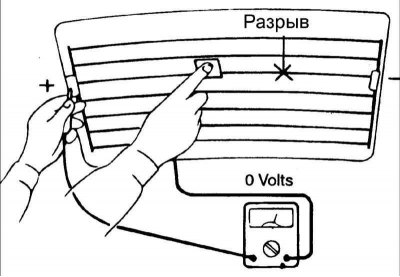
3. If the voltmeter shows a voltage below 0 V, then the heater conductive strip has a break on the side between the voltmeter connection point and the side of the heater connected to the positive terminal of the battery.

4. To determine the break point, move…


4. To determine the break point, move the probe along the conductive strip of the heater in the appropriate direction. The point where the voltage shown by the voltmeter changes abruptly is the break point.


5. Using an ohmmeter, measure the…


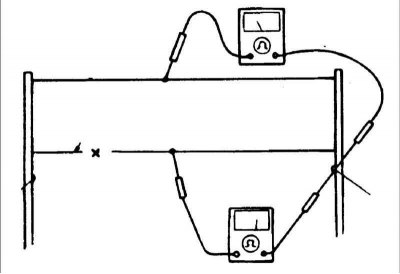
5. Using an ohmmeter, measure the resistance of each conductive strip between the side terminal of the heater and the center of each strip. The section of the strip that has a break will have a resistance that is twice as high as the resistance of the rest of the heater strips.

Repair of the heater conductive strip


1. To repair the heater's conductive strip, prepare the following materials and tools:
  • conductive mass;
  • finely dispersed conductive mass;
  • sticky tape;
  • solvent;
  • brush.

2. Wipe the glass area near the break…


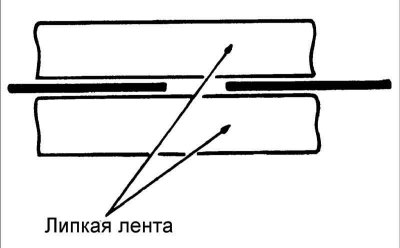
2. Wipe the glass area near the break in the heater's conductive strip with solvent and stick strips of adhesive tape on both sides of the conductive strip.

3. Apply three layers of conductive mass at 15-minute intervals. Remove the adhesive tape and wait until the conductive mass dries. After 24 hours, remove excess conductive mass with a sharp knife.

Warning! After restoring the conductive strip of the heater, clean the glass along the strip of the heater with a slightly damp cloth.
This article is available at russian, bulgarian, belarusian, ukrainian, serbian, croatian, romanian, polish, slovak, hungarian
This article has been reviewed by: Konstantin Smirnov
Add to social network:

Previous
Elantra 3: Equipment and devices
Next

Radio receiver — removal and installation
Rear window wiper
Windscreen wiper and washer
Parking brake position switch
Instrument cluster
Airbags (SRS)
Seat belts
Troubleshooting electrical equipment
Basic data for adjustments and control
We recommend other articles on the topic of Hyundai manuals:

Checking the rear window defroster Hyundai Accent 3 (2005-2010)
Rear window defroster switch Hyundai Getz (2002-2011)
Rear window defroster and side mirror defrosters Hyundai Sonata 4 (2001-2012, petrol)
Rear window defroster switch Hyundai Santa Fe 2 (2007-2012, petrol)
Checking the front window defroster Hyundai Tucson 1 (2005-2010)
Rear window defroster switch Hyundai Matrix (2001-2010, petrol)

Link in different formats to this article

Visitor comments
No comments yet


How much will 13 + 37 ?


Elantra 3 (2000-2006) 
  • User manual
  • Control devices
  • Audio system
  • Starting the engine and driving
  • Faults en route
  • Maintenance and care
  • Technical information
  • Power unit
  • Gasoline engines
  • Diesel engines
  • Lubrication system
  • Cooling system
  • Fuel system (gasoline)
  • Fuel system (diesel)
  • Decreased toxicity
  • Ignition system
  • Transmission
  • Clutch
  • Mechanical gearbox
  • Automatic gearbox
  • Drive shafts and axles
  • Chassis
  • Car suspension
  • Steering
  • Brake system
  • Body
  • Exterior (external elements)
  • Interior (internal elements)
  • Air conditioning system
  • Electrical equipment
  • Equipment and devices
  • Headlights and lighting
  • Power devices
  • Electrical circuits
Elantra 2 (1995-2000, petrol) 
  • General information
  • Maintenance
  • Power unit
  • Engine repair
  • Cooling system
  • Intake and exhaust system
  • Fuel system
  • Transmission
  • Clutch
  • Manual gearbox
  • Automatic gearbox
  • Drive shafts and axles
  • Chassis
  • Front suspension
  • Rear suspension
  • Steering
  • Brake system
  • Body
  • Body elements
  • Electrical equipment
  • Equipment and devices
  • Electrical diagrams
Elantra 1 (1990-1995, petrol) 
  • General information
  • Introduction to the guide
  • Maintenance
  • Power unit
  • Minor engine repair
  • Engine overhaul
  • Lubrication system
  • Cooling system
  • Fuel injection system
  • Ignition system
  • Exhaust system
  • Transmission
  • Clutch
  • Manual gearbox
  • Automatic gearbox
  • Drive shafts
  • Chassis
  • Front suspension
  • Rear suspension
  • Steering
  • Wheels and tires
  • Troubleshooting
  • Brake system
  • Body
  • Body elements
  • Electrical equipment
  • Equipment and devices
  • Power devices
  • Heating and air conditioning
  • Electrical circuits
HyundaiBook.ru © 2018-2026 · Mobile version · Sitemap: EN BG BY UA RS HR RO PL SK HU · Administration · Site search · Hyundai owners Accent 1 · Accent 2 · Accent 3 · Elantra 1 · Elantra 2 · Elantra 3 · Getz · Sonata 3 · Sonata 4 · Santa Fe 2 · Tucson 1 · Tucson 2 · Matrix ·
This site uses cookies to optimize its functionality. By continuing, you agree to our terms.