
Contents: Models before 2000. ⇓ Models since 2000. ⇓
Models before 2000.
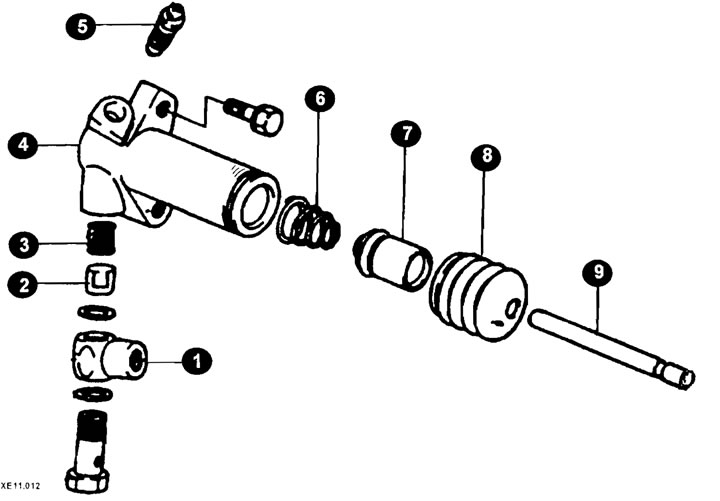
Clutch slave cylinder components
1 - nipple;
2 - valve;
3 - spring;
4 - body;
5 - bleed screw;
6 - spring;
7 - piston assembly;
8 - anther;
9 - thrust.
Removal
Disconnect the hydraulic hose.
Loosen the working cylinder mounting bolt.
Check for fluid leaks from the slave cylinder.
Check the slave cylinder dust boots for damage.
Disassembly and inspection
Remove the valve plate, spring, rod and dust boot.
Clean the slave cylinder bore.
Remove the piston from the working cylinder using compressed air, covering the cylinder with a rag to prevent the piston from flying out of the cylinder.
Check for rust and scoring on the inner surface of the cylinder.
Measure in three sections (at the bottom, in the middle and at the top) inner diameter of the cylinder and replace the working cylinder assembly if the gap between the cylinder walls and the piston exceeds the limit value (0.15 mm).
Assembly
Apply brake fluid to the inner surface of the cylinder and the outer surface of the piston assembly, and insert the piston assembly into the cylinder.
Install the valve plate, spring, rod and dust boot.
Installation
After coating the pin with grease, align the hole in the end of the slave cylinder rod with the hole in the clutch fork shaft and install the pin into the hole.
Install the working cylinder and connect the hydraulic drive pipe to it.
Models since 2000.
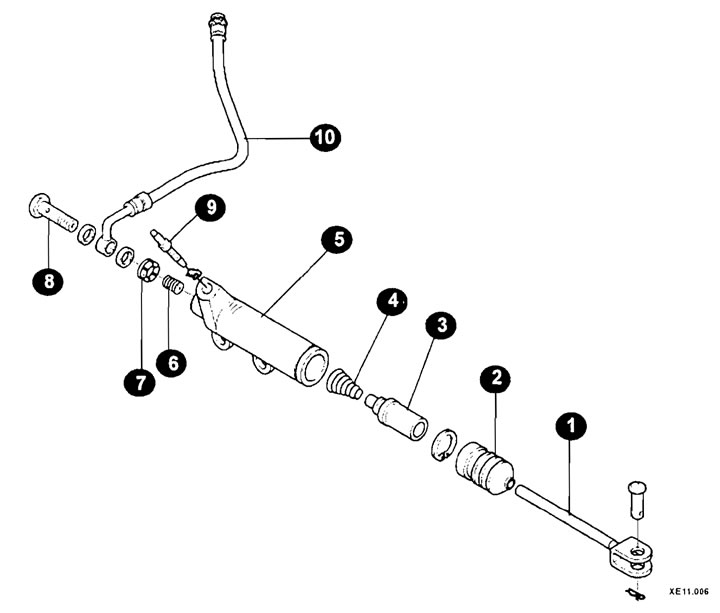
Clutch slave cylinder components (models since 2000.)
1 - pusher;
2 - anther;
3 - piston;
4 - spring;
5 - body;
6 - spring;
7 - limiting valve;
8 - bolt;
9 - bleed nipple;
10 - hose.
Removal
Apply the handbrake, then jack up the front of the car.
Pump out all the fluid from the reservoir, then open the bleed nipple of the slave cylinder and gently press the clutch pedal several times to remove the fluid. Tighten the nipple when all the fluid has been removed.
Clean the area around the hydraulic tube union nut on the slave cylinder and remove the nut. Carefully remove the tube from the cylinder and plug the end to prevent dirt from entering.
Loosen the cylinder mounting bolts and carefully remove it from the clutch release fork.
Repair
Clean the outside of the cylinder.
Remove the dust cover from the cylinder (and a retaining ring where there is) and remove the piston assembly and spring, noting the correct orientation of the spring.
If necessary, loosen and remove the bolt and washers securing the union nut adapter to the cylinder and remove the restrictor valve and spring from the cylinder. New sealing washers will be required during assembly.
Inspect the piston and cylinder surfaces. If they are scratched or corroded, replace the slave cylinder assembly.
If the cylinder is in good condition, purchase a piston replacement parts rebuild kit that will contain all the necessary components.
Make sure all components are clean and dry, lubricate the piston assembly with fresh brake fluid.
Set the spring to a smaller size (tapered) end towards the piston, then carefully insert the assembly into the cylinder. Push the piston into the working position with a rotational motion, being careful not to pinch the sealing lips.
Press the piston and install the dust boot.
Where they were removed, install the spring and limiting valve into the working cylinder. Place a new sealing washer on each side of the union nut, then install the bolt and tighten it to the proper torque.
Installation
Apply a small amount of grease to the pushrod fork and connect the slave cylinder to the pushrod. Install the cylinder mounting bolts and tighten them securely. If the pushrod has been removed, connect it to the release lever by installing the pushrod fork pin and securing it with a bracket before installing the cylinder.
Connect the hydraulic tube to the cylinder and tighten the union nut.
Bleed the hydraulic system.
Check the position and travel of the clutch pedal.