HyundaiBook.ru
Repair Chevrolet Repair Honda Repair Toyota Repair Land Rover Repair VAZ Repair Renault Repair Nissan
English Русский
Български
Беларускі
Український
Српски
Hrvatski
Română
Polski
Slovenský
Magyar
ArticlesSitemapContacts  


  Accent   Elantra   Getz   Grandeur   Sonata   Santa Fe   Tucson   Others
Elantra 1 (1990-1995, petrol) Elantra 2 (1995-2000, petrol) Elantra 3 (2000-2006)
  • Main
  • Elantra
  • J1 (1990-1995)
  • Chassis
  • Rear suspension
  • Shock absorber strut of late models of the car — removal, installation and repair

Shock absorber strut of late models of the car — removal, installation and repair (Hyundai Elantra J1)

0
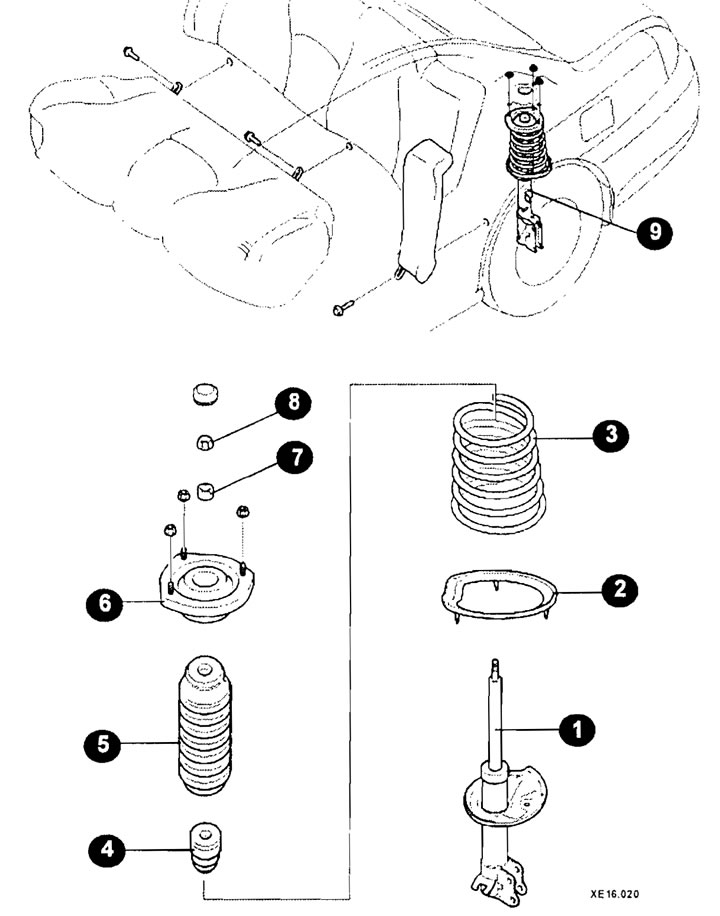
Shock absorber strut elements of late model cars

Shock absorber strut elements of late model cars
1 - body;
2 - spring cup;
3 - spring;
4 - buffer;
5 - case;
6 - upper support of the rack;
7 - bushing;
8 - nut;
9 - shock absorber strut assembly.


Removal


Unscrew the self-locking upper nuts (1).

After installing the jack under the lower suspension arm, unscrew the fastening elements.

Disconnect the brake hoses.

Loosen and remove the bolts connecting the rear shock absorber assembly to the rear suspension knuckle.
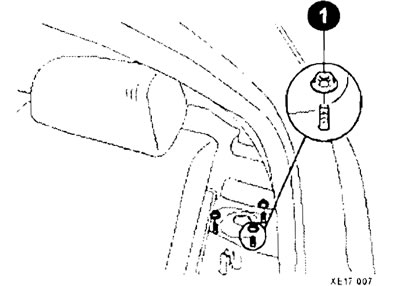
Loosen and remove the bolts connecting the rear shock absorber assembly to the…


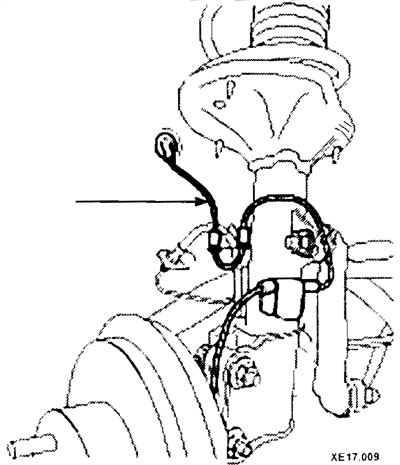
Disconnect the ABS sensor.

Disconnect the ABS sensor.


Disconnect the anti-roll bar (1).
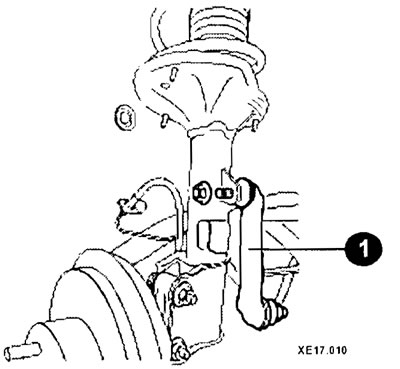


Disconnect the anti-roll bar (1).


Remove the rear pillar assembly from under the vehicle arch.

Check rubber parts for wear and cracks.

Check the shock absorber for faults, fluid leaks and extraneous noise during operation.

Installation


Installation is carried out in reverse order.

Note: The final tightening of the rear suspension nuts is carried out after the vehicle has been lowered to the ground.


Shock absorber strut - disassembly and assembly


Disassembly


Using a screwdriver blade as a lever, remove the protective cap.
Using a screwdriver blade as a lever, remove the protective cap.


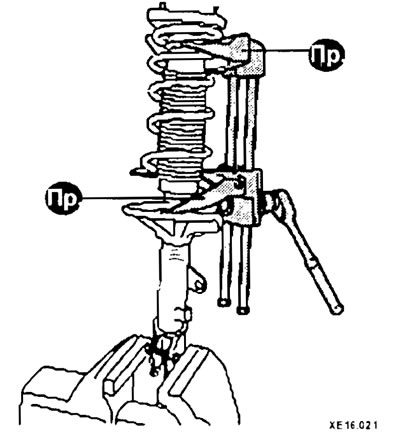
Using the tool, compress the spring so that it moves away from the top. When using a special device for compressing springs, make sure that the spring coils are securely gripped and compress the spring from opposite sides (see picture).


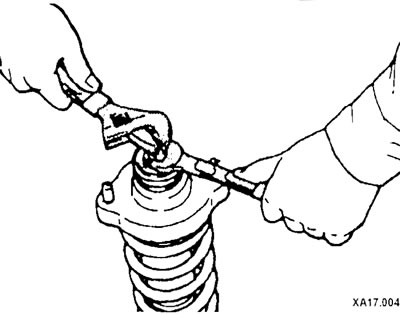
Secure the shock absorber rod with a wrench to prevent it from turning and, using a second wrench, unscrew the shock absorber rod mounting nut.
Secure the shock absorber rod with a wrench to prevent it from turning and,…


After removing the washer, remove the upper bushing.

Remove the upper strut support.

Remove the upper spring cup.

Remove the upper bushing.

Remove the sleeve, shock absorber cup, protective cover, and compression stroke buffer.

Using the spring compressor, remove the spring.

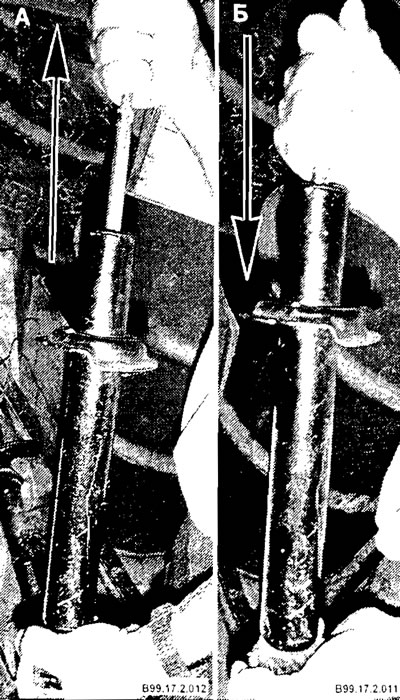
Check the smoothness of the piston rod movement during full compression and extension. The rod should move without jerking or jamming.

Note: The rear shock absorber must have a greater extension force (A) than compression force (B).

Note: The rear shock absorber must have a greater extension force (A) than…


Check for oil leaks through the rod seals and welds. The stem must not be deformed or damaged.


Assembly


If installing a new spring, compress it with the tool and install it on the shock absorber.

[The full version is located on the website: www.hyundaibook.ru]

Align the lower coil of the spring with the notch in the spring seat.

Install the compression buffer, protective cover, then align the upper coil of the spring with the recess in the upper cup and install the cup.

Install the sleeve, upper bushing and upper spring cup.

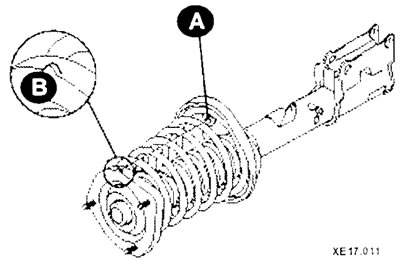
Install the upper support of the rack so that marks (A) and (B) coincide when viewed from above.

Screw on and pre-tighten the self-locking nut.
Screw on and pre-tighten the self-locking nut.


Remove the special spring compressors and tighten the self-locking nut completely.

Caution: Do not use an impact wrench when tightening the special tool bolt.
This article is available at russian, bulgarian, belarusian, ukrainian, serbian, croatian, romanian, polish, slovak, hungarian
This article has been reviewed by: Konstantin Smirnov
Add to social network:

Previous
Elantra 1: Rear suspension
Next

Shock absorber strut of early car models — removal, installation and repair
Rear suspension device
Rear wheel hub brake drum — removal and installation (models of cars with two bearings)
Rear wheel hub bearings — removal, installation, inspection (car models with two bearings)
Rear wheel hub of single bearing car models
Control Arm Bushings — Replacement
Anti-roll bar — removal and installation (late models)
We recommend other articles on the topic of Hyundai manuals:

Removal and installation the shock absorber strut Hyundai Accent 3 (2005-2010)
Rear suspension shock absorber Hyundai Getz (2002-2011)
Shock absorber — removal Hyundai Sonata 3 (1993-1998)
4WD all-wheel drive locking system (models with electronically… Hyundai Santa Fe 2 (2007-2012, petrol)
Rear suspension shock absorber Hyundai Tucson 2 (2009-2015)
Removal and installation the front shock absorber strut Hyundai Matrix (2001-2010, petrol)

Link in different formats to this article

Visitor comments
No comments yet


How much will 29 + 45 ?


Elantra 3 (2000-2006) 
  • User manual
  • Control devices
  • Audio system
  • Starting the engine and driving
  • Faults en route
  • Maintenance and care
  • Technical information
  • Power unit
  • Gasoline engines
  • Diesel engines
  • Lubrication system
  • Cooling system
  • Fuel system (gasoline)
  • Fuel system (diesel)
  • Decreased toxicity
  • Ignition system
  • Transmission
  • Clutch
  • Mechanical gearbox
  • Automatic gearbox
  • Drive shafts and axles
  • Chassis
  • Car suspension
  • Steering
  • Brake system
  • Body
  • Exterior (external elements)
  • Interior (internal elements)
  • Air conditioning system
  • Electrical equipment
  • Equipment and devices
  • Headlights and lighting
  • Power devices
  • Electrical circuits
Elantra 2 (1995-2000, petrol) 
  • General information
  • Maintenance
  • Power unit
  • Engine repair
  • Cooling system
  • Intake and exhaust system
  • Fuel system
  • Transmission
  • Clutch
  • Manual gearbox
  • Automatic gearbox
  • Drive shafts and axles
  • Chassis
  • Front suspension
  • Rear suspension
  • Steering
  • Brake system
  • Body
  • Body elements
  • Electrical equipment
  • Equipment and devices
  • Electrical diagrams
Elantra 1 (1990-1995, petrol) 
  • General information
  • Introduction to the guide
  • Maintenance
  • Power unit
  • Minor engine repair
  • Engine overhaul
  • Lubrication system
  • Cooling system
  • Fuel injection system
  • Ignition system
  • Exhaust system
  • Transmission
  • Clutch
  • Manual gearbox
  • Automatic gearbox
  • Drive shafts
  • Chassis
  • Front suspension
  • Rear suspension
  • Steering
  • Wheels and tires
  • Troubleshooting
  • Brake system
  • Body
  • Body elements
  • Electrical equipment
  • Equipment and devices
  • Power devices
  • Heating and air conditioning
  • Electrical circuits
HyundaiBook.ru © 2018-2026 · Mobile version · Sitemap: EN BG BY UA RS HR RO PL SK HU · Administration · Site search · Hyundai owners Accent 1 · Accent 2 · Accent 3 · Elantra 1 · Elantra 2 · Elantra 3 · Getz · Sonata 3 · Sonata 4 · Santa Fe 2 · Tucson 1 · Tucson 2 · Matrix ·
This site uses cookies to optimize its functionality. By continuing, you agree to our terms.