
Contents: Filling and bleeding the cooling…⇓ Checking the radiator cap ⇓ Checking the tightness of the…⇓
Filling and bleeding the cooling system
Attention.
- Do not remove the radiator cap when the engine is hot. Hot fluid escaping from the radiator under high pressure can cause severe burns.
- Before adding coolant, close the relay box cover. Pour the coolant carefully so that it does not splash onto electrical parts or painted surfaces. If coolant is spilled, wipe it up immediately.
1. Make sure the engine and radiator are cold.
2. Remove the radiator cap.
3. Unscrew the drain plug and drain the coolant.
4. Tighten the radiator drain plug securely.
5. After draining the engine coolant, clean the reservoir.
6. Fill the radiator with water through the filler neck and tighten the cap.
Note: Under pressure in the system, water may burst out through the radiator cap. Therefore, it should be poured in slowly, periodically squeezing the radiator hoses.
7. Warm up the engine until the cooling fan comes on several times, then increase the idle speed.
8. Wait until the engine cools down.
9. Repeat steps 1 through 8 until the drained water runs clear.
10. Fill the coolant and water mixture (5:5) (for tropical zones - 4:6) slowly through the filler neck. To facilitate the removal of air from the system, you can gently squeeze the upper and lower hoses.
Note:
- Use only branded antifreeze and coolant.
- To ensure the best corrosion protection, the antifreeze concentration should be maintained at a minimum of 35% throughout the year.
- Coolant with an antifreeze concentration of less than 35% may not provide adequate protection against corrosion or freezing.
- The use of coolant concentrations greater than 60% is not recommended as they reduce cooling efficiency.
Attention.
- Do not mix antifreeze and coolants of different brands.
- Do not use additional anti-corrosion additives as they may be incompatible with the coolant.
11. Start the engine and wait until the coolant begins to circulate. When the cooling fan starts to operate and the coolant begins to circulate, fill the coolant through the radiator cap.
12. Repeat step 11 until the cooling fan turns on 3-5 times and bleed the air from the cooling system.
13. Install the radiator cap and fill the expansion tank with coolant up to the "MAX" mark.
14. Start the engine at idle speed and wait until the cooling fan turns on 2-3 times.
15. Stop the engine and allow the coolant to cool.
16. Repeat steps 10 through 15 until the coolant level stops dropping, bleeding the cooling system.
Note:
- After bleeding the cooling system and adding coolant when it has completely cooled down, recheck the coolant level in the expansion tank within 2-3 days after replacing the coolant.
- Coolant capacity: Petrol engines: 6.8 l. Diesel engines: 8.5 l.
Checking the radiator cap
1. Remove the radiator cap, wet the seal with engine coolant, and then install the cap on the pressure testing device.
2. Create a pressure of 93-123 kPa (1.6 l)
3. Check for pressure drop.
4. If the pressure drops, replace the radiator cap with a new one.
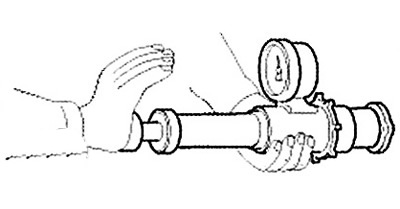
Checking the tightness of the cooling system
1. Wait until the engine has cooled down, then carefully remove the radiator cap and check the coolant level (top up if necessary), then install a pressure tester on the radiator filler neck.
2. Create pressure in the cooling system of 93 - 123 kPa.

3. Check for engine coolant leaks and pressure drop on the pressure gauge.
4. If the pressure drops, check the hoses, radiator and water pump for leaks. If no leaks are found, check the heater core, cylinder block and cylinder head.
5. Remove the tool and replace the radiator cap.
Note: Check for engine oil in coolant and/or coolant in engine oil.