HyundaiBook.ru
Repair Chevrolet Repair Honda Repair Toyota Repair Land Rover Repair VAZ Repair Renault Repair Nissan
English Русский
Български
Беларускі
Український
Српски
Hrvatski
Română
Polski
Slovenský
Magyar
ArticlesSitemapContacts  


  Accent   Elantra   Getz   Grandeur   Sonata   Santa Fe   Tucson   Others
Tucson 1 (2005-2010) Tucson 2 (2009-2015)
  • Main
  • Tucson
  • LM (2009-2015)
  • Chassis
  • Suspension and wheels
  • Front strut assembly

Front strut assembly (Hyundai Tucson LM)

0
Contents: Replacement ⇓ Disassembly and assembly ⇓ Checking the technical condition ⇓ Disposal ⇓

Replacement


1. Remove the front wheel.

Note: Tightening torque: 88.3 - 107.9 Nm.


Caution: Be careful not to damage the hub studs when removing the front wheel.


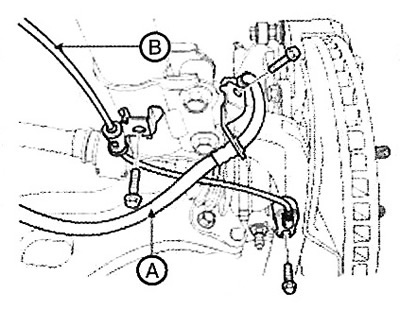
2. Disconnect the brake hose (A), loosen the mounting bolts and remove the wheel speed sensor bracket (B) from the front strut.

2. Disconnect the brake hose (A),…


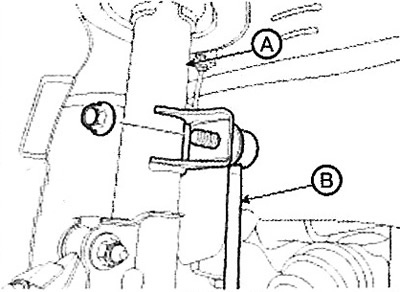
3. Loosen the nut and disconnect the stabilizer link (B) from the front strut (A).

Note: Tightening torque: 98.1-117.7 Nm.


Note: Tightening torque: 98.1-117.7 Nm.


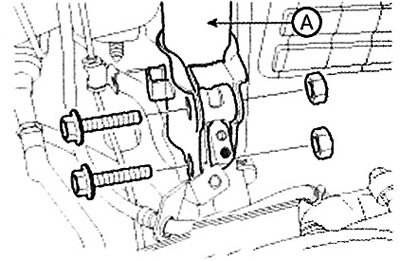
4. Remove the bolt and nut, then separate the front strut (A) assembly from the steering knuckle.

Note: Tightening torque: 137.3-156.9 Nm.


Note: Tightening torque: 137.3-156.9 Nm.


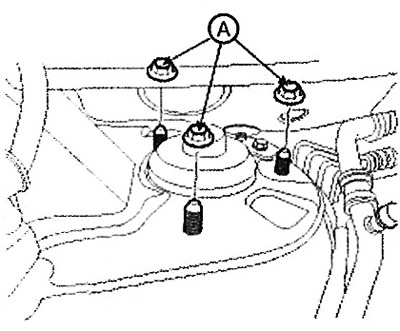
5. Remove the front strut assembly, then loosen the strut mounting nuts (A).


Note: Tightening torque: 44.1-58.8 Nm.


Note: Tightening torque: 44.1-58.8 Nm.


6. Installation is carried out in reverse order.

Disassembly and assembly


1. Remove the dust cover (A).

1. Remove the dust cover (A).


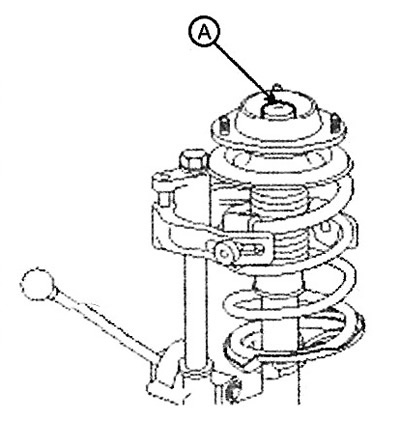
2. Compress the coil spring (A) with a special tool (09546-26000).

2. Compress the coil spring (A) with a…


3. Unscrew the self-locking nut (C) of the strut (B) assembly.

4. Remove the insulator, spring seat, coil spring and boot from the strut assembly.


5. Assembly is carried out in the reverse order of disassembly.

Checking the technical condition


1. Check the strut bearing for wear and damage.

The original version is stored on the website [HYUNDAIBOOK.RU]

2. Check rubber products for wear and deterioration.

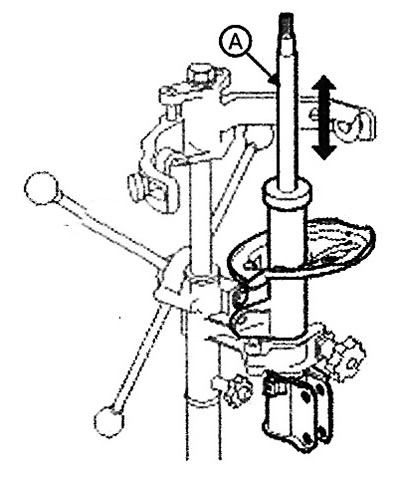
3. Compress and pull out the shock absorber rod (A) to check for abnormal resistance or abnormal noise during operation.

3. Compress and pull out the shock…


Disposal


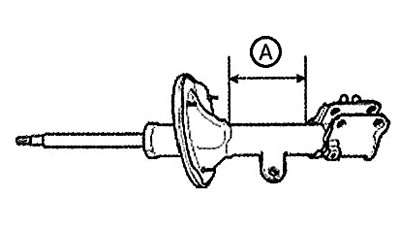
1. Pull the shock absorber rod out completely.

2. Drill a hole in area A to remove gas from the cylinder.

Attention.

The escaping gas is harmless, but care should be taken as chips may fly out during the drilling process.

Wear safety glasses before performing this procedure.


Wear safety glasses before performing…
This article is available at russian, bulgarian, belarusian, ukrainian, serbian, croatian, romanian, polish, slovak, hungarian
This article has been reviewed by: Konstantin Smirnov
Add to social network:

Previous
Tucson 2: Suspension and wheels
Next

Front suspension — device
General information about the suspension
Lower control arm of the front suspension
Front stabilizer bar
Front suspension cross beam
Rear suspension — device
Rear suspension shock absorber
Upper arm rear suspension
We recommend other articles on the topic of Hyundai manuals:

Front suspension strut assembly Hyundai Accent 1 (1994-1999)
Front suspension strut Hyundai Elantra 3 (2000-2006)
Removal and installation the front suspension strut Hyundai Getz (2002-2011)
Front suspension strut Hyundai Sonata 4 (2001-2012, petrol)
Removal, checking and installation the front strut Hyundai Santa Fe 2 (2007-2012, petrol)
Removal and installation the front shock absorber strut Hyundai Matrix (2001-2010, petrol)
Link in different formats to this article

Visitor comments
No comments yet


How much will 31 + 46 ?


Tucson 2 (2009-2015) 
  • General information
  • Faults en route
  • User manual
  • Maintenance
  • Power unit
  • Gasoline engines
  • Diesel engines
  • Engine cooling system
  • Engine lubrication system
  • Engine power system
  • Control system
  • Intake and exhaust systems
  • Engine electrical equipment
  • Transmission
  • Clutch
  • Mechanical gearbox
  • Automatic gearbox
  • Drive shafts
  • Chassis
  • Suspension and wheels
  • Brake system
  • Steering
  • Body
  • Exterior (external elements)
  • Interior (internal elements)
  • Security systems
  • Air conditioning and heater
  • Electrical equipment
  • Electrical circuits
Tucson 1 (2005-2010) 
  • General information
  • User manual
  • Maintenance
  • Power unit
  • Gasoline engine G6BA
  • Gasoline engine G4GC
  • Diesel engine D4EA
  • Fuel system (gasoline)
  • Fuel system (diesel)
  • Engine lubrication system
  • Engine cooling system
  • Engine electrical equipment
  • Transmission
  • Clutch
  • Car gearbox
  • Drive shafts and cardan
  • Chassis
  • Car suspension
  • Steering
  • Brake system
  • Body
  • Exterior (external elements)
  • Interior (internal elements)
  • Air conditioning and heater
  • Airbags
  • Electrical equipment
  • Equipment and devices
  • Electrical circuits
HyundaiBook.ru © 2018-2026 · Mobile version · Sitemap: EN BG BY UA RS HR RO PL SK HU · Administration · Site search · Hyundai owners Accent 1 · Accent 2 · Accent 3 · Elantra 1 · Elantra 2 · Elantra 3 · Getz · Sonata 3 · Sonata 4 · Santa Fe 2 · Tucson 1 · Tucson 2 · Matrix ·
This site uses cookies to optimize its functionality. By continuing, you agree to our terms.