HyundaiBook.ru
Repair Chevrolet Repair Honda Repair Toyota Repair Land Rover Repair VAZ Repair Renault Repair Nissan
English Русский
Български
Беларускі
Український
Српски
Hrvatski
Română
Polski
Slovenský
Magyar
ArticlesSitemapContacts  


  Accent   Elantra   Getz   Grandeur   Sonata   Santa Fe   Tucson   Others
Tucson 1 (2005-2010) Tucson 2 (2009-2015)
  • Main
  • Tucson
  • LM (2009-2015)
  • Chassis
  • Brake system
  • Parking brake system — adjustment

Parking brake system — adjustment (Hyundai Tucson LM)

0
Contents: Adjusting the Parking Brake Shoe…⇓ Adjusting the Parking Brake Pedal…⇓ Adjusting the travel of the parking…⇓

Adjusting the Parking Brake Shoe Clearance


1. Raise the vehicle and make sure the supports are secure.

2. Remove the rear wheel.

3. Remove the disc blank.

3. Remove the disc blank.


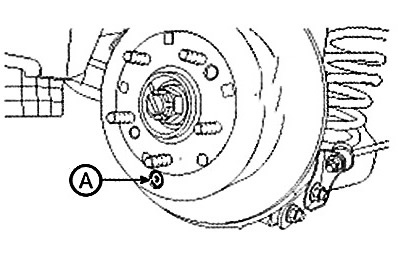
4. Rotate the regulator gear with a screwdriver until the disk stops moving. Then turn the gear 4 teeth in the opposite direction.

5. Install the plug on the disc and then install the rear wheel on the vehicle.

Adjusting the Parking Brake Pedal Travel


1. Press the parking brake pedal all the way down three times to take up the slack in the cables.

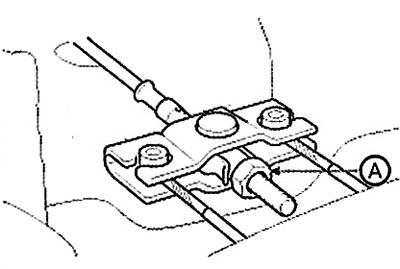
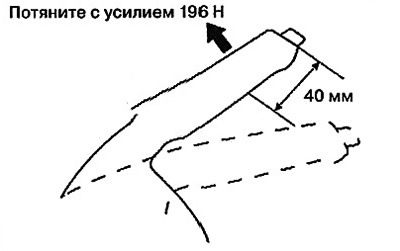
2. Turn the adjusting nut (A) until the operating force is 196 N when the parking brake pedal travels 4 teeth.

2. Turn the adjusting nut (A) until the…


Attention.

1. Adjust the parking brake after adjusting the rear brake shoe.

2. After adjusting the parking brake, check the following:
  • There should be no gap between the adjusting nut and the stud.
  • The brake should not stick.


Adjusting the travel of the parking brake lever


1. Raise the vehicle and make sure the supports are secure.

2. Remove the floor console trim

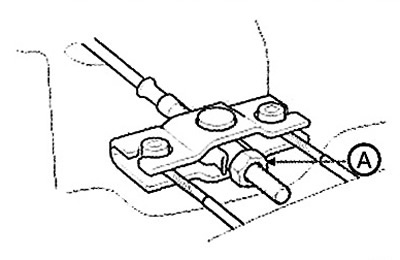
3. Adjust the stroke of the parking brake lever by turning the adjusting nut (A).

Note:

Parking brake lever travel: 6 clicks (with a force on the lever of 20 kgf).

After replacing the parking brake shoe, you must first adjust its clearance and then the stroke of the parking brake lever.


After replacing the parking brake shoe,…


4. Release the parking brake lever completely and check that the parking brakes do not rub against the rotating rear wheels. Readjust if necessary.

5. When the lever is fully pulled out, the parking brakes should be fully applied.

6. Install the floor console.
This article is available at russian, bulgarian, belarusian, ukrainian, serbian, croatian, romanian, polish, slovak, hungarian
This article has been reviewed by: Konstantin Smirnov
Add to social network:

Previous
Tucson 2: Brake system
Next

Parking brake system — installation
Parking brake system — removal
Parking brake system — device
Rear brakes
Front brake mechanisms
Anti-lock braking system — device
Hydroelectronic control unit (HECU)
Front wheel speed sensors
Rear wheel speed sensors
Longitudinal acceleration sensor
We recommend other articles on the topic of Hyundai manuals:

Brake system malfunctions Hyundai Accent 1 (1994-1999)
Parking brake — adjustment Hyundai Elantra 1 (1990-1995, petrol)
Parking brake Hyundai Getz (2002-2011)
Possible malfunctions of the brake system Hyundai Sonata 3 (1993-1998)
Table 6.1. Technical characteristics (main brake system) Hyundai Santa Fe 2 (2007-2012, petrol)
Parking brake Hyundai Matrix (2001-2010, petrol)
Link in different formats to this article

Visitor comments
No comments yet


How much will 34 + 27 ?


Tucson 2 (2009-2015) 
  • General information
  • Faults en route
  • User manual
  • Maintenance
  • Power unit
  • Gasoline engines
  • Diesel engines
  • Engine cooling system
  • Engine lubrication system
  • Engine power system
  • Control system
  • Intake and exhaust systems
  • Engine electrical equipment
  • Transmission
  • Clutch
  • Mechanical gearbox
  • Automatic gearbox
  • Drive shafts
  • Chassis
  • Suspension and wheels
  • Brake system
  • Steering
  • Body
  • Exterior (external elements)
  • Interior (internal elements)
  • Security systems
  • Air conditioning and heater
  • Electrical equipment
  • Electrical circuits
Tucson 1 (2005-2010) 
  • General information
  • User manual
  • Maintenance
  • Power unit
  • Gasoline engine G6BA
  • Gasoline engine G4GC
  • Diesel engine D4EA
  • Fuel system (gasoline)
  • Fuel system (diesel)
  • Engine lubrication system
  • Engine cooling system
  • Engine electrical equipment
  • Transmission
  • Clutch
  • Car gearbox
  • Drive shafts and cardan
  • Chassis
  • Car suspension
  • Steering
  • Brake system
  • Body
  • Exterior (external elements)
  • Interior (internal elements)
  • Air conditioning and heater
  • Airbags
  • Electrical equipment
  • Equipment and devices
  • Electrical circuits
HyundaiBook.ru © 2018-2026 · Mobile version · Sitemap: EN BG BY UA RS HR RO PL SK HU · Administration · Site search · Hyundai owners Accent 1 · Accent 2 · Accent 3 · Elantra 1 · Elantra 2 · Elantra 3 · Getz · Sonata 3 · Sonata 4 · Santa Fe 2 · Tucson 1 · Tucson 2 · Matrix ·
This site uses cookies to optimize its functionality. By continuing, you agree to our terms.