HyundaiBook.ru
Repair Chevrolet Repair Honda Repair Toyota Repair Land Rover Repair VAZ Repair Renault Repair Nissan
English Русский
Български
Беларускі
Український
Српски
Hrvatski
Română
Polski
Slovenský
Magyar
ArticlesSitemapContacts  


  Accent   Elantra   Getz   Grandeur   Sonata   Santa Fe   Tucson   Others
Tucson 1 (2005-2010) Tucson 2 (2009-2015)
  • Main
  • Tucson
  • JM (2005-2010)
  • Power unit
  • Gasoline engine G6BA
  • Cylinder head — installation

Cylinder head — installation (Hyundai Tucson JM)

0
Note:
  • 1. Clean all surfaces thoroughly before installation.
  • 2. Always use new gaskets.
  • 3. The cylinder head gasket is metal. Be careful not to bend it.
  • 4. Turn the crankshaft to set the piston of the first cylinder to the top dead center position.


1. Install the gaskets on the cylinder block in accordance with the markings.

1. Install the gaskets on the cylinder…


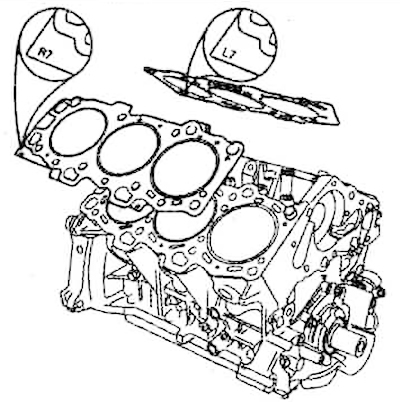
Note: The marks on the cylinder head gaskets correspond to: R7 - right, L7 - left.


2. Install the cylinder head carefully so as not to damage the gasket.

3. Insert washers and apply engine oil to the cylinder head mounting bolts.

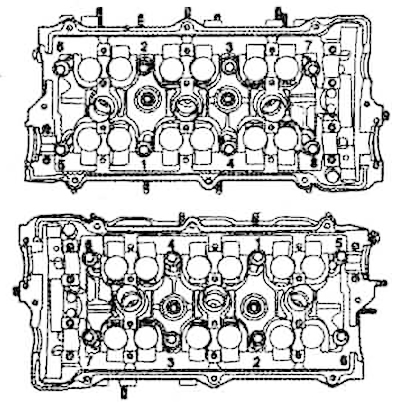
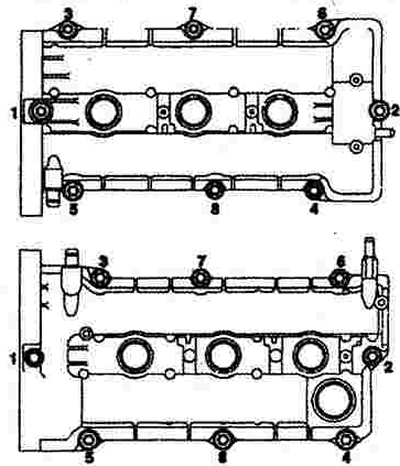
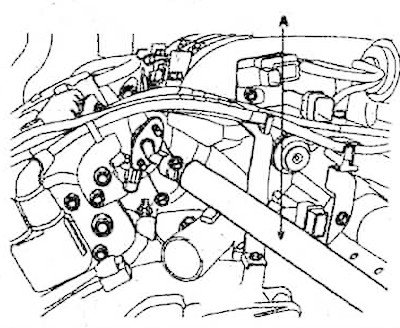
4. Tighten and then tighten the cylinder head bolts in the order shown in the figure.

4. Tighten and then tighten the…


5. First tighten all cylinder head mounting bolts to a torque of 25 Nm.


5. First tighten all cylinder head…


6. Tighten all mounting bolts again by 60°.

7. Finally tighten all mounting bolts by 45°.

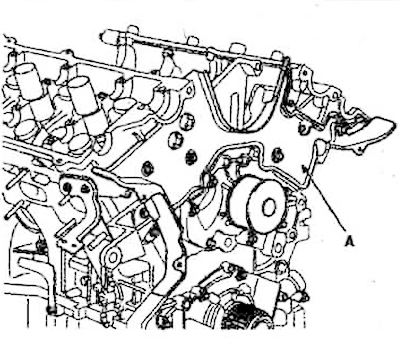
8. Install the water pump assembly with the coolant temperature control unit (A). Tighten the mounting bolts to 15-20 Nm.

8. Install the water pump assembly with…


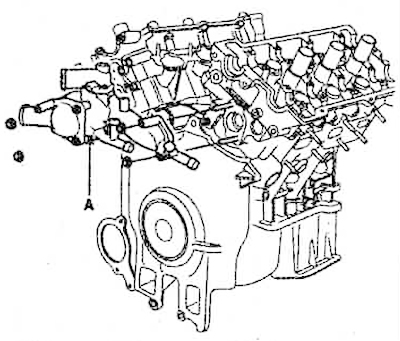
9. Install the rear drive belt cover (A). Tighten the mounting bolts to a torque of 10-12 Nm.

9. Install the rear drive belt cover…


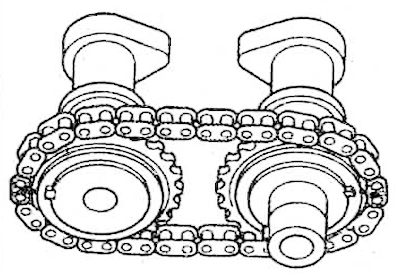
10. Install the chain on the camshafts so that the painted chain links coincide with the timing marks on the camshaft sprockets (as shown in the figure).


10. Install the chain on the camshafts…


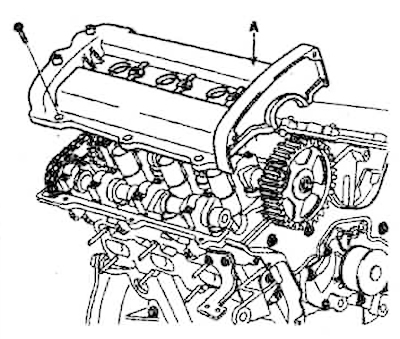
11. Install the camshafts (A) into the cylinder head.

11. Install the camshafts (A) into the…


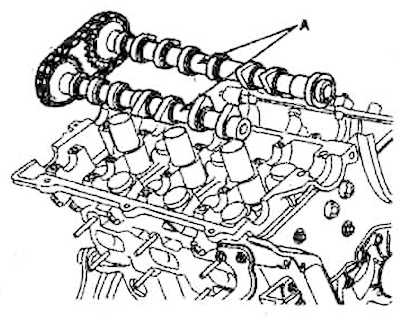
12. Install the camshaft support bearing caps (A). Tighten the bolts to 10-16 Nm.

12. Install the camshaft support…


Note: Apply fresh engine oil to the bearing shells and camshaft journals before installing the caps. Apply a thin layer of engine oil to the threaded portion of the bolts.


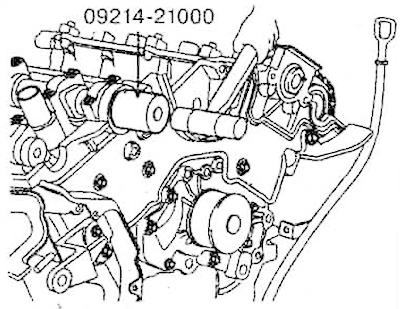
13. Using a special device (09214-21000), press in the camshaft oil seal.

13. Using a special device…


14. Install the camshaft drive gears. Lightly tighten and then tighten the gear mounting bolts with a wrench to a torque of 90-110 Nm.

15. Install the semicircular plugs.

16. Install the gasket (A) into the recess in the cylinder head (B).

16. Install the gasket (A) into the…


Note:
  • Before installation, thoroughly clean the gasket and cylinder head recess.
  • During installation, ensure that the gasket is installed without protruding parts.


17. Apply sealant to the corners of the recess.

Note: Use sealant No.5699. Before applying the sealant, make sure the surfaces to be applied are dry and clean. After assembly, wait at least 30 minutes and only then pour engine oil into the engine.


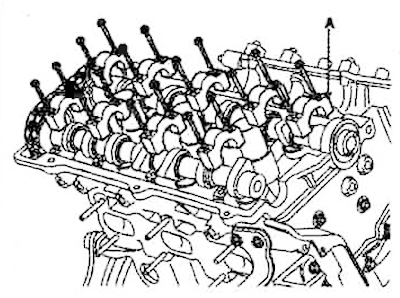
18. Install the cylinder head cover (A) and tighten the mounting bolts to a torque of 8-10 Nm in several steps in the order shown in the figure.

18. Install the cylinder head cover (A)…


19. Connect the high-voltage wires to the spark plugs.

20. Install the drive belt.

21. Install the exhaust manifold.

22. Install the power steering pump.

23. Install the intake manifold.

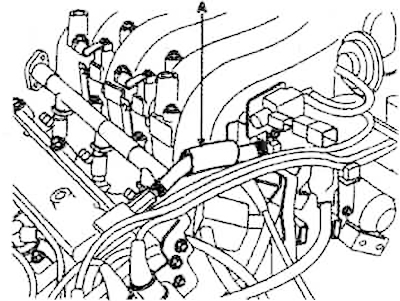
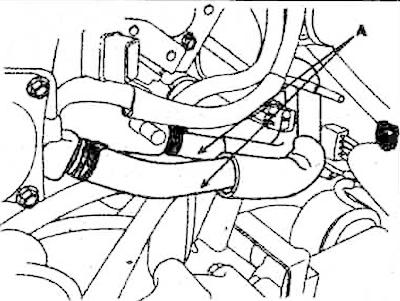
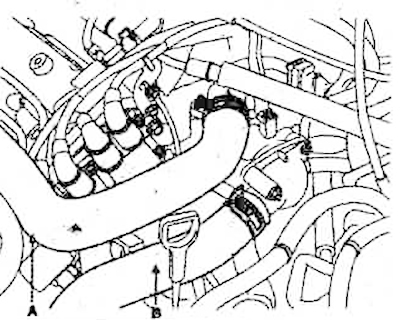
24. Install the crankcase ventilation hose (A).

24. Install the crankcase ventilation…


25. Install the throttle cable.


25. Install the throttle cable.


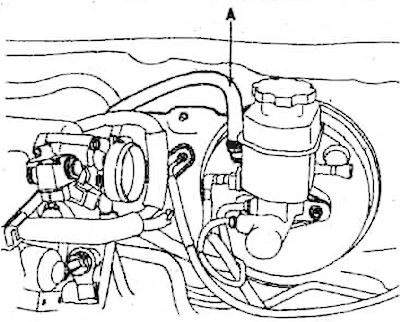
26. Connect the vacuum hose (A) to the brake booster.

26. Connect the vacuum hose (A) to the…


27. Connect the crankcase ventilation hose.

28. Connect the fuel hose (A).

28. Connect the fuel hose (A).


29. Connect the connectors in the reverse order of removal.

30. Connect the heater hoses.

30. Connect the heater hoses.


31. Connect the upper (A) and lower (B) radiator hoses.


31. Connect the upper (A) and lower (B)…


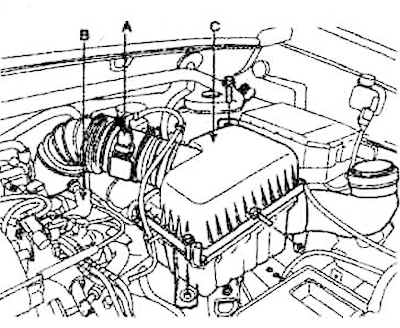
32. Install the air cleaner (C) complete with the intake hose. Connect the breather hose (B) and the mass air flow sensor connector (A).

32. Install the air cleaner (C)…


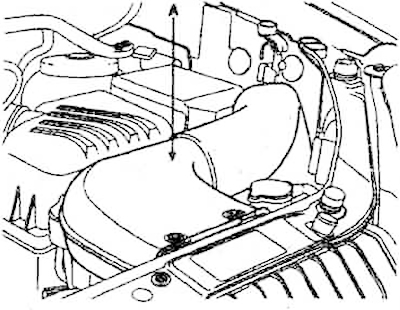
33. Install the engine cover.

34. Connect the negative terminal to the battery.

35. Install the air intake (A).

35. Install the air intake (A).


36. Fill the cooling system with coolant.

37. Start the engine and check for leaks.

38. Recheck oil and coolant levels.
This article is available at russian, bulgarian, belarusian, ukrainian, serbian, croatian, romanian, polish, slovak, hungarian
This article has been reviewed by: Konstantin Smirnov
Add to social network:

Previous
Tucson 1: Gasoline engine G6BA
Next

Cylinder head — assembly
Cylinder head — replacing guide bushings
Cylinder head — technical condition check
Cylinder head — disassembly
Cylinder head — removal
Cylinder head — device
Removal and installation the engine with gearbox assembly
Cylinder block — device
Cylinder Block — Disassembly
Cylinder block — checking technical condition
Cylinder Block — Assembly
Intake and exhaust systems — device
We recommend other articles on the topic of Hyundai manuals:

Cylinder head — removal, inspection and installation Hyundai Accent 1 (1994-1999)
Cylinder head — replacement and installation of gasket (all… Hyundai Elantra 1 (1990-1995, petrol)
Cylinder head — removal and installation Hyundai Getz (2002-2011)
Cylinder head and valves — components Hyundai Sonata 3 (1993-1998)
Disassembly, inspection and assembly of the cylinder head Hyundai Santa Fe 2 (2007-2012, petrol)
Disassembly, inspection and assembly of the cylinder head Hyundai Matrix (2001-2010, petrol)
Link in different formats to this article

Visitor comments
No comments yet


How much will 31 + 15 ?


Tucson 2 (2009-2015) 
  • General information
  • Faults en route
  • User manual
  • Maintenance
  • Power unit
  • Gasoline engines
  • Diesel engines
  • Engine cooling system
  • Engine lubrication system
  • Engine power system
  • Control system
  • Intake and exhaust systems
  • Engine electrical equipment
  • Transmission
  • Clutch
  • Mechanical gearbox
  • Automatic gearbox
  • Drive shafts
  • Chassis
  • Suspension and wheels
  • Brake system
  • Steering
  • Body
  • Exterior (external elements)
  • Interior (internal elements)
  • Security systems
  • Air conditioning and heater
  • Electrical equipment
  • Electrical circuits
Tucson 1 (2005-2010) 
  • General information
  • User manual
  • Maintenance
  • Power unit
  • Gasoline engine G6BA
  • Gasoline engine G4GC
  • Diesel engine D4EA
  • Fuel system (gasoline)
  • Fuel system (diesel)
  • Engine lubrication system
  • Engine cooling system
  • Engine electrical equipment
  • Transmission
  • Clutch
  • Car gearbox
  • Drive shafts and cardan
  • Chassis
  • Car suspension
  • Steering
  • Brake system
  • Body
  • Exterior (external elements)
  • Interior (internal elements)
  • Air conditioning and heater
  • Airbags
  • Electrical equipment
  • Equipment and devices
  • Electrical circuits
HyundaiBook.ru © 2018-2026 · Mobile version · Sitemap: EN BG BY UA RS HR RO PL SK HU · Administration · Site search · Hyundai owners Accent 1 · Accent 2 · Accent 3 · Elantra 1 · Elantra 2 · Elantra 3 · Getz · Sonata 3 · Sonata 4 · Santa Fe 2 · Tucson 1 · Tucson 2 · Matrix ·
This site uses cookies to optimize its functionality. By continuing, you agree to our terms.