
HyundaiBook.ru
Repair Chevrolet Repair Honda Repair Toyota Repair Land Rover Repair VAZ Repair Renault Repair Nissan
English Русский
Български
Беларускі
Український
Српски
Hrvatski
Română
Polski
Slovenský
Magyar
ArticlesSitemapContacts  


  Accent   Elantra   Getz   Grandeur   Sonata   Santa Fe   Tucson   Others
Elantra 1 (1990-1995, petrol) Elantra 2 (1995-2000, petrol) Elantra 3 (2000-2006)
  • Main
  • Elantra
  • XD (2000-2006)
  • Power unit
  • Gasoline engines
  • Adjusting the tension of the poly V-belt

Adjusting the tension of the poly V-belt (Hyundai Elantra XD)

0

Procedure


1. Check the condition of the poly V-belt and its position on the pulleys.
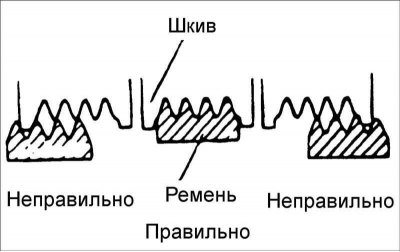
2. Check the belt tension by applying 100 N of force to it at a location…


2. Check the belt tension by applying 100 N of force to it at a location equidistant from the pulleys and measure the belt deflection.

  • 1. Check the correct position of the poly V-belt ribs in the pulley grooves.
  • 2. If the poly V-belt makes any extraneous noise during operation, check the belt for wear and damage, as well as the working surfaces of the pulleys.


  • 1. Belt tension must be measured exactly at the center between the pulleys.
  • 2. When a new belt is installed, adjust the tension to the average value given in the "New" column. A used belt is one that has been running on the engine for more than 5 minutes and its tension must be adjusted to the average value given in the "Used" column.
  • 3. When adjusting the tension of a used belt or a belt that has been in operation on the engine for more than 5 minutes, it is necessary to adjust its tension to the average value given in the "Used" column.
  • 4. For periodic inspections, please refer to the "Check" column.


Measuring tension with a special device type A
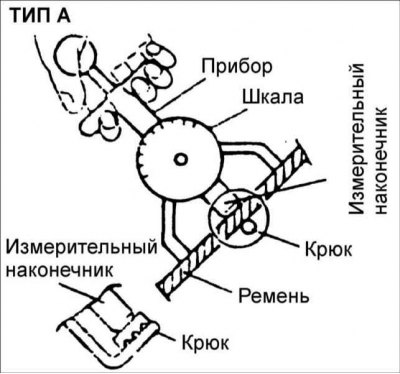
When measuring the tension of the poly V-belt, the device must not touch other…


When measuring the tension of the poly V-belt, the device must not touch other engine elements.


(The article is borrowed from an online resource: HYUNDAIBOOK)

Measuring tension with a special device type B

1. When measuring, make sure to turn the reset button in the direction of the arrow to reset the meter arrow to its original position.

2. After removing the instrument from the belt, the instrument arrow will still indicate the belt tension.

Purpose
Examination
Adjustment
New
Pre-owned
Generator drive belt Sag, mm
5,1–6,0
4,0–4,4
5,1–5,7
Tension, N
350–500
650–750
400–500
Drive belt
air conditioning compressor
Sag, mm
800%
5,0–5,5
6,0–7,0
Tension, N
250–500
470–570
320–400
Power steering pump drive belt Sag, mm
6,0–9,0
–
–
This article is available at russian, bulgarian, belarusian, ukrainian, serbian, croatian, romanian, polish, slovak, hungarian
This article has been reviewed by: Konstantin Smirnov
Add to social network:

Previous
Elantra 3: Gasoline engines
Next

Adjusting the timing belt tension
Timing belt — removal and installation
Compression check
Technical data of petrol engines
Adjusting the alternator drive belt tension
Camshafts
Checking and adjusting valve clearances on 1.8 and 2.0 L engines (MLA)
Hydraulic valve clearance compensators for 1.6L engine
Installing the cylinder head cover
We recommend other articles on the topic of Hyundai manuals:

Adjusting the timing belt tension Hyundai Accent 1 (1994-1999)
Adjusting the tension of the poly V-belt Hyundai Getz (2002-2011)
Checking and adjusting belt tension Hyundai Sonata 3 (1993-1998)
Adjusting the tension of the drive belts of mounted units Hyundai Santa Fe 2 (2007-2012, petrol)
Adjusting the drive belt tension Hyundai Tucson 1 (2005-2010)
Adjusting the timing belt tension Hyundai Matrix (2001-2010, petrol)

Link in different formats to this article

Visitor comments
No comments yet


How much will 12 + 38 ?


Elantra 3 (2000-2006) 
  • User manual
  • Control devices
  • Audio system
  • Starting the engine and driving
  • Faults en route
  • Maintenance and care
  • Technical information
  • Power unit
  • Gasoline engines
  • Diesel engines
  • Lubrication system
  • Cooling system
  • Fuel system (gasoline)
  • Fuel system (diesel)
  • Decreased toxicity
  • Ignition system
  • Transmission
  • Clutch
  • Mechanical gearbox
  • Automatic gearbox
  • Drive shafts and axles
  • Chassis
  • Car suspension
  • Steering
  • Brake system
  • Body
  • Exterior (external elements)
  • Interior (internal elements)
  • Air conditioning system
  • Electrical equipment
  • Equipment and devices
  • Headlights and lighting
  • Power devices
  • Electrical circuits
Elantra 2 (1995-2000, petrol) 
  • General information
  • Maintenance
  • Power unit
  • Engine repair
  • Cooling system
  • Intake and exhaust system
  • Fuel system
  • Transmission
  • Clutch
  • Manual gearbox
  • Automatic gearbox
  • Drive shafts and axles
  • Chassis
  • Front suspension
  • Rear suspension
  • Steering
  • Brake system
  • Body
  • Body elements
  • Electrical equipment
  • Equipment and devices
  • Electrical diagrams
Elantra 1 (1990-1995, petrol) 
  • General information
  • Introduction to the guide
  • Maintenance
  • Power unit
  • Minor engine repair
  • Engine overhaul
  • Lubrication system
  • Cooling system
  • Fuel injection system
  • Ignition system
  • Exhaust system
  • Transmission
  • Clutch
  • Manual gearbox
  • Automatic gearbox
  • Drive shafts
  • Chassis
  • Front suspension
  • Rear suspension
  • Steering
  • Wheels and tires
  • Troubleshooting
  • Brake system
  • Body
  • Body elements
  • Electrical equipment
  • Equipment and devices
  • Power devices
  • Heating and air conditioning
  • Electrical circuits
HyundaiBook.ru © 2018-2026 · Mobile version · Sitemap: EN BG BY UA RS HR RO PL SK HU · Administration · Site search · Hyundai owners Accent 1 · Accent 2 · Accent 3 · Elantra 1 · Elantra 2 · Elantra 3 · Getz · Sonata 3 · Sonata 4 · Santa Fe 2 · Tucson 1 · Tucson 2 · Matrix ·
This site uses cookies to optimize its functionality. By continuing, you agree to our terms.