
Regeneration of the diesel particulate filter
This procedure is designed to force a regeneration of the diesel particulate filter (DPF) using the GDS scanner if the DPF has not been regenerated while driving. For example, if the vehicle has been driven intermittently at low speeds, for short distances, or with intermittent idling, the DPF regeneration procedure has not been performed because the conditions for enabling regeneration mode have not been met.
Conditions for forced regeneration
Engine coolant temperature: about 70°C.
The engine is idling.
The gearshift lever position is "P" (Park) (for automatic transmission) or "neutral" (for manual transmission).
Normal battery voltage.
Full electrical load (air conditioning (if installed), fan at maximum speed, headlights, windshield wipers, other lighting devices, etc. on).
The hood is open.
The amount of soot is less than 25 g (indication of the electronic engine control unit).
Note: The air conditioner consumes a lot of electricity. To speed up the regeneration, turn it on (if installed).
1. Turn off the ignition.
2. Connect the GDS scanner to the data link connector (DLC).
3. Start the engine in idle mode and with the gearshift lever in position "P" (for automatic transmission) or "neutral" (for manual transmission).
4. Apply maximum electrical load to the vehicle (air conditioning on, fan on at maximum speed, headlights on, windshield wipers on, other lights on, etc.).
5. Select "Vehicle, Model year, Engine, System".
6. Select Vehicle S/W Management (Vehicle Software Management).
7. Select DPF Service Regeneration (Service regeneration of the diesel particulate filter (DPF)).
8. Follow the procedure according to the instructions on the screen.
Note: If the diesel particulate filter (DPF) condition does not meet the required conditions, regeneration will end with an unsatisfactory result.
Removal
Attention.
- Before removing the diesel particulate filter (DPF) assembly, it must be checked for damage.
- Remove the exhaust pipe from the DPF side. Check the rear of the DPF for damage or discoloration (white).
- Check for soot at the rear of the diesel particulate filter. If soot is visible, the diesel particulate filter pressure sensor (DPS) may be faulty.
1. Turn the ignition key to the OFF position and disconnect the negative (-) cable from the battery.
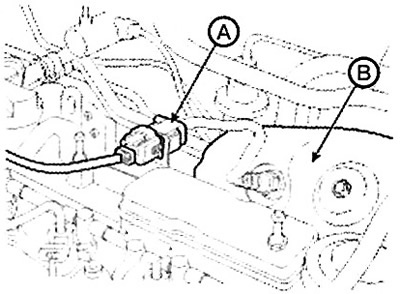
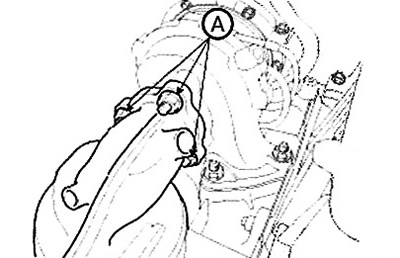
2. Disconnect the oxygen sensor connector (A), then remove the heat shield (B).
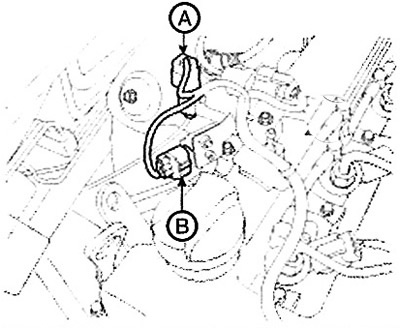
3. Disconnect the exhaust gas temperature sensor connector (A) and the diesel particulate filter (DPF) pressure change sensor connector (B).
4. Disconnect the pressure change sensor hoses (A) from the diesel particulate filter (DPF) assembly.
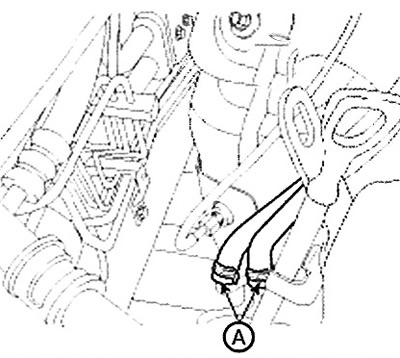
Caution: Be careful not to mix up the rear and front hoses when disconnecting and connecting.
5. Raise the vehicle and remove the front muffler mounting nut.
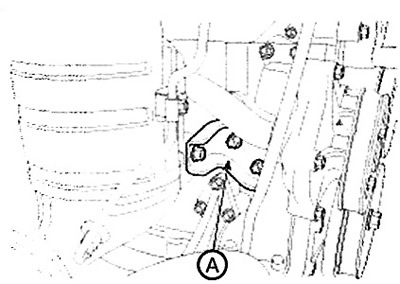
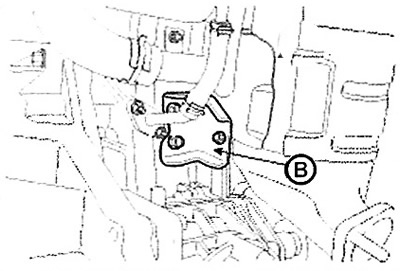
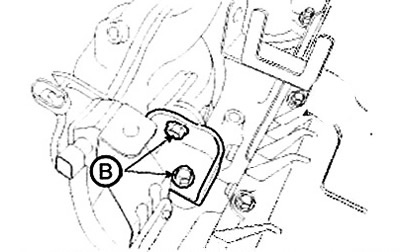
6. Remove the supports (A, B) of the diesel particulate filter (DPF) assembly.
Note:
Tightening torque:
- Diesel particulate filter support mounting bolt: 44.1 ~ 54.0 Nm.
- Front muffler mounting nut: 39.2 ~ 58.8 Nm.
 |
 |
7. Remove the mounting nuts (A) and remove the mounting bolts (B) from the turbocharger, then remove the diesel particulate filter (DPF) assembly.
Note: Tightening torque:
- Diesel Particulate Filter Mounting Bolt: 44.1 ~ 54.0 Nm.
- Diesel particulate filter mounting nut: 49.1 ~ 68.7 Nm.
 |
 |
Installation
Installation is performed in the reverse order of removal.
Attention.
- Try to prevent foreign materials from getting into the tubes and the particulate filter itself.
- If foreign material enters the DPF or its tubes, the DPF may be damaged or may become permanently/excessively contaminated.
- Tighten the component mounting bolts to the specified torque.
Replacement
Caution: After replacing the Diesel Particulate Filter (DPF) assembly, the Component Change Routine must be performed. Otherwise, a fault related to engine performance or exhaust management may occur and persist until the new component is registered in the ECM.
1. Turn off the ignition.
2. Connect the GDS scanner to the data link connector (DLC).
3. Turn on the ignition.
4. Select "Vehicle, Model year, Engine, System".
5. Select "Vehicle S/W Management" (Vehicle Software Management).
6. Select Component Change Routine.
7. Select "DPF Change" (Replacing the diesel particulate filter (DPF)).
(Information is taken from a thematic website: «hyundaibook»)
8. Follow the procedure according to the instructions on the screen.