HyundaiBook.ru
Repair Chevrolet Repair Honda Repair Toyota Repair Land Rover Repair VAZ Repair Renault Repair Nissan
English Русский
Български
Беларускі
Український
Српски
Hrvatski
Română
Polski
Slovenský
Magyar
ArticlesSitemapContacts  


  Accent   Elantra   Getz   Grandeur   Sonata   Santa Fe   Tucson   Others
Tucson 1 (2005-2010) Tucson 2 (2009-2015)
  • Main
  • Tucson
  • LM (2009-2015)
  • Body
  • Air conditioning and heater
  • Capacitor — Checking and Replacing

Capacitor — Checking and Replacing (Hyundai Tucson LM)

0
Contents: Checking the technical condition ⇓ Replacement ⇓ Dehumidifier ⇓
Capacitor — Checking and Replacing


Checking the technical condition


1. Check the capacitor plates for dirt and damage. If there is dirt, wash the plates with water and blow with compressed air. If necessary, carefully straighten bent plates with a screwdriver or pliers.

2. Check the capacitor connections for leaks. If necessary, repair or replace the capacitor.
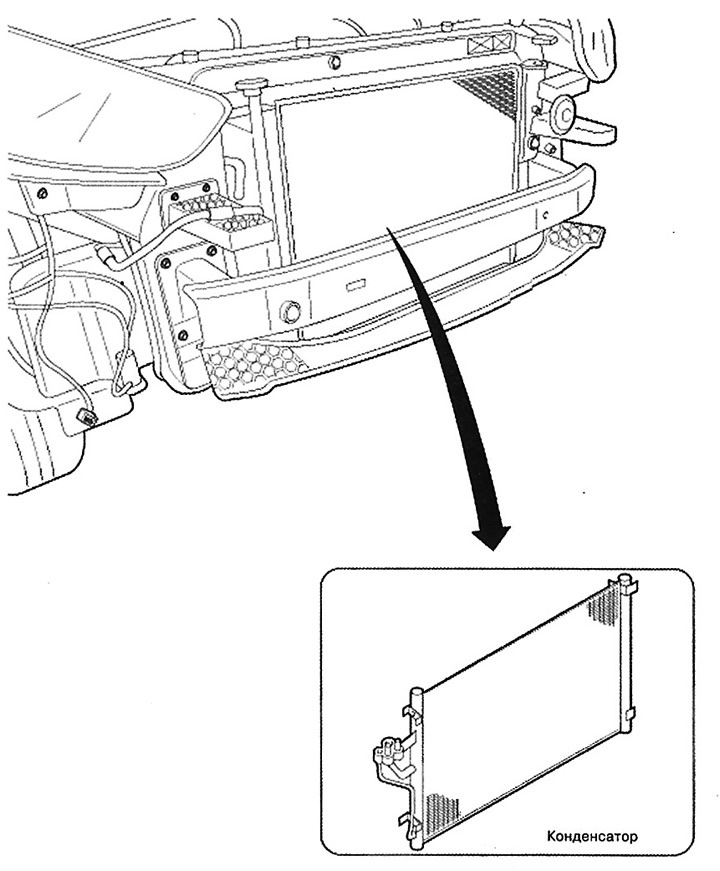
Replacement


Capacitor assembly


1. Drain the refrigerant using a refrigerant recovery, recycling and recharging machine.

2. Disconnect the negative battery terminal.

3. Remove the front bumper.

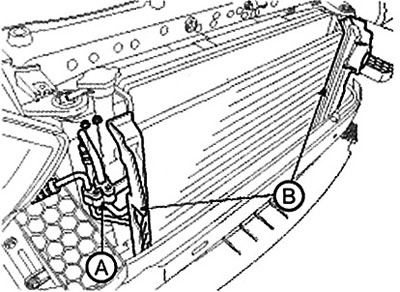
4. Disconnect the refrigerant pipe (A), then remove the side cover (B) of the condenser.

[The material is reprinted from another resource HyundaiBook.ru]

4. Disconnect the refrigerant pipe (A),…


5. Remove the condenser (A) from the radiator.


5. Remove the condenser (A) from the…


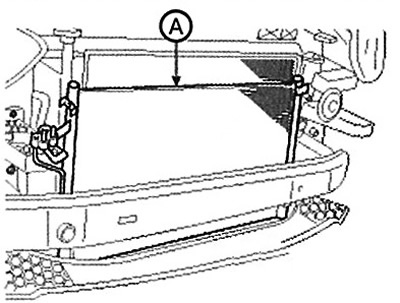
6. Installation is carried out in the reverse order. Please note the following features:

When installing a new condenser, add refrigerant oil (ND-OIL8).

Replace the sealing rings with new ones; apply a thin layer of refrigerant oil to them before installation. Be sure to use O-rings designed for R-134a refrigerant to prevent leaks.

Be careful not to damage the condenser fins and radiator when installing the condenser.

Make sure the bottom condenser mounting pads are seated in their holes.

Prime the system and check its performance.

Dehumidifier


Replacement


1. After removing the capacitor, remove the lower plug (B) from it using an L-shaped wrench (A).

1. After removing the capacitor, remove…


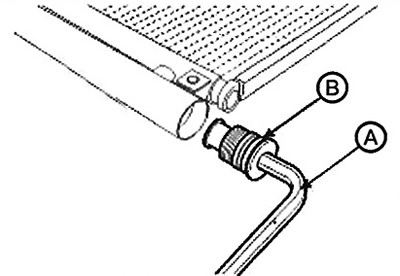
Note: Tightening torque: 20-25 Nm.


2. Remove the desiccant (A) from the condenser with pliers. Check for crumbled desiccant and clogged bottom plug filter.


2. Remove the desiccant (A) from the…


3. Lubricate the sealing rings and the threaded portion of the new bottom plug with compressor oil.

4. Place the new desiccant in the receiver-dryer tank. The desiccant should be kept under vacuum until use.

5. Screw a new bottom plug into the condenser.

Note:

Always replace the bottom plug at the same time as the dehydrator.

Replace the sealing rings with new ones; apply a thin layer of refrigerant oil to them before installation. Be sure to use O-rings designed for R-134a refrigerant to prevent leaks.

Be careful not to damage the condenser fins and radiator when installing the condenser.

Make sure the bottom condenser support pads fit into their holes.

Prime the system and check its performance.
This article is available at russian, bulgarian, belarusian, ukrainian, serbian, croatian, romanian, polish, slovak, hungarian
This article has been reviewed by: Konstantin Smirnov
Add to social network:

Previous
Tucson 2: Air conditioning and heater
Next

Compressor — device, removal and installation
Compressor oil
Checking the tightness of the system
Filling the system with refrigerant
Creating a vacuum in the system
Air Conditioner Pressure Sensor
Refrigerant pipeline
Evaporator temperature sensor
Car interior air temperature sensor
Ambient air temperature sensor
We recommend other articles on the topic of Hyundai manuals:

Checking and replacing stator elements Hyundai Accent 2 (1999-2005)
Engine Brackets — Checking, Replacing and Adjusting Hyundai Elantra 1 (1990-1995, petrol)
Checking and replacing engine coolant Hyundai Getz (2002-2011)
Checking the engine oil level Hyundai Sonata 3 (1993-1998)
Checking and replacing engine coolant Hyundai Santa Fe 2 (2007-2012, petrol)
Checking and replacing fuses Hyundai Matrix (2001-2010, petrol)

Link in different formats to this article

Visitor comments
No comments yet


How much will 17 + 33 ?


Tucson 2 (2009-2015) 
  • General information
  • Faults en route
  • User manual
  • Maintenance
  • Power unit
  • Gasoline engines
  • Diesel engines
  • Engine cooling system
  • Engine lubrication system
  • Engine power system
  • Control system
  • Intake and exhaust systems
  • Engine electrical equipment
  • Transmission
  • Clutch
  • Mechanical gearbox
  • Automatic gearbox
  • Drive shafts
  • Chassis
  • Suspension and wheels
  • Brake system
  • Steering
  • Body
  • Exterior (external elements)
  • Interior (internal elements)
  • Security systems
  • Air conditioning and heater
  • Electrical equipment
  • Electrical circuits
Tucson 1 (2005-2010) 
  • General information
  • User manual
  • Maintenance
  • Power unit
  • Gasoline engine G6BA
  • Gasoline engine G4GC
  • Diesel engine D4EA
  • Fuel system (gasoline)
  • Fuel system (diesel)
  • Engine lubrication system
  • Engine cooling system
  • Engine electrical equipment
  • Transmission
  • Clutch
  • Car gearbox
  • Drive shafts and cardan
  • Chassis
  • Car suspension
  • Steering
  • Brake system
  • Body
  • Exterior (external elements)
  • Interior (internal elements)
  • Air conditioning and heater
  • Airbags
  • Electrical equipment
  • Equipment and devices
  • Electrical circuits
HyundaiBook.ru © 2018-2026 · Mobile version · Sitemap: EN BG BY UA RS HR RO PL SK HU · Administration · Site search · Hyundai owners Accent 1 · Accent 2 · Accent 3 · Elantra 1 · Elantra 2 · Elantra 3 · Getz · Sonata 3 · Sonata 4 · Santa Fe 2 · Tucson 1 · Tucson 2 · Matrix ·
This site uses cookies to optimize its functionality. By continuing, you agree to our terms.