
Contents: Preparing to test the generator…⇓ Checking the generator output current ⇓ Preparing to test the regulated…⇓ Checking the regulated voltage ⇓
The generator output current is checked in order to determine whether the generator output current corresponds to the nominal value.
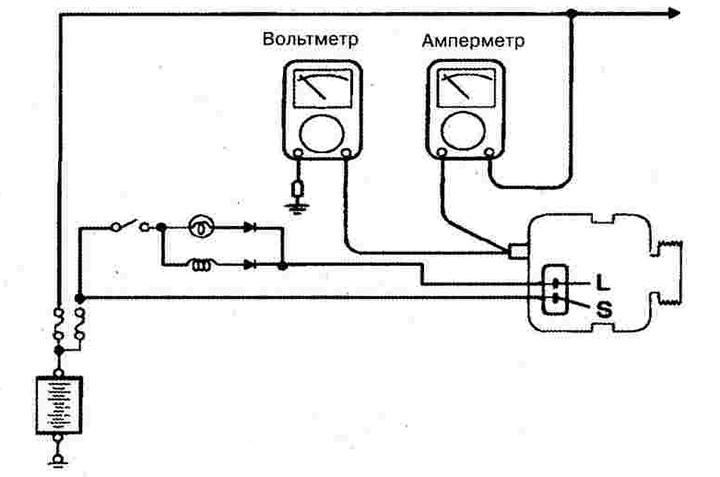
Preparing to test the generator output current
1. Before checking, perform the following operations and, if necessary, troubleshoot:
a) Check the serviceability of the battery installed in the vehicle and its charge level.
Note: When checking the generator output current, the battery must be partially discharged. If the battery is fully charged, the test result will be inaccurate due to insufficient load on the generator.
b) Check the tension of the generator drive belt.
2. Set the ignition key to the "OFF" position.
3. Disconnect the wire from the negative "-" terminal of the battery.
4. Disconnect the wire from the "B" terminal of the generator.
5. Connect a DC ammeter (with a measurement range of 0-100 A) in series to terminal "B" and the disconnected output wire of the generator. Connect the negative wire ("-") of the ammeter to the disconnected output wire.
Note: Due to the high current, both connections must be tightened securely. Do not use alligator clips.
6. Connect a voltmeter (with a measurement range of 0-20 V) to the "B" terminal and the "ground" ("-"): the positive wire ("+") of the voltmeter to the "B" terminal of the generator, and the negative wire ("-") securely to the "ground".
7. Connect a tachometer to monitor engine speed, connect the negative battery cable.
8. Leave the hood open.
Checking the generator output current
1. Make sure the voltmeter shows battery voltage. If the voltmeter shows 0 V, possible causes include a broken wire between the generator terminal "B" and the negative terminal ("-") of the battery, a blown fuse, or a poor connection to the "ground" ("-").
2. Start the engine and turn on the headlights.
3. Turn on the high beam headlights and the heater fan at the highest speed, sharply increase the crankshaft speed to 2500 rpm and read the maximum value of the generator output current using the ammeter.
Note: After the engine starts, the charging current decreases rapidly. Therefore, to obtain the true maximum current, the above operations should be performed in as little time as possible.
Result
1. The ammeter reading should be above the current limit. If it is lower with a good generator output wire, remove the generator from the vehicle and check it. Current limit (90 A generator) 63 Amin.
Note:
- 1. The nominal value of the output current is indicated on the plate attached to the generator casing.
- 2. The value of the output current varies depending on the load current and the generator temperature. Therefore, the current value of the output current may differ from the nominal value. In this case, turn on the headlights to discharge the battery, or connect the headlights of another car to increase the generator load current.
2. After checking the return current, reduce the engine speed to idle and turn off the ignition.
3. Disconnect the wire from the negative terminal of the battery.
4. Disconnect the ammeter, voltmeter and control tachometer.
5. Connect the output wire to the "B" terminal of the generator.
6. Connect the wire to the negative terminal of the battery.
The purpose of checking the regulated voltage is to check the functionality of the electronic voltage regulator.
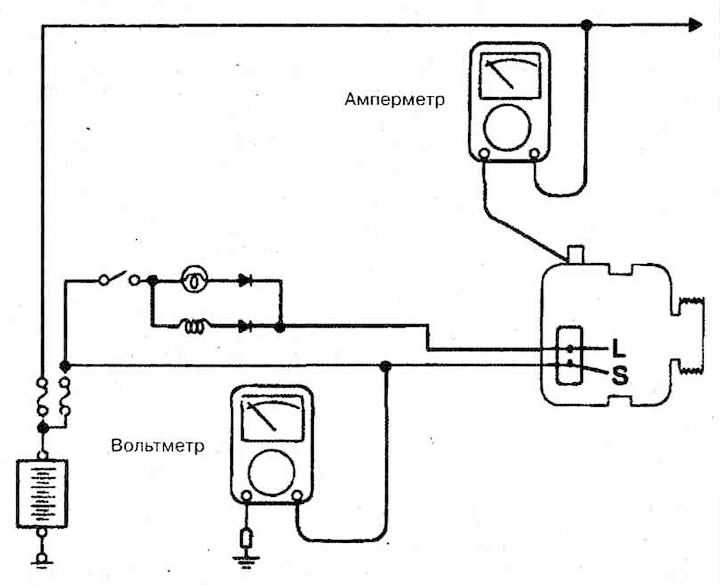
Preparing to test the regulated voltage
1. Before checking, perform the following operations and, if necessary, troubleshoot:
a) Check the serviceability of the battery installed in the vehicle.
b) Check the tension of the generator drive belt.
2. Set the ignition key to the "OFF" position.
3. Disconnect the wire from the negative battery cable.
4. Connect the digital voltmeter to the "S(L)" terminal of the generator and to the "ground" (the positive wire ("+") of the voltmeter to the "S(L)" terminal of the generator, and the negative wire of the voltmeter ("-") to the negative terminal ("-") of the battery).
5. Disconnect the generator output wire from terminal "B".
6. Connect a DC ammeter (with a measurement range of 0-100 A) in series to terminal "B" and to the disconnected generator output wire. Connect the negative passage ("-") of the ammeter to the disconnected output wire.
7. Connect a tachometer to monitor engine speed and connect the negative cable to the battery.
Checking the regulated voltage
1. Turn on the ignition and make sure that the voltmeter shows the battery voltage.
If the voltmeter shows 0 V, the cause is a break in the circuit between the "S(L)" terminal of the generator and the positive terminal ("+") of the battery or a burnt-out fuse.
2. Start the engine, turn off the headlights and all electrical consumers.
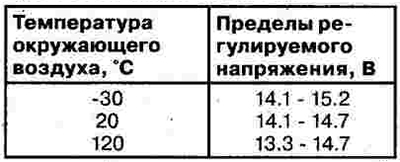
3. Increase the crankshaft speed to approximately 2500 rpm and read the voltmeter reading when the generator output current decreases to 10 A or less.
Result
1. If the voltmeter readings match the values shown in the "Adjustable Voltage Limits" table below, the voltage regulator is operational.
If the voltmeter readings differ from the norm, the voltage regulator is faulty.
Gasoline engine

Diesel engine
2. After completing the check, reduce engine speed to idle and turn off the ignition.
3. Disconnect the negative battery cable.
4. Disconnect the voltmeter, ammeter and control tachometer.
5. Connect the output wire to the "B" terminal of the generator.
6. Connect the negative wire to the battery terminal.