
1. Set the required tire pressure on all wheels.
2. Place the vehicle on a level, horizontal surface and press the front and rear bumpers several times to seat the suspension springs. Place the car at a distance of 3 m from the wall with the screen.
3. Perform the adjustment on a vehicle without a load, with a full fill of coolant, engine oil and fuel, with a spare wheel, jack and driver's tool kit. The driver's seat must be occupied by the driver or a load of equal weight.
4. Clean the headlight lenses and turn on the headlights (low beam),

5. Open the hood.
6. Draw a vertical and horizontal line on the screen through the center of the light spot of each headlight. After this, draw a line parallel to the horizontal line at a distance of 30 mm.
7. To adjust IN THE VERTICAL PLANE, turn the screw with a Phillips screwdriver so that the edge of the low beam spot of each headlight is located at the lower horizontal line of the screen.
8. To adjust IN THE HORIZONTAL PLANE, turn the screw with a Phillips screwdriver so that the border of the low beam spot of each headlight is located at the vertical lines of the screen.
Adjusting the light beam after replacing the headlight
 |
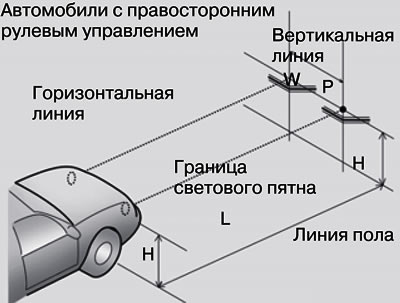 |
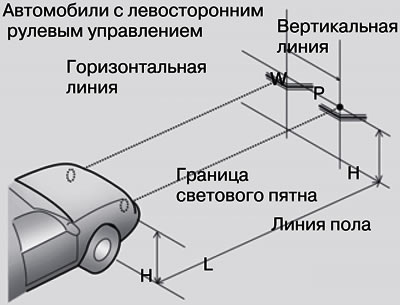
When replacing the headlight during repair of the front part of the body, you should check the position of its light beam using the screen, as shown in the figure. Turn on the headlights.
1. Adjust the light beams so that their axes are parallel to the body axis and pass through the "P" points shown in the figure.
2. The axes of the light beams are shown in the figure by dotted lines.
Dimensions on screen:
- "H" - Height of light beam axes above the floor: 904 mm
- "W" - Distance between the axes of the light beams: 1356 mm
- "L" - Distance between headlights and screen: 3000 mm.