
1. All tires must have the rated air pressure.
2. Place the car on a level surface and rock it several times, pressing on the front and rear bumpers. Position the car at a distance of 3000 mm from the adjustment screen.
3. Make sure the vehicle is unloaded (nothing other than the spare tire, jack, tools, full engine coolant, engine oil and fuel).
4. Wash the headlight lenses and turn on the low beam headlights.
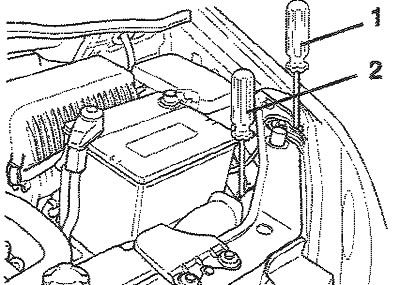
1 - Adjustment in the vertical plane
2 - Adjustment in the horizontal plane
5. Open the hood.
6. Draw a vertical and horizontal line (through the center of each headlight) on the alignment screen.
Then draw a line parallel to and 30 mm below the horizontal line. Adjust the low beam illumination boundary line to the parallel line using a Phillips screwdriver - VERTICAL ADJUSTMENT.
Adjust the low beam illumination boundary line of the headlights along each vertical line using a Phillips screwdriver - HORIZONTAL ADJUSTMENT.
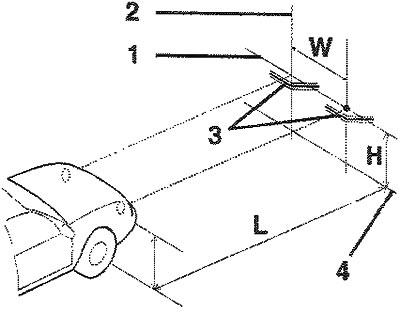
1 - Horizontal line
2 - Vertical line
3 - Illumination boundary line
4 - Earth line
If the headlight assemblies were replaced during body repair of the front part of the vehicle body, it is necessary to check the adjustment of the headlight beam using the screen as shown in the figure. Turn on the headlight switch. (To the low beam position).
1. Adjust the headlight beam so that the beam's own axis is parallel to the center line of the car body and coincides at point "P" shown in the figure.
2. The dotted lines in the figure indicate the centers of the headlights.
Technical specifications
"N"
Distance from horizontal center line of headlamps to ground: 656 mm.
"W"
Distance between headlamp centres: 1100 mm.
"L"
Distance between headlamps and the screen on which they are tested: 3000 mm.