
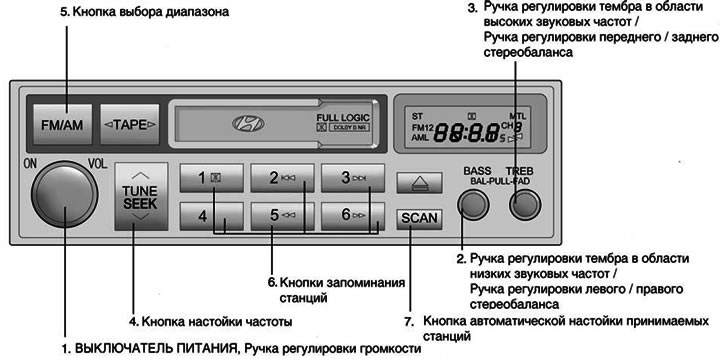
1. POWER ON-OFF (Power switch)
The radio operates when the ignition key is in the "ON" or "ACC" position. Press the button to turn on the power. In radio reception mode, the LCD display will show the frequency of the radio station being received, and in cassette playback mode, the tape direction indicator will be shown. To turn off the radio power, press the button again.
VOLUME (Volume control knob)
To increase the volume, rotate the knob clockwise, and to decrease the volume, rotate it counterclockwise.
2. BASS (Low frequency tone control knob)
Push the knob to push it outwards, and turn it left or right to set the desired timbre in the low-frequency range.
BAL (Left/Right Stereo Balance Adjustment Knob)
Pull the extended handle outward to the next locked position.
Turn the knob clockwise to increase the volume of the right speaker. (The volume of the left speaker will decrease).
Turning the knob counterclockwise will increase the volume of the left speaker. (The volume of the right speaker will decrease).
3. TREB (High frequency tone control knob)
Push the knob outward and turn it left or right to set the desired tone in the high frequency range.
FAD (Front/Rear Stereo Balance Adjustment Knob)
Pull the extended handle outward to the next locked position.
Turn the knob counterclockwise to increase the volume of the front speakers. (The volume of the rear speakers will decrease).
Turning the knob clockwise will increase the volume of the rear speakers. (The volume of the front speakers will decrease).
4. TUNE (Manual frequency setting button)
Press the v or L sides of this button to increase or decrease the frequency. If the button is held down for 0.5 seconds or longer, the stop signal is skipped (broadcast station waves) and the selection of channels continues.
SEEK Operation (Automatic frequency tuning)
Press and hold the (TUNE) button for 1 second or longer, when you release it, the receiver will automatically tune in to the next possible station with a stable signal. When you press the L side, the radio will automatically tune to the next station with a higher broadcast frequency, and when you press the V side, the radio will automatically tune to the next station with a lower broadcast frequency.
5. FM/AM (Range selection button)
Pressing the FM/AM button switches between AM, FM1 and FM2 bands. The selected band is displayed on the LCD display.
6. Station memory buttons
You can store six (6) stations in each of the AM, FM1 and FM2 bands into the memory of this radio.
7. SCAN (Automatic tuning button for received stations)
When you press this button, the frequency will increase and the receiver will tune in to the received stations one by one for 5 seconds. To stop, press this button again.
Storing station frequencies
You can store 6 AM stations and 12 FM stations in the audio system's memory. You can then select one of these stations by simply pressing the band selection button and one of the six station memory buttons. To store these stations in memory, follow these steps:
- Press the band selection button to select one of the AM, FM1 or FM2 bands.
- Select the station you want to store in memory using manual or automatic tuning.
- Select the station memory button to which you want to assign this station. Press and hold this station memory button for two seconds or more. The display will show an indicator with the number of the station memory button you have selected. After the frequency is stored in memory, its value will flash on the display. You must release the button and continue memorizing the next desired station. You can program a total of 18 stations, assigning one AM station and two FM stations to one button.
- Once programming is complete, you can turn on any of the programmed stations by selecting any of the AM, FM1 or FM2 bands and pressing the corresponding station frequency memory button.