HyundaiBook.ru
Repair Chevrolet Repair Honda Repair Toyota Repair Land Rover Repair VAZ Repair Renault Repair Nissan
English Русский
Български
Беларускі
Український
Српски
Hrvatski
Română
Polski
Slovenský
Magyar
ArticlesSitemapContacts  


  Accent   Elantra   Getz   Grandeur   Sonata   Santa Fe   Tucson   Others
Elantra 1 (1990-1995, petrol) Elantra 2 (1995-2000, petrol) Elantra 3 (2000-2006)
  • Main
  • Elantra
  • XD (2000-2006)
  • User manual
  • Audio system
  • Car CD Changer (H260)

Car CD Changer (H260) (Hyundai Elantra XD)

0
The car's CD changer, connected to the…


The car's CD changer, connected to the audio system, is located in the left-hand part of the luggage compartment.

To use the CD changer.

1. Open the sliding cover of the CD changer.

2. To eject the CD magazine, press the "EJECT" button located inside the CD changer.

3. Insert the CDs into the magazine.

4. Place the magazine into the CD changer and close the sliding cover.

The CD changer operates when the ignition switch is in the "ON" or "ACC" position.

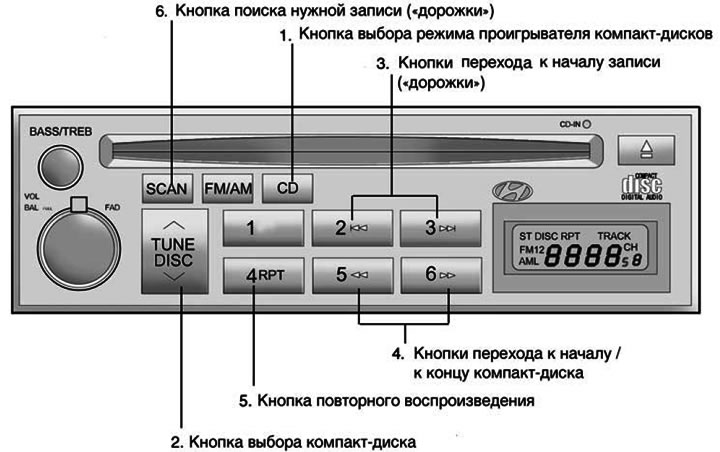
1. CD (CD Player Mode Select Button)


When there are CDs in the CD changer magazine, even if the stereo receiver is working, you can press this button to use the CD changer. The Hyundai CD changer can hold up to eight CDs. The display will show the disc number, track number and playing time.

2. DISC (CD Select Button)


To select the desired CD, click on the button to change the CD number.

3. Buttons for going to the beginning of the recording ("track")


Using the record number ("tracks"), you can select the desired record on the CD being played.


Press the ►► button once to skip to the beginning of the next entry. Press the ◄◄ button once to go to the beginning of the current recording.

4. ►►/◄◄ (Buttons to go to the beginning / end of the CD)


If you want to go to the beginning or end of the CD, press and hold the ►► (FF) or ◄◄ (REW) button.

When you release the button, the CD player will resume playback.

5. RPT (Replay button)


You can listen to the same recording again by pressing the RPT repeat button. To cancel, press the button again. If you do not disable this function, after the recording is finished, its playback will start again automatically. This process will repeat until you click this button again.

6. SCAN (Button for searching the desired record ("track"))


Pressing this button will play the first 10 seconds of each recording ("track").

When the melody you want is playing, press the SCAN button again for 10 seconds, and then the recording you have selected will sound in full and from the very beginning.

Note:
  • To ensure proper operation of the audio equipment, maintain normal air temperature in the vehicle using the air conditioning and heating systems of the vehicle.
  • When replacing a fuse, replace it with a fuse of the same rated current.
  • This equipment is designed for use only with a battery rated at 12VDC and negative ground.
  • This is high-precision electrical equipment. Do not attempt to disassemble or adjust it.
  • While driving, set the volume of the audio equipment so that you can hear outside sounds.
This article is available at russian, bulgarian, belarusian, ukrainian, serbian, croatian, romanian, polish, slovak, hungarian
This article has been reviewed by: Konstantin Smirnov
Add to social network:

Previous
Elantra 3: Audio system
Next

Operation of the CD player (H260)
Stereo Receiver Operation (H260)
Radio operation (H240)
Stereo Radio Operation (H240)
Stereo Receiver Operation (H210)
Stereo radio operation (H280)/(H290)
Radio operation (H280)/(H290)
CD Player (H280)/(H290)
CD changer (H280)/(H290)
Audio System Error Codes
Link in different formats to this article

Visitor comments
No comments yet


How much will 35 + 23 ?


Elantra 3 (2000-2006) 
  • User manual
  • Control devices
  • Audio system
  • Starting the engine and driving
  • Faults en route
  • Maintenance and care
  • Technical information
  • Power unit
  • Gasoline engines
  • Diesel engines
  • Lubrication system
  • Cooling system
  • Fuel system (gasoline)
  • Fuel system (diesel)
  • Decreased toxicity
  • Ignition system
  • Transmission
  • Clutch
  • Mechanical gearbox
  • Automatic gearbox
  • Drive shafts and axles
  • Chassis
  • Car suspension
  • Steering
  • Brake system
  • Body
  • Exterior (external elements)
  • Interior (internal elements)
  • Air conditioning system
  • Electrical equipment
  • Equipment and devices
  • Headlights and lighting
  • Power devices
  • Electrical circuits
Elantra 2 (1995-2000, petrol) 
  • General information
  • Maintenance
  • Power unit
  • Engine repair
  • Cooling system
  • Intake and exhaust system
  • Fuel system
  • Transmission
  • Clutch
  • Manual gearbox
  • Automatic gearbox
  • Drive shafts and axles
  • Chassis
  • Front suspension
  • Rear suspension
  • Steering
  • Brake system
  • Body
  • Body elements
  • Electrical equipment
  • Equipment and devices
  • Electrical diagrams
Elantra 1 (1990-1995, petrol) 
  • General information
  • Introduction to the guide
  • Maintenance
  • Power unit
  • Minor engine repair
  • Engine overhaul
  • Lubrication system
  • Cooling system
  • Fuel injection system
  • Ignition system
  • Exhaust system
  • Transmission
  • Clutch
  • Manual gearbox
  • Automatic gearbox
  • Drive shafts
  • Chassis
  • Front suspension
  • Rear suspension
  • Steering
  • Wheels and tires
  • Troubleshooting
  • Brake system
  • Body
  • Body elements
  • Electrical equipment
  • Equipment and devices
  • Power devices
  • Heating and air conditioning
  • Electrical circuits
HyundaiBook.ru © 2018-2026 · Mobile version · Sitemap: EN BG BY UA RS HR RO PL SK HU · Administration · Site search · Hyundai owners Accent 1 · Accent 2 · Accent 3 · Elantra 1 · Elantra 2 · Elantra 3 · Getz · Sonata 3 · Sonata 4 · Santa Fe 2 · Tucson 1 · Tucson 2 · Matrix ·
This site uses cookies to optimize its functionality. By continuing, you agree to our terms.