HyundaiBook.ru
Repair Chevrolet Repair Honda Repair Toyota Repair Land Rover Repair VAZ Repair Renault Repair Nissan
English Русский
Български
Беларускі
Український
Српски
Hrvatski
Română
Polski
Slovenský
Magyar
ArticlesSitemapContacts  


  Accent   Elantra   Getz   Grandeur   Sonata   Santa Fe   Tucson   Others
Elantra 1 (1990-1995, petrol) Elantra 2 (1995-2000, petrol) Elantra 3 (2000-2006)
  • Main
  • Elantra
  • J2 (1995-2000)
  • Transmission
  • Automatic gearbox
  • Differential — disassembly and assembly

Differential — disassembly and assembly (Hyundai Elantra J2)

0
Contents: Disassembly ⇓ Assembly ⇓
Differential — disassembly and assembly


Disassembly


1. Loosen the drive gear mounting bolts and remove it from the differential housing.

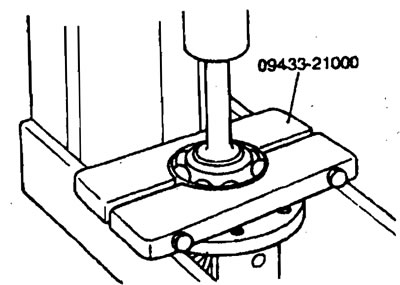
2. Using a special tool (09433-21000), remove the bearing.

2. Using a special tool (09433-21000),…


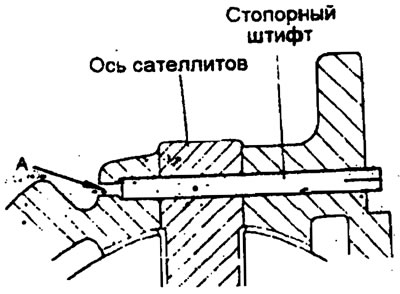
3. Using a punch inserted into hole "A", knock out the locking pin.

3. Using a punch inserted into hole…


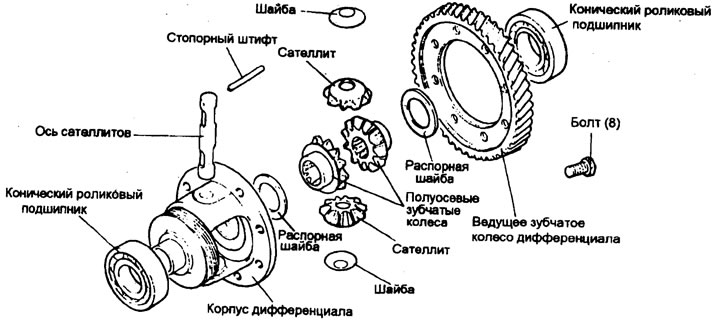
4. Remove the satellite shaft, satellites and washers.


5. Remove the axle gears and spacer bushings. Do not confuse the gears and spacers installed on the right and left sides.

Assembly


1. After installing spacers on the rear sides of the differential axle gears, install the gears into the differential housing. When reusing parts, install them in their original positions according to the marks made during disassembly.

When using new axle gears, install spacers of medium thickness 1.0 mm.

2. Install the washers on the back sides of the satellites. Install the satellites into the differential housing, then insert the satellite axle.

3. Measure the clearance between the axle gears and the satellites.

3. Measure the clearance between the…


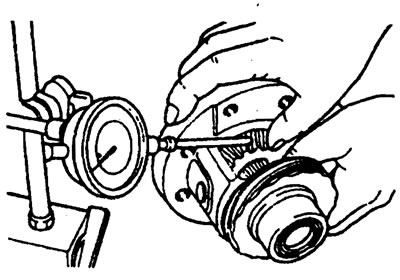
The gap should be 0.025-0.150 mm, and the gap in the pairs of gears on the right and left sides should be the same. If the clearance is outside the specified limits, disassemble the mechanism and reassemble it using other spacers that provide the normal clearance value.

Nominal value - 0.025-0.150 mm

4. Install the satellite axle locking pin in the direction shown in the figure. After installation, the pin should protrude no more than 3 mm.

4. Install the satellite axle locking…


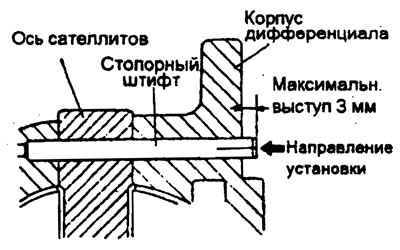
Precaution. The locking pin cannot be reused.


5. Press the bearings onto both ends of the differential housing. When installing bearings, press on the inner rings. Do not apply pressure to the outer rings of bearings.

6. Install the differential drive gear onto the housing.

7. Apply automatic transmission fluid to the bolts and tighten them to the specified torque.

Tightening torque: 130-140 Nm
This article is available at russian, bulgarian, belarusian, ukrainian, serbian, croatian, romanian, polish, slovak, hungarian
This article has been reviewed by: Konstantin Smirnov
Add to social network:

Previous
Elantra 2: Automatic gearbox
Next

Internal gear and external flange
Planetary gear
End coupling
Rear clutch
Front clutch
Valve body
Servo mechanism for forced downshifting
Speedometer drive
We recommend other articles on the topic of Hyundai manuals:

Differential — disassembly and assembly Hyundai Accent 1 (1994-1999)
Replacing the differential seal Hyundai Getz (2002-2011)
Differential — disassembly and assembly Hyundai Sonata 3 (1993-1998)

Link in different formats to this article

Visitor comments
No comments yet


How much will 14 + 49 ?


Elantra 3 (2000-2006) 
  • User manual
  • Control devices
  • Audio system
  • Starting the engine and driving
  • Faults en route
  • Maintenance and care
  • Technical information
  • Power unit
  • Gasoline engines
  • Diesel engines
  • Lubrication system
  • Cooling system
  • Fuel system (gasoline)
  • Fuel system (diesel)
  • Decreased toxicity
  • Ignition system
  • Transmission
  • Clutch
  • Mechanical gearbox
  • Automatic gearbox
  • Drive shafts and axles
  • Chassis
  • Car suspension
  • Steering
  • Brake system
  • Body
  • Exterior (external elements)
  • Interior (internal elements)
  • Air conditioning system
  • Electrical equipment
  • Equipment and devices
  • Headlights and lighting
  • Power devices
  • Electrical circuits
Elantra 2 (1995-2000, petrol) 
  • General information
  • Maintenance
  • Power unit
  • Engine repair
  • Cooling system
  • Intake and exhaust system
  • Fuel system
  • Transmission
  • Clutch
  • Manual gearbox
  • Automatic gearbox
  • Drive shafts and axles
  • Chassis
  • Front suspension
  • Rear suspension
  • Steering
  • Brake system
  • Body
  • Body elements
  • Electrical equipment
  • Equipment and devices
  • Electrical diagrams
Elantra 1 (1990-1995, petrol) 
  • General information
  • Introduction to the guide
  • Maintenance
  • Power unit
  • Minor engine repair
  • Engine overhaul
  • Lubrication system
  • Cooling system
  • Fuel injection system
  • Ignition system
  • Exhaust system
  • Transmission
  • Clutch
  • Manual gearbox
  • Automatic gearbox
  • Drive shafts
  • Chassis
  • Front suspension
  • Rear suspension
  • Steering
  • Wheels and tires
  • Troubleshooting
  • Brake system
  • Body
  • Body elements
  • Electrical equipment
  • Equipment and devices
  • Power devices
  • Heating and air conditioning
  • Electrical circuits
HyundaiBook.ru © 2018-2026 · Mobile version · Sitemap: EN BG BY UA RS HR RO PL SK HU · Administration · Site search · Hyundai owners Accent 1 · Accent 2 · Accent 3 · Elantra 1 · Elantra 2 · Elantra 3 · Getz · Sonata 3 · Sonata 4 · Santa Fe 2 · Tucson 1 · Tucson 2 · Matrix ·
This site uses cookies to optimize its functionality. By continuing, you agree to our terms.