
HyundaiBook.ru
Repair Chevrolet Repair Honda Repair Toyota Repair Land Rover Repair VAZ Repair Renault Repair Nissan
English Русский
Български
Беларускі
Український
Српски
Hrvatski
Română
Polski
Slovenský
Magyar
ArticlesSitemapContacts  


  Accent   Elantra   Getz   Grandeur   Sonata   Santa Fe   Tucson   Others
Sonata 3 (1993-1998) Sonata 4 (2001-2012, petrol)
  • Main
  • Sonata
  • Y3 (1993-1998)
  • Transmission
  • Mechanical gearbox
  • Differential — disassembly and assembly

Differential — disassembly and assembly (Hyundai Sonata Y3)

0
Contents: Disassembly ⇓ Assembly ⇓
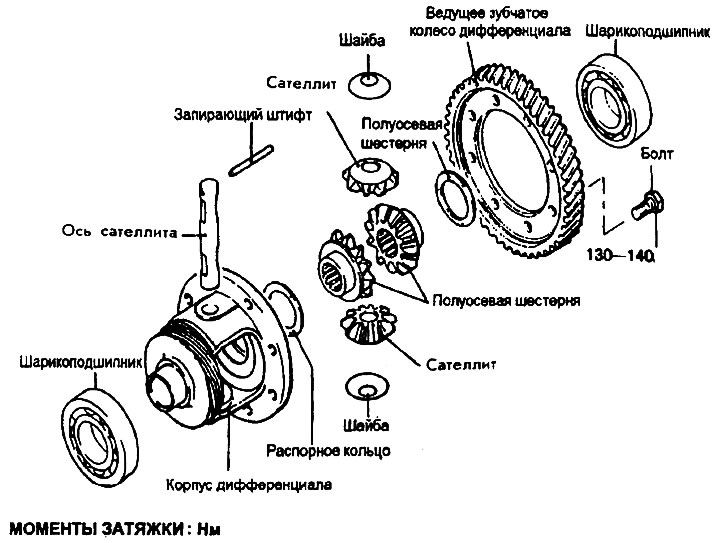
Differential — disassembly and assembly


Disassembly


1. Clamp the differential housing in a vice.

2. Remove the bolts holding the differential drive gear and remove it from the housing.

3. Remove the ball bearing using a special tool (09433-21000; 09532-11301)

4. Knock out the locking pin from hole A.

5. Knock out the satellite axle.

6. Remove both the pinions and washers, axle gears and spacer rings.
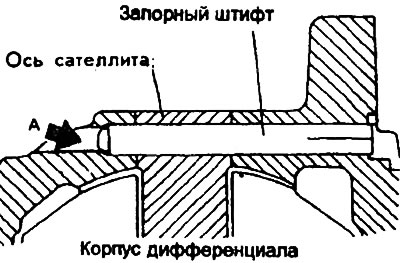
6. Remove both the pinions and washers, axle gears and spacer rings.


Assembly


1. Install the spacer ring on the rear side of the axle gear and then install the gear into the differential housing.

Warning:
  • 1. When installing a new axle gear, use a spacer ring of medium thickness (0.93-1.00 mm).
  • 2. Do not reuse the locking pin.
  • 3. The head of the locking pin must be recessed below the surface of the differential housing flange.


2. Place a washer on the back of each satellite and set both pinions to the required positions by engaging them with the axle gears by turning.
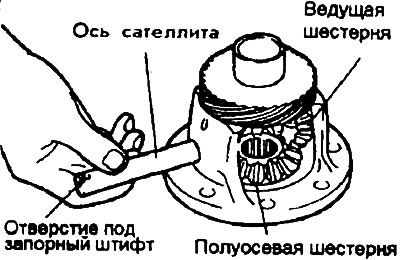


2. Place a washer on the back of each satellite and set both pinions to the…


3. Install the satellite axis.

4. Measure the clearance between the axle gears and the satellites.
  • Standard size: 0.025-0.150 mm

5. If the clearance is outside the specified limits, disassemble and install the proper spacer ring, then reassemble and remeasure.

Caution: Adjust the clearance for both axle gears to the same value.


6. Align the pin hole in the pinion shaft with the pin hole in the differential housing and install the pin.

Warning:
  • 1. Do not reuse the locking pin.
  • 2. The head of the locking pin must be recessed and located below the surface of the differential housing flange.

(The material is republished from the web portal: www.HyundaiBook.ru)
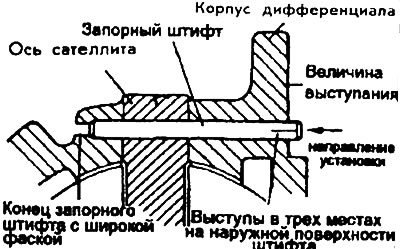

2. The head of the locking pin must be recessed and located below the surface…


7. Install the tapered roller bearings on both sides of the differential housing using the special tool (09455-21100).


Caution: When installing bearings with a press fit, apply pressure only to the inner race.


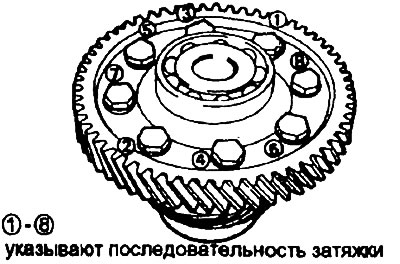
8. Apply the recommended sealant to the bolt threads and tighten them in the order shown in the illustration to the specified torque with the differential housing clamped in a vice.
  • Recommended sealant: Tri Bond 1303 or Loctite 648

Warning: If the bolt is reused, remove the old sealant from the threads.

Warning: If the bolt is reused, remove the old sealant from the threads.
This article is available at russian, bulgarian, belarusian, ukrainian, serbian, croatian, romanian, polish, slovak, hungarian
This article has been reviewed by: Konstantin Smirnov
Add to social network:

Previous
Sonata 3: Mechanical gearbox
Next

Shift Fork — Assembly
Output shaft — disassembly and assembly
Intermediate shaft — disassembly, inspection, assembly
Synchronizer bushing and hub
Drive shaft — removal and inspection
Clutch housing — disassembly and assembly
Speedometer Drive — Assembly
Drive shafts (half-axles) — technical characteristics
Drive shafts (half shafts) — tightening torques
Drive shafts (half shafts) — lubricants
We recommend other articles on the topic of Hyundai manuals:

Differential — disassembly and assembly Hyundai Accent 1 (1994-1999)
Differential — disassembly and assembly (gearbox up to 2000) Hyundai Elantra 1 (1990-1995, petrol)
Replacing the differential seal Hyundai Getz (2002-2011)

Link in different formats to this article

Visitor comments
No comments yet


How much will 22 + 25 ?


Sonata 4 (2001-2012, petrol) 
  • General information
  • User manual
  • Maintenance
  • Power unit
  • 2.0 and 2.4 liter engines
  • 2.7 liter engines
  • Engine overhaul
  • Cooling system
  • Intake and exhaust systems
  • Lubrication system
  • MFI fuel injection system
  • Engine electrical equipment
  • Transmission
  • Clutch
  • Mechanical gearbox
  • Automatic gearbox
  • Drive shafts
  • Chassis
  • Front suspension
  • Rear suspension
  • Steering
  • Brake system
  • Body
  • Exterior
  • Interior
  • Heater and air conditioner
  • Security systems
  • Electrical equipment
  • Troubleshooting
  • Electrical circuits
Sonata 3 (1993-1998) 
  • General information
  • Maintenance
  • Power unit
  • Engine repair I4 DOHC
  • Engine repair I4 SOHC
  • Engine repair V6 SOHC
  • Cooling system
  • Intake and exhaust system
  • Exhaust gas treatment
  • Fuel system
  • Transmission
  • Clutch
  • Mechanical gearbox
  • Automatic transmission KM-175
  • Automatic transmission F4A33
  • Chassis
  • Front suspension
  • Rear suspension
  • Steering
  • Brake system
  • Body
  • Body elements
  • Electrical equipment
  • Equipment and devices
HyundaiBook.ru © 2018-2026 · Mobile version · Sitemap: EN BG BY UA RS HR RO PL SK HU · Administration · Site search · Hyundai owners Accent 1 · Accent 2 · Accent 3 · Elantra 1 · Elantra 2 · Elantra 3 · Getz · Sonata 3 · Sonata 4 · Santa Fe 2 · Tucson 1 · Tucson 2 · Matrix ·
This site uses cookies to optimize its functionality. By continuing, you agree to our terms.