


1.8 and 2.0 liter I4 SOHC engine Hyundai Sonata 3

Single Overhead Camshaft Engines — Specifications
Technical specifications Characteristic Nominal value The Limit Engine type In-line overhead valve with overhead camshaft Number of cylinders 4 Cylinder diameter 1.8 l...
Technical specifications Characteristic Nominal value The Limit Engine type In-line overhead valve with overhead camshaft Number of cylinders 4 Cylinder diameter 1.8 l...
Single Overhead Camshaft Engines — Tightening Torques
Cylinder head bolts Cold engine - 90-100 Hot engine - 100-110 Front Cover Bolts - 20-27 Camshaft Pulley Bolt - 80-100 Valve Cover Bolts - 5-7 Bolts (large) of shaft...
Cylinder head bolts Cold engine - 90-100 Hot engine - 100-110 Front Cover Bolts - 20-27 Camshaft Pulley Bolt - 80-100 Valve Cover Bolts - 5-7 Bolts (large) of shaft...
Adjusting valve clearances
Since the intake and exhaust valves are equipped with automatic adjustment mechanisms, there is no need to adjust the valve clearances. The correct operation of the...
Since the intake and exhaust valves are equipped with automatic adjustment mechanisms, there is no need to adjust the valve clearances. The correct operation of the...

Tightening the cylinder head bolts
1. Using a special tool (09221-32001), tighten them lightly at first and then fully to the required torque. Bolt tightening torque: Cold engine (temperature...
1. Using a special tool (09221-32001), tighten them lightly at first and then fully to the required torque. Bolt tightening torque: Cold engine (temperature...
Checking the engine oil level
1. Place the vehicle on a level surface. 2. Turn off the engine. Note: If the vehicle has not been used for a long time, let the engine run for a few minutes before...
1. Place the vehicle on a level surface. 2. Turn off the engine. Note: If the vehicle has not been used for a long time, let the engine run for a few minutes before...

Selecting engine oil
Recommendation (API classification): SE or higher. SAE recommended viscosity grades: *1. Limited by traffic and climate conditions. *2. Not recommended for long-term use...
Recommendation (API classification): SE or higher. SAE recommended viscosity grades: *1. Limited by traffic and climate conditions. *2. Not recommended for long-term use...
Changing engine oil
1. Warm up the engine. 2. Turn off the engine. 3. Remove the oil filler plug (on the valve cover) and the drain plug (on the oil pan) and drain the old oil. 4. Tighten...
1. Warm up the engine. 2. Turn off the engine. 3. Remove the oil filler plug (on the valve cover) and the drain plug (on the oil pan) and drain the old oil. 4. Tighten...

Replacing the oil filter
Select filter All Hyundai Motor Company engines are equipped with high-quality full-flow oil filters with replaceable filter elements. The quality of replacement filters...
Select filter All Hyundai Motor Company engines are equipped with high-quality full-flow oil filters with replaceable filter elements. The quality of replacement filters...

Checking and adjusting the intake valve
For vehicles running on unleaded petrol 1. Start the engine and let it run until the coolant temperature reaches 80-95°C. 2. Check the ignition timing and idle speed and...
For vehicles running on unleaded petrol 1. Start the engine and let it run until the coolant temperature reaches 80-95°C. 2. Check the ignition timing and idle speed and...

Timing Belt Tension Adjustment Procedure
1. Remove the upper front timing belt cover. 2. Turn the crankshaft clockwise and make sure there are no malfunctions. 3. Turn the crankshaft clockwise until the piston...
1. Remove the upper front timing belt cover. 2. Turn the crankshaft clockwise and make sure there are no malfunctions. 3. Turn the crankshaft clockwise until the piston...

Adjusting the tension of the toothed belt «B»
1. Press the toothed belt tensioner "B" with your hand in the direction of the arrow to create pressure on the toothed belt so that its working branch is taut. Now...
1. Press the toothed belt tensioner "B" with your hand in the direction of the arrow to create pressure on the toothed belt so that its working branch is taut. Now...


Engine Mounting — Removal
Attach the cable to the engine brackets and lift it up to take the load off the dampers. 1. Loosen the bolts securing the engine to the dampers. 2. Remove the mounting...
Attach the cable to the engine brackets and lift it up to take the load off the dampers. 1. Loosen the bolts securing the engine to the dampers. 2. Remove the mounting...

Engine and gearbox assembly — removal
Removal 1. Remove the battery. 2. Disconnect the air filter. 3. Disconnect the wire connectors to the reversing lights and the engine compartment wiring. 4. Disconnect...
Removal 1. Remove the battery. 2. Disconnect the air filter. 3. Disconnect the wire connectors to the reversing lights and the engine compartment wiring. 4. Disconnect...


Timing belt — removal and installation
Removal 1. Set the piston of cylinder No.1 at the top dead center of the compression stroke. 2. Remove the drive belt and coolant pump pulley. 3. Remove the crankshaft...
Removal 1. Set the piston of cylinder No.1 at the top dead center of the compression stroke. 2. Remove the drive belt and coolant pump pulley. 3. Remove the crankshaft...


Rocker arms and their shafts — removal and installation
Removal and inspection 1. Before removing the rocker arm assembly and its shafts, using a special tool (09246- 32000), make sure that the automatic clearance adjuster...
Removal and inspection 1. Before removing the rocker arm assembly and its shafts, using a special tool (09246- 32000), make sure that the automatic clearance adjuster...

Camshaft — Check
Examination 1. Replace the camshaft if the following areas are severely worn or damaged. 1) Necks. 2) Cam lobes. 3) Fuel pump drive cam. 4) Teeth of the ignition...
Examination 1. Replace the camshaft if the following areas are severely worn or damaged. 1) Necks. 2) Cam lobes. 3) Fuel pump drive cam. 4) Teeth of the ignition...


Cylinder head — removal, inspection, installation
Removal 1. Loosen the intake manifold mounting bolts and nuts and remove the manifold and its gasket. 2. Remove the exhaust manifold mounting nuts and washers, remove...
Removal 1. Loosen the intake manifold mounting bolts and nuts and remove the manifold and its gasket. 2. Remove the exhaust manifold mounting nuts and washers, remove...


Valves and valve springs — removal and installation
Removal 1. Using a special tool (09222—21001), remove the crackers. Remove the upper plate, valve spring, lower plate and valve. Note: Lay out all removed parts in the...
Removal 1. Using a special tool (09222—21001), remove the crackers. Remove the upper plate, valve spring, lower plate and valve. Note: Lay out all removed parts in the...


Front Cover, Oil Pump and Balance Shafts — Removal, Check, Installation
Removal 1. Remove the oil filter. 2. Remove the oil pan. 3. Remove the oil receiver and gasket. 4. Remove the relief valve plug and gasket, and then remove the relief...
Removal 1. Remove the oil filter. 2. Remove the oil pan. 3. Remove the oil receiver and gasket. 4. Remove the relief valve plug and gasket, and then remove the relief...
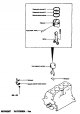

Pistons and connecting rods — removal and installation
Removal Connecting rod lower head cover 1. For subsequent installation, arrange the liners in the order corresponding to the location of the connecting rods (according...
Removal Connecting rod lower head cover 1. For subsequent installation, arrange the liners in the order corresponding to the location of the connecting rods (according...


Crankshaft — disassembly, inspection and installation
Disassembly 1. Remove the timing belt sprockets, front cover, flywheel, flywheel cylindrical rim and oil pan. 2. Remove the rear plate and rear oil seal. 3. Remove the...
Disassembly 1. Remove the timing belt sprockets, front cover, flywheel, flywheel cylindrical rim and oil pan. 2. Remove the rear plate and rear oil seal. 3. Remove the...


Cylinder Block — Removal and Assembly
Removal Remove the cylinder head, timing belt sprockets, front cover, flywheel, pistons and crankshaft. Examination Cylinder block 1. Visually check the cylinder block...
Removal Remove the cylinder head, timing belt sprockets, front cover, flywheel, pistons and crankshaft. Examination Cylinder block 1. Visually check the cylinder block...

Selecting engine oil
Recommendation (according to API classification): SE or higher SG or SG/CD SAE Recommended Oil Brands. *1. Limited by traffic and climate conditions. *2. Not recommended...
Recommendation (according to API classification): SE or higher SG or SG/CD SAE Recommended Oil Brands. *1. Limited by traffic and climate conditions. *2. Not recommended...
This section is available on russian, bulgarian, belarusian, ukrainian, serbian, croatian, romanian, polish, slovak, hungarian
We recommend other sections on the topic of Hyundai manuals:
Power unit: SOHC engines Hyundai Accent 1 (1994-1999)
Power unit: Engine repair 1.1/1.3 l Hyundai Getz (2002-2011)
Link in different formats to this section
TextHTMLBB Code
- General information
- User manual
- Maintenance
- Power unit
- 2.0 and 2.4 liter engines
- 2.7 liter engines
- Engine overhaul
- Cooling system
- Intake and exhaust systems
- Lubrication system
- MFI fuel injection system
- Engine electrical equipment
- Transmission
- Clutch
- Mechanical gearbox
- Automatic gearbox
- Drive shafts
- Chassis
- Front suspension
- Rear suspension
- Steering
- Brake system
- Body
- Exterior
- Interior
- Heater and air conditioner
- Security systems
- Electrical equipment
- Troubleshooting
- Electrical circuits
- General information
- Maintenance
- Power unit
- Engine repair I4 DOHC
- Engine repair I4 SOHC
- Engine repair V6 SOHC
- Cooling system
- Intake and exhaust system
- Exhaust gas treatment
- Fuel system
- Transmission
- Clutch
- Mechanical gearbox
- Automatic transmission KM-175
- Automatic transmission F4A33
- Chassis
- Front suspension
- Rear suspension
- Steering
- Brake system
- Body
- Body elements
- Electrical equipment
- Equipment and devices