Removal
1. Set the piston of cylinder No.1 at the top dead center of the compression stroke.
2. Remove the drive belt and coolant pump pulley.
3. Remove the crankshaft pulley and the upper and lower timing belt covers.
4. Slide the tensioner fully toward the coolant pump and secure the tensioner.
5. If the timing belt has already been used, mark it with an arrow indicating the direction of its movement so that when the belt is installed, it moves in the same direction.
6. Remove the toothed belt from the toothed pulleys.
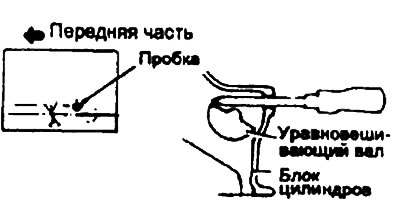
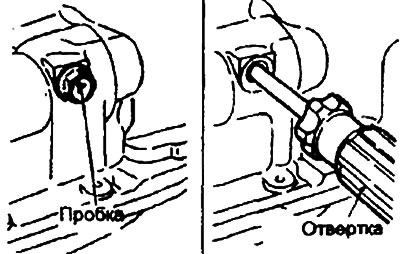
7. When loosening the oil pump toothed pulley nut, first remove the plug on the left side of the cylinder block and insert a screwdriver into the hole to hold the balance shaft in position. The screwdriver used for this purpose should have an 8 mm diameter shaft and should be inserted to a depth of more than 60 mm.
8. Loosen the oil pump toothed pulley mounting nut and remove its toothed pulley.
9. Loosen the right balance shaft toothed pulley mounting bolt until it can be unscrewed by hand.
10. Remove tensioner "B" and toothed belt "B".
Warning: After removing the timing belt "B", do not attempt to remove the bolt by holding the timing pulley with pliers, etc.
11. Remove toothed pulley "B" from the crankshaft.
12. Check the belt carefully. If there are any defects, replace the belt with a new one.

Installation
Toothed pulleys and tensioner
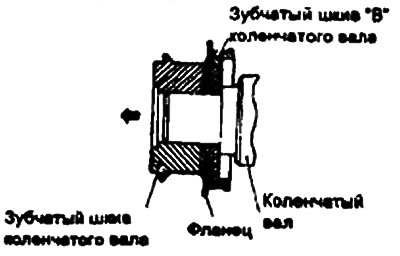
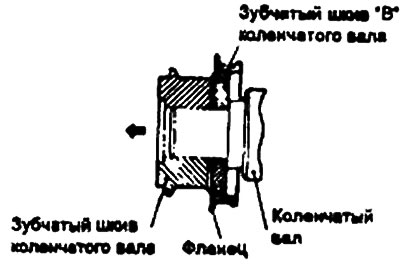
1. Install toothed pulley "B" on the crankshaft.
Warning: Pay particular attention to the location of the flange. If installed incorrectly, the belt may break.
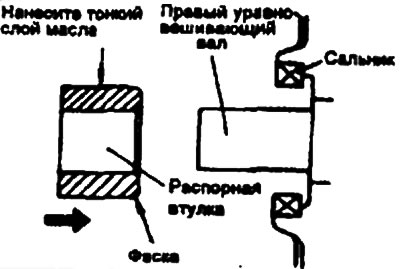
2. Apply a thin layer of engine oil to the outer surface of the spacer sleeve and install it onto the right balance shaft in the direction shown in the figure.
3. Install the toothed pulley onto the right balance shaft and hand tighten the flange bolt.
4. Install toothed belt "B" and adjust its tension.
5. Tighten the right balance shaft toothed pulley bolt.
- Tightening torque: Toothed pulley bolt - 35-40 Nm.
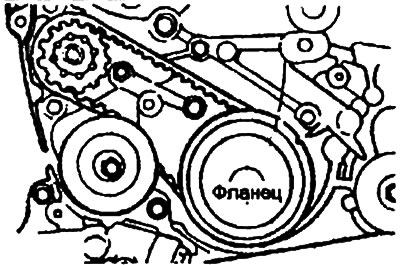
6. Install the flange and toothed pulley onto the crankshaft. Make sure to install in the direction shown in the figure.
Warning: Pay attention to the location of the flange. If installed incorrectly, the belt may break.
7. Install the special spacer sleeve and toothed pulley bolt onto the crankshaft, then tighten the toothed pulley bolt.
- Tightening torque: Crankshaft toothed pulley bolt - 110-130 Nm.
8. Install the timing pulley onto the camshaft and tighten the bolt.
- Tightening torque: Camshaft timing pulley bolt - 80-100 Nm.
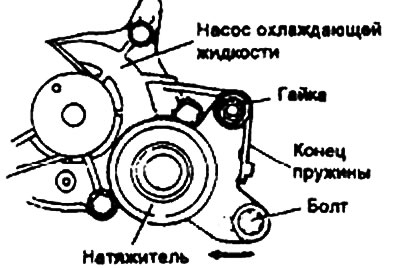
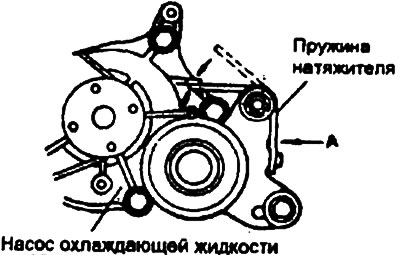
9. Install the spacer sleeve, tensioner and tensioner spring.
10. Secure end A of the spring to the tensioner bracket.
11. Position end B of the spring on the coolant pump housing.
12. Install the timing belt and adjust its tension.
13. Install the timing belt covers.
14. Install the crankshaft pulley and tip, then tighten the bolts.
- Tightening torque: Crankshaft pulley bolts - 20-30 Nm.
Timing Belt Installation Sequence
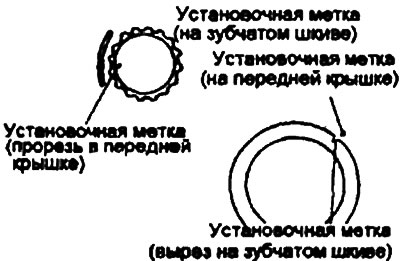
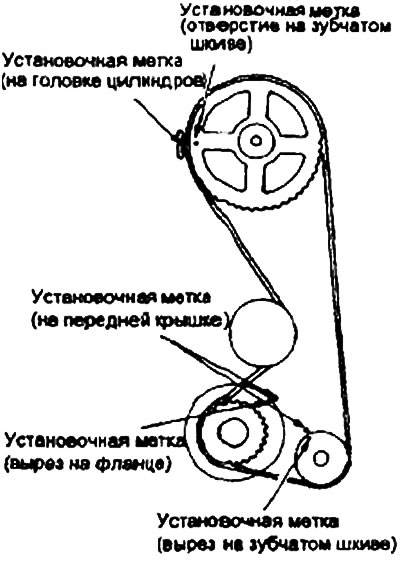
1. Align the timing marks on all toothed pulleys with the corresponding marks on the front cover.
2. After installing toothed belt "B", make sure that there is no sagging in its working section.
3. Install tensioner "B" so that the pulley center is located to the left of the mounting bolt and the pulley flange is facing the front of the engine.
4. Align the timing marks of the front cover right balance shaft sprocket.
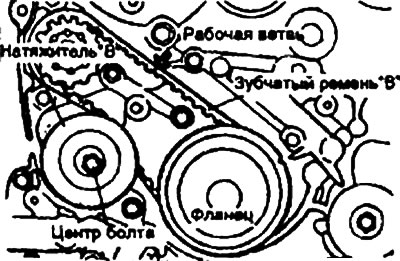
5. Raise tensioner "B" to tension toothed belt "B" so that its working branch is taut. At this point, tighten the tensioner mounting bolt "B". When tightening the bolt, take measures to prevent the shaft from rotating together with the bolt. If the shaft turns, the belt will be over-tensioned.
Tighten the right balance shaft flange mounting bolt.
6. Make sure the alignment marks match.
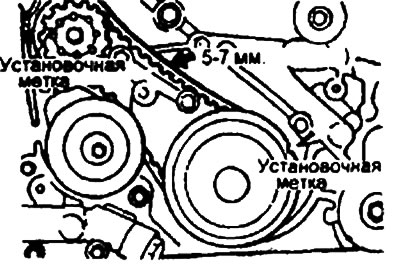
7. Make sure that when you press the center of the working section of the belt with your index finger, the deflection of the belt is as shown below.
- Belt deviation: 5-7 mm.
8. Move the tensioner fully toward the coolant pump and temporarily secure the tensioner.
9. Align the timing marks on the camshaft sprocket and on the cylinder head.
10. Align the timing marks on the crankshaft sprocket and the front cover.
11. Align the timing marks on the oil pump toothed pulley and on the front cover.
12. After aligning the mark on the oil pump pulley with the mark on the front cover, remove the plug on the left side of the cylinder block and insert an 8 mm screwdriver into the hole. If it can be inserted 60 mm or more, the alignment is correct. If it can only be inserted 25 mm, turn the oil pump toothed pulley one turn and align the marks again. Make sure that the screwdriver can be inserted more than 60 mm. Keep the screwdriver inserted until the toothed belt is installed.
13. Install the toothed belt (the working branch of the belt should not sag); install the toothed belt on the toothed pulleys of the crankshaft, oil pump
and the camshaft in exactly this order.
14. Loosen the tensioner bolt and nut. This will cause the spring to move the tensioner and apply tension to the belt.
15. Inspect the belt area and make sure the belt is pressed against the pulley.
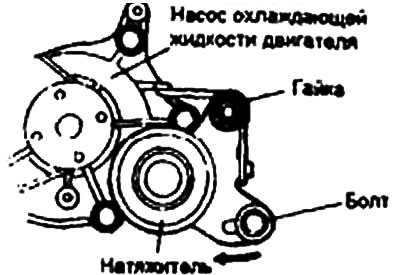
16. Tighten the tensioner mounting bolt and nut.
First tighten the bolt located in the bracket slot, and then tighten the nut installed on its pivot axis. If you tighten the nut first, the tensioner bracket will turn with it and the belt will be over-tensioned.

17. Make sure that the timing marks on all toothed pulleys are aligned with the corresponding marks.
18. Turn the crankshaft one turn clockwise.
Warning: Do not rotate the crankshaft in the opposite direction.
19. Loosen the tensioner mounting nut and bolt.
20. Tighten the tensioner mounting nut and bolt.
Tighten the nut and bolt in the order specified in point 16.
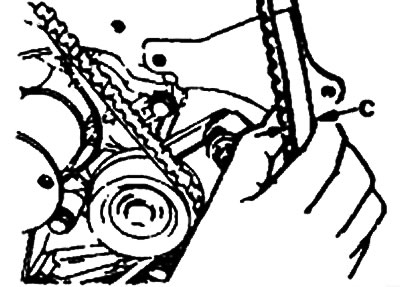
21. Make sure that the clearance "C" between the belt and the cover sealing line corresponds to the specified value.
- Gap "C" - approximately 14 mm.