HyundaiBook.ru
Repair Chevrolet Repair Honda Repair Toyota Repair Land Rover Repair VAZ Repair Renault Repair Nissan
English Русский
Български
Беларускі
Український
Српски
Hrvatski
Română
Polski
Slovenský
Magyar
ArticlesSitemapContacts  


  Accent   Elantra   Getz   Grandeur   Sonata   Santa Fe   Tucson   Others
Sonata 3 (1993-1998) Sonata 4 (2001-2012, petrol)
  • Main
  • Sonata
  • Y3 (1993-1998)
  • Transmission
  • Mechanical gearbox
  • Synchronizer bushing and hub

Synchronizer bushing and hub (Hyundai Sonata Y3)

0
Contents: Crackers and synchronizer spring ⇓ Transmissions ⇓ Assembly ⇓
1. Assemble the synchronizer sleeve and its hub and check the smoothness of their movement.

2. Check the bushing for damage at its inner, front and rear ends.

3. Check the wear of the end surfaces of the hub.

Replace the synchronizer sleeve and hub as a set.

Crackers and synchronizer spring


(The material is reprinted from another resource: «www.hyundaibook.ru»)

1. Check if the central projection of the synchronizer key is worn.

2. Check that the spring is not weakened, deformed or damaged.

Transmissions


1. Check the bevel gear and clutch gear teeth for damage and wear.

2. Check whether the surface of the synchronizer cone is rough, damaged or worn.

3. Check the gear bore and front and rear ends for damage and wear.

Assembly


1. Install the hub and synchronizer sleeve so that they are positioned as shown in the figure.

1. Install the hub and synchronizer…


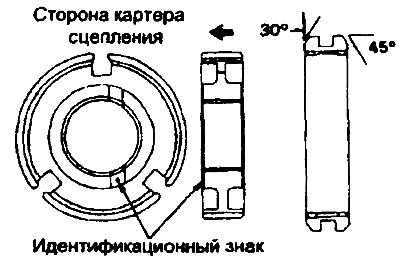
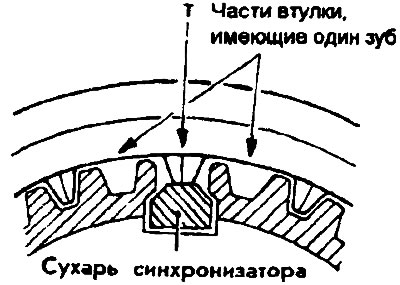
2. The synchronizer sleeve has teeth that are interrupted in six places.

Assemble this sleeve with the hub so that the central tooth located between the two teeth where there is a gap touches the synchronizer key.


Assemble this sleeve with the hub so…


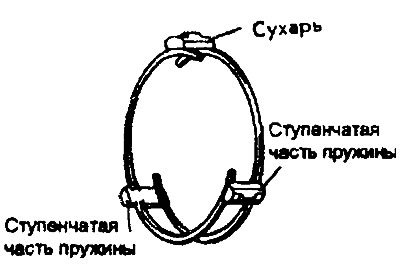
3. Install the synchronizer spring so that its protrusion can enter the groove in the synchronizer crackers.

When installing the synchronizer springs, make sure that the front and rear springs are not facing in the same direction.

When installing the synchronizer…


4. Install the needle bearing and third speed gear onto the input shaft.

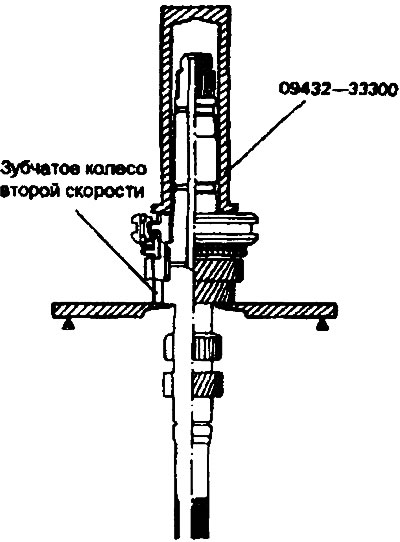
5. Install the third-fourth speed synchronizer assembly onto the input shaft using the special tool (09432-33300).

5. Install the third-fourth speed…


Warning:
  • 1. When installing the synchronizer unit, make sure that the three synchronizer crackers are properly installed in the corresponding grooves of the synchronizer ring.
  • 2. After installing the synchronizer unit, check whether the third gear gear rotates smoothly.


6. Install the needle bearing using the same special tool (09432-33300).


7. Install the synchronizer ring, needle bearing, fourth speed gear and spacer ring.

8. Install the snap ring.

9. Install the rear bearing using the special tool (09432-33300).

10. Install the clamping ring.

11. Install the rear bearing bushing using the special tool (09432-33300).

12. Install the front bearing using the special tool (09432-33300).
This article is available at russian, bulgarian, belarusian, ukrainian, serbian, croatian, romanian, polish, slovak, hungarian
This article has been reviewed by: Konstantin Smirnov
Add to social network:

Previous
Sonata 3: Mechanical gearbox
Next

Drive shaft — removal and inspection
Manual gearbox — disassembly and installation
Gear Shift Lever Assembly — Check
Manual transmission control
Possible malfunctions
Intermediate shaft — disassembly, inspection, assembly
Output shaft — disassembly and assembly
Shift Fork — Assembly
Differential — disassembly and assembly
Clutch housing — disassembly and assembly
We recommend other articles on the topic of Hyundai manuals:

Replacing the valve guide bushing Hyundai Accent 2 (1999-2005)
Rear Lower Control Arm Bushing (Pre-2002 Models) — Replacement Hyundai Elantra 1 (1990-1995, petrol)
Installing the compressor bushing and pulley Hyundai Tucson 1 (2005-2010)

Link in different formats to this article

Visitor comments
No comments yet


How much will 46 + 27 ?


Sonata 4 (2001-2012, petrol) 
  • General information
  • User manual
  • Maintenance
  • Power unit
  • 2.0 and 2.4 liter engines
  • 2.7 liter engines
  • Engine overhaul
  • Cooling system
  • Intake and exhaust systems
  • Lubrication system
  • MFI fuel injection system
  • Engine electrical equipment
  • Transmission
  • Clutch
  • Mechanical gearbox
  • Automatic gearbox
  • Drive shafts
  • Chassis
  • Front suspension
  • Rear suspension
  • Steering
  • Brake system
  • Body
  • Exterior
  • Interior
  • Heater and air conditioner
  • Security systems
  • Electrical equipment
  • Troubleshooting
  • Electrical circuits
Sonata 3 (1993-1998) 
  • General information
  • Maintenance
  • Power unit
  • Engine repair I4 DOHC
  • Engine repair I4 SOHC
  • Engine repair V6 SOHC
  • Cooling system
  • Intake and exhaust system
  • Exhaust gas treatment
  • Fuel system
  • Transmission
  • Clutch
  • Mechanical gearbox
  • Automatic transmission KM-175
  • Automatic transmission F4A33
  • Chassis
  • Front suspension
  • Rear suspension
  • Steering
  • Brake system
  • Body
  • Body elements
  • Electrical equipment
  • Equipment and devices
HyundaiBook.ru © 2018-2026 · Mobile version · Sitemap: EN BG BY UA RS HR RO PL SK HU · Administration · Site search · Hyundai owners Accent 1 · Accent 2 · Accent 3 · Elantra 1 · Elantra 2 · Elantra 3 · Getz · Sonata 3 · Sonata 4 · Santa Fe 2 · Tucson 1 · Tucson 2 · Matrix ·
This site uses cookies to optimize its functionality. By continuing, you agree to our terms.