HyundaiBook.ru
Repair Chevrolet Repair Honda Repair Toyota Repair Land Rover Repair VAZ Repair Renault Repair Nissan
English Русский
Български
Беларускі
Український
Српски
Hrvatski
Română
Polski
Slovenský
Magyar
ArticlesSitemapContacts  


  Accent   Elantra   Getz   Grandeur   Sonata   Santa Fe   Tucson   Others
Elantra 1 (1990-1995, petrol) Elantra 2 (1995-2000, petrol) Elantra 3 (2000-2006)
  • Main
  • Elantra
  • J1 (1990-1995)
  • Electrical equipment
  • Equipment and devices
  • Replacement of outdoor lighting lamps

Replacement of outdoor lighting lamps (Hyundai Elantra J1)

0
Contents: Headlights ⇓ Front direction indicators ⇓ Front parking light ⇓ Fog lights, reversing lights ⇓ Side direction indicators ⇓ Rear lights ⇓ License plate lighting ⇓

Headlights


Turn off the corresponding switch.

Open the engine compartment hood.

After removing the battery retaining bar next to the right headlight, lift up the coolant expansion tank and the windshield washer reservoir (if necessary). Do not place tanks on the engine or battery.
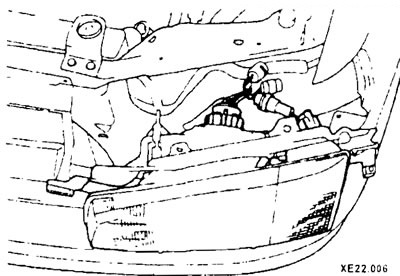
After removing the battery retaining bar next to the right headlight, lift up…


Detach and remove the rubber cap.

Detach and remove the rubber cap.


Release the lamp retaining spring from the latch and fold it back.
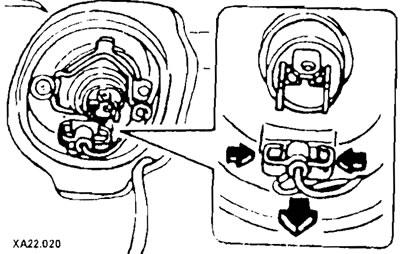
Release the lamp retaining spring from the latch and fold it back.


Remove the burnt-out bulb.


Insert the tabs of the new lamp into the corresponding holes in the housing. Hold the lamp by the socket, not by the glass.

Insert and snap the spring clip of the lamp into place.

Place the rubber cap on the back of the headlight bulb and insert the socket into the socket.

Reinstall the coolant and windshield washer fluid reservoirs. Secure the battery.

Check the headlight adjustment.

To replace the headlight, remove the front trim.
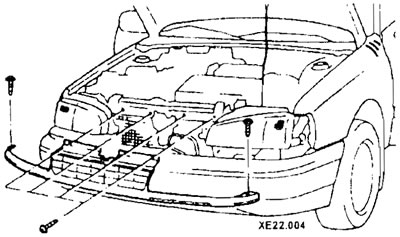
To replace the headlight, remove the front trim.


Loosen the mounting screws and remove the headlight.
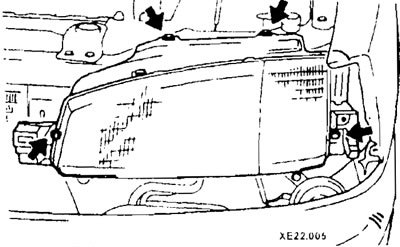
Loosen the mounting screws and remove the headlight.


Front direction indicators


To access the back of the turn signal, move the battery slightly towards the middle of the vehicle.
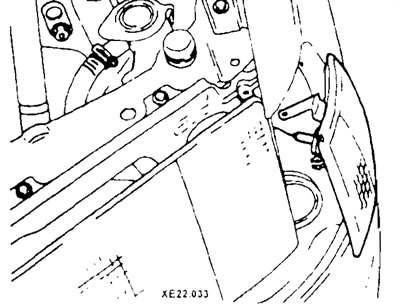
To access the back of the turn signal, move the battery slightly towards the…


Disconnect the spring from the rear of the engine compartment light and pull the indicator light forward.


After removing the socket from the back of the indicator lamp, replace the incandescent bulb.

Insert the projections of the flashlight with the inserted socket into the corresponding mounts. Attach the spring to the back side.
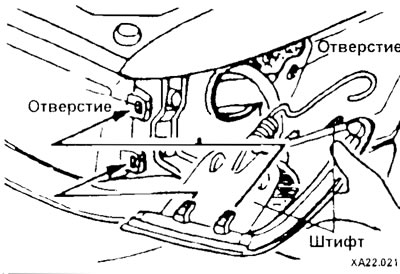
Insert the projections of the flashlight with the inserted socket into the…


Front parking light


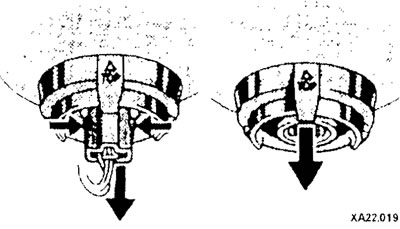
From the back of the headlight, pull out the socket by squeezing the side clamps. Press the bulb lightly into the socket, turn it 90° (¼ turn) to the left and remove it.

Insert the new bulb, press it lightly and turn it to the right. Insert the cartridge.

Fog lights, reversing lights


After unscrewing the mounting screws, remove the protective glass.

Remove all bulbs from their sockets.

Insert and press down lightly on the new bulbs.

After replacing the damaged rubber gasket, secure the protective glass.

Side direction indicators


Use a screwdriver to pry the glass off. Turn the socket to the left to remove it, then the lamp. Insert the new bulb (2) and snap the socket and glass into place.
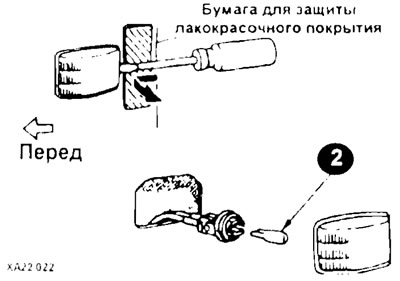
Use a screwdriver to pry the glass off. Turn the socket to the left to remove…


Rear lights


Remove the trim in the trunk.

Disconnect the connector from the lamp holder.
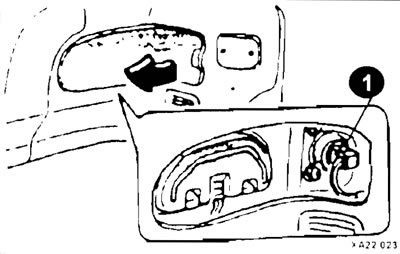
Disconnect the connector from the lamp holder.


Remove the connector (1) by turning the cartridge to the left and take it out. Lightly press the burnt-out bulb into the socket, turn it 90° (¼ turn) and remove it.

After installing the new bulb, snap the glass into place.

To replace the rear light, you need to unscrew the nuts.
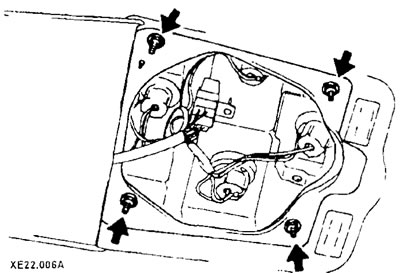
To replace the rear light, you need to unscrew the nuts.


License plate lighting


Press the burnt-out lamp lightly into the socket, turn it 90° (¼ turn) to the left and remove it. After inserting the new bulb, press and turn to the right.
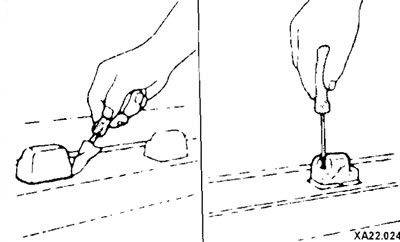
Press the burnt-out lamp lightly into the socket, turn it 90° (¼ turn) to the…
This article is available at russian, bulgarian, belarusian, ukrainian, serbian, croatian, romanian, polish, slovak, hungarian
This article has been reviewed by: Konstantin Smirnov
Add to social network:

Previous
Elantra 1: Equipment and devices
Next

General description of the lighting system
Fuses
General description of the vehicle's electrical equipment
General recommendations for troubleshooting electrical equipment
Basic concepts of electricity
Headlight adjustment
Front fog lights
Replacing the brush rubber
Windscreen wiper motor — removal and installation
Windscreen washer
We recommend other articles on the topic of Hyundai manuals:

Replacement of lamps. Lighting of luggage compartment Hyundai Accent 3 (2005-2010)
Replacing lamps in lighting fixtures Hyundai Getz (2002-2011)
Malfunctions of lighting and light signaling devices Hyundai Sonata 3 (1993-1998)
Outdoor Lighting Control Panel Hyundai Santa Fe 2 (2007-2012, petrol)
Sound signaling device for external lighting not switched off… Hyundai Tucson 1 (2005-2010)
Front passenger compartment lighting lamps Hyundai Matrix (2001-2010, petrol)

Link in different formats to this article

Visitor comments
No comments yet


How much will 48 + 24 ?


Elantra 3 (2000-2006) 
  • User manual
  • Control devices
  • Audio system
  • Starting the engine and driving
  • Faults en route
  • Maintenance and care
  • Technical information
  • Power unit
  • Gasoline engines
  • Diesel engines
  • Lubrication system
  • Cooling system
  • Fuel system (gasoline)
  • Fuel system (diesel)
  • Decreased toxicity
  • Ignition system
  • Transmission
  • Clutch
  • Mechanical gearbox
  • Automatic gearbox
  • Drive shafts and axles
  • Chassis
  • Car suspension
  • Steering
  • Brake system
  • Body
  • Exterior (external elements)
  • Interior (internal elements)
  • Air conditioning system
  • Electrical equipment
  • Equipment and devices
  • Headlights and lighting
  • Power devices
  • Electrical circuits
Elantra 2 (1995-2000, petrol) 
  • General information
  • Maintenance
  • Power unit
  • Engine repair
  • Cooling system
  • Intake and exhaust system
  • Fuel system
  • Transmission
  • Clutch
  • Manual gearbox
  • Automatic gearbox
  • Drive shafts and axles
  • Chassis
  • Front suspension
  • Rear suspension
  • Steering
  • Brake system
  • Body
  • Body elements
  • Electrical equipment
  • Equipment and devices
  • Electrical diagrams
Elantra 1 (1990-1995, petrol) 
  • General information
  • Introduction to the guide
  • Maintenance
  • Power unit
  • Minor engine repair
  • Engine overhaul
  • Lubrication system
  • Cooling system
  • Fuel injection system
  • Ignition system
  • Exhaust system
  • Transmission
  • Clutch
  • Manual gearbox
  • Automatic gearbox
  • Drive shafts
  • Chassis
  • Front suspension
  • Rear suspension
  • Steering
  • Wheels and tires
  • Troubleshooting
  • Brake system
  • Body
  • Body elements
  • Electrical equipment
  • Equipment and devices
  • Power devices
  • Heating and air conditioning
  • Electrical circuits
HyundaiBook.ru © 2018-2026 · Mobile version · Sitemap: EN BG BY UA RS HR RO PL SK HU · Administration · Site search · Hyundai owners Accent 1 · Accent 2 · Accent 3 · Elantra 1 · Elantra 2 · Elantra 3 · Getz · Sonata 3 · Sonata 4 · Santa Fe 2 · Tucson 1 · Tucson 2 · Matrix ·
This site uses cookies to optimize its functionality. By continuing, you agree to our terms.