HyundaiBook.ru
Repair Chevrolet Repair Honda Repair Toyota Repair Land Rover Repair VAZ Repair Renault Repair Nissan
English Русский
Български
Беларускі
Український
Српски
Hrvatski
Română
Polski
Slovenský
Magyar
ArticlesSitemapContacts  


  Accent   Elantra   Getz   Grandeur   Sonata   Santa Fe   Tucson   Others
Elantra 1 (1990-1995, petrol) Elantra 2 (1995-2000, petrol) Elantra 3 (2000-2006)
  • Main
  • Elantra
  • J2 (1995-2000)
  • Transmission
  • Manual gearbox
  • Gearbox control

Gearbox control (Hyundai Elantra J2)

0
Contents: Removal ⇓ Examination ⇓ Installation ⇓
Tightening torque: Nm

Tightening torque: Nm


Removal


1. Remove the console assembly.

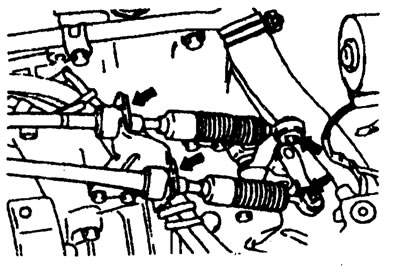
2. Remove the cotter pins and clamps (from the gear shift lever side).

2. Remove the cotter pins and clamps…


3. Remove the gear shift lever assembly.

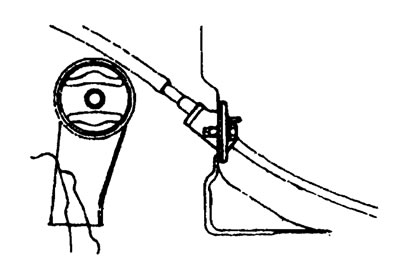
4. Remove the holder and bolts.

5. Remove the cotter pins and clamps (from the gearbox side).

5. Remove the cotter pins and clamps…


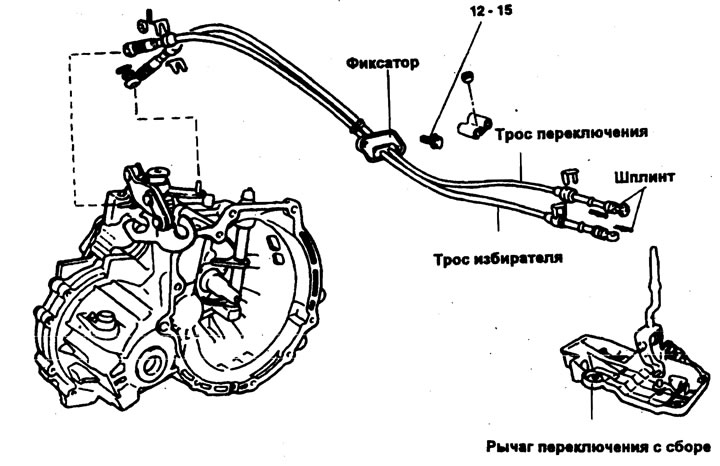
6. Remove the shift and selector cables.


Examination


1. Check the functionality of the selector cable and the presence of damage.

2. Check the shift cable for functionality and damage.

3. Check the cable sheaths for damage.

4. Inspect each bushing for wear, abrasion, binding, restricted movement and damage.

5. Check for loose or damaged springs.

Installation


1. Install the gear shift lever assembly.

2. Installing the gear shift lever and selector cable.

1) Move the gear selector and shift levers to neutral position.

2) When connecting the selector cable to the lever (B), adjust the length of this cable so that the lever (B) is in the neutral position.

2) When connecting the selector cable…


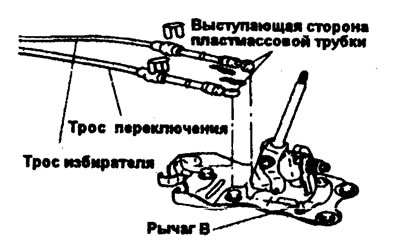
3) The side of the rubber bushing with the edge at the end of the selection cable should be positioned on the surface of the lever (B).

4) The edged side of the rubber bushing at the end of the shift cable should be positioned against the hole for the cotter pin in the shift lever.

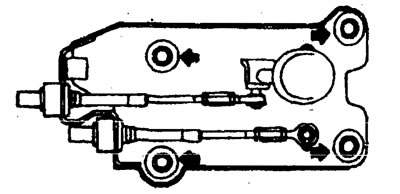
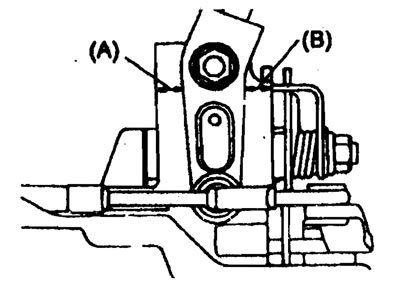
5) After connecting the shift cable, check that the dimensions (A) and (B) shown in the figure are the same.

5) After connecting the shift cable,…


6) Move the gear shift lever to each position, making sure that the gear shifts smoothly.


3. Install the holder and bolts.

3. Install the holder and bolts.
This article is available at russian, bulgarian, belarusian, ukrainian, serbian, croatian, romanian, polish, slovak, hungarian
This article has been reviewed by: Konstantin Smirnov
Add to social network:

Previous
Elantra 2: Manual gearbox
Next

Maintenance and adjustment
Manual transmission — malfunctions
Manual gearbox — tightening torque, Nm
Manual transmission — gaskets
Manual transmission — sealing materials
Gear shift lever assembly
Manual gearbox — removal and installation
Manual gearbox assembly
Manual transmission — assembly
5th gear synchronizer
We recommend other articles on the topic of Hyundai manuals:

Gearbox control mechanism Hyundai Accent 1 (1994-1999)
Replacement of the electronic control unit of the engine and… Hyundai Getz (2002-2011)
Gearbox control Hyundai Sonata 3 (1993-1998)
Outdoor Lighting Control Panel Hyundai Santa Fe 2 (2007-2012, petrol)
Removal and installation the gearbox control unit Hyundai Tucson 2 (2009-2015)
Ventilation control panel with round knobs Hyundai Matrix (2001-2010, petrol)

Link in different formats to this article

Visitor comments
No comments yet


How much will 49 + 23 ?


Elantra 3 (2000-2006) 
  • User manual
  • Control devices
  • Audio system
  • Starting the engine and driving
  • Faults en route
  • Maintenance and care
  • Technical information
  • Power unit
  • Gasoline engines
  • Diesel engines
  • Lubrication system
  • Cooling system
  • Fuel system (gasoline)
  • Fuel system (diesel)
  • Decreased toxicity
  • Ignition system
  • Transmission
  • Clutch
  • Mechanical gearbox
  • Automatic gearbox
  • Drive shafts and axles
  • Chassis
  • Car suspension
  • Steering
  • Brake system
  • Body
  • Exterior (external elements)
  • Interior (internal elements)
  • Air conditioning system
  • Electrical equipment
  • Equipment and devices
  • Headlights and lighting
  • Power devices
  • Electrical circuits
Elantra 2 (1995-2000, petrol) 
  • General information
  • Maintenance
  • Power unit
  • Engine repair
  • Cooling system
  • Intake and exhaust system
  • Fuel system
  • Transmission
  • Clutch
  • Manual gearbox
  • Automatic gearbox
  • Drive shafts and axles
  • Chassis
  • Front suspension
  • Rear suspension
  • Steering
  • Brake system
  • Body
  • Body elements
  • Electrical equipment
  • Equipment and devices
  • Electrical diagrams
Elantra 1 (1990-1995, petrol) 
  • General information
  • Introduction to the guide
  • Maintenance
  • Power unit
  • Minor engine repair
  • Engine overhaul
  • Lubrication system
  • Cooling system
  • Fuel injection system
  • Ignition system
  • Exhaust system
  • Transmission
  • Clutch
  • Manual gearbox
  • Automatic gearbox
  • Drive shafts
  • Chassis
  • Front suspension
  • Rear suspension
  • Steering
  • Wheels and tires
  • Troubleshooting
  • Brake system
  • Body
  • Body elements
  • Electrical equipment
  • Equipment and devices
  • Power devices
  • Heating and air conditioning
  • Electrical circuits
HyundaiBook.ru © 2018-2026 · Mobile version · Sitemap: EN BG BY UA RS HR RO PL SK HU · Administration · Site search · Hyundai owners Accent 1 · Accent 2 · Accent 3 · Elantra 1 · Elantra 2 · Elantra 3 · Getz · Sonata 3 · Sonata 4 · Santa Fe 2 · Tucson 1 · Tucson 2 · Matrix ·
This site uses cookies to optimize its functionality. By continuing, you agree to our terms.