HyundaiBook.ru
Repair Chevrolet Repair Honda Repair Toyota Repair Land Rover Repair VAZ Repair Renault Repair Nissan
English Русский
Български
Беларускі
Український
Српски
Hrvatski
Română
Polski
Slovenský
Magyar
ArticlesSitemapContacts  


  Accent   Elantra   Getz   Grandeur   Sonata   Santa Fe   Tucson   Others
Accent 1 (1994-1999) Accent 2 (1999-2005) Accent 3 (2005-2010)
  • Main
  • Accent
  • MC (2005-2010)
  • Body
  • Exterior (external elements)
  • Disassembly and assembly of the front door

Disassembly and assembly of the front door (Hyundai Accent MC)

0
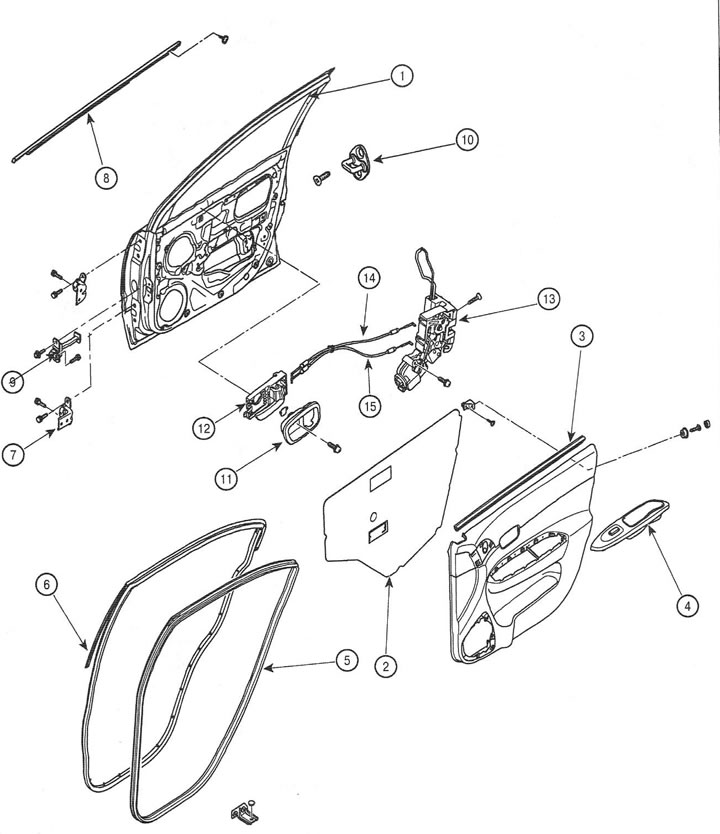
1. Front door; 2. Waterproof film; 3. Door trim; 4. Switch block; 5. Door…
1. Front door; 2. Waterproof film; 3. Door trim; 4. Switch block; 5. Door opening seal; 6. Door seal; 7. Door hinge; 8. Door glass seal; 9. Door stop; 10. Lock retainer; 11. Handle lining; 12. Inner door handle; 13. Door lock; 14. Lock lock cable; 15. Lock release cable
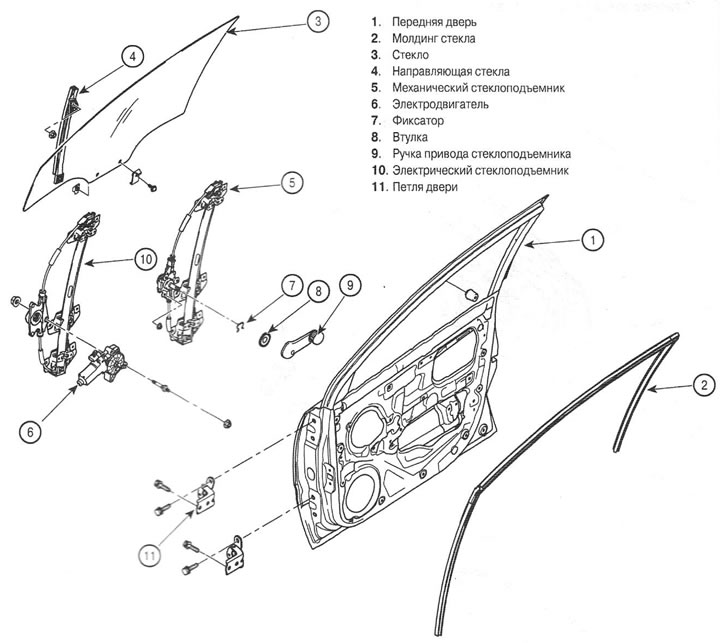

1. Front door; 2. Glass molding; 3. Glass; 4. Glass guide; 5. mechanical window…
1. Front door; 2. Glass molding; 3. Glass; 4. Glass guide; 5. mechanical window lift; 6. Electric motor; 7. Retainer; 8. Bushing; 9. Window lifter handle; 10. Electric window lift; 11. Door hinge


1. Removing the door trim
  • Remove the mirror bracket trim (1) by disconnecting connector 2
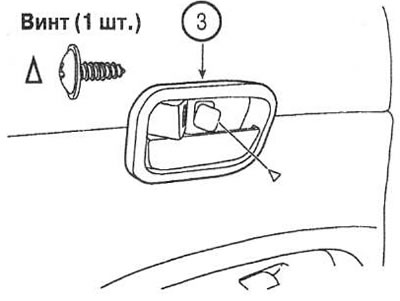
  • Remove the screw and remove the inner door handle trim (3).
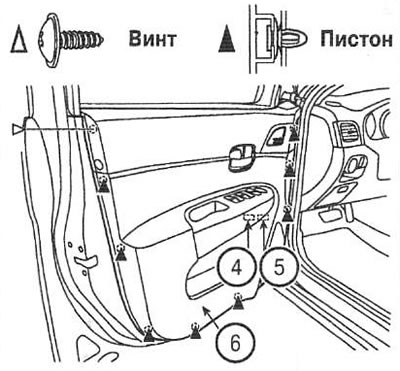
  • Remove the screws and the door trim pins. Disconnect the switch block connectors (4 and 5). Remove the door trim (6).
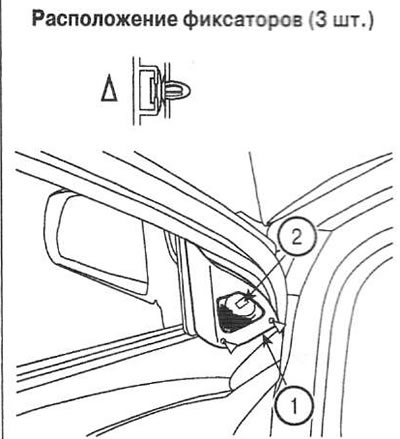
Remove the screws and the door trim pins. Disconnect the switch block…

Remove the screws and the door trim pins. Disconnect the switch block…


2. Removing the door glass.


  • Remove the door trim.
  • Remove the waterproof film.
  • Carefully lower the glass (A) until the screws are visible. Unscrew the screws, separate the glass from the guide and carefully remove it from the door.
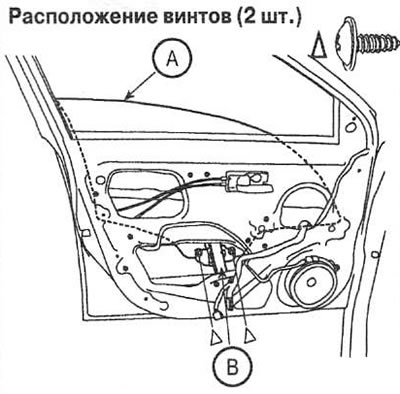
Carefully lower the glass (A) until the screws are visible. Unscrew the screws,…


3. Removing the inner handle.
  • Remove the door trim.
  • Remove the screw. Press the inner handle (1) back to separate it from the trim.
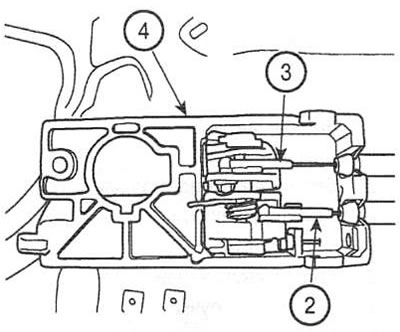
  • Disconnect the release (2) and lock (3) rods of the lock and remove the inner door handle (4).
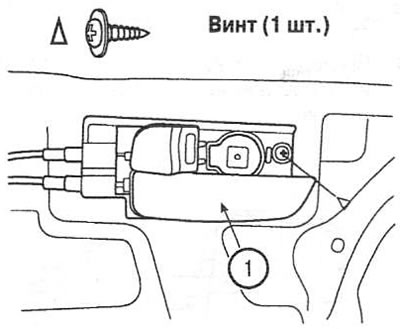
Disconnect the release (2) and lock (3) rods of the lock and remove the inner…

4. Removing the window regulator.


  • Remove the door trim.
  • Remove the waterproof film.
  • Remove the door glass.
  • Disconnect the connector, unscrew the nuts and remove the window regulator (1) and electric motor (2).
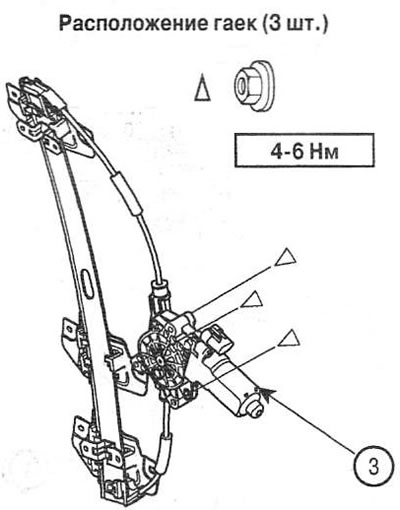
  • Unscrew the nuts and remove the window lift motor (3).
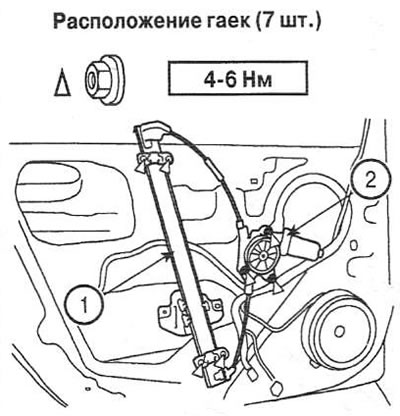
Unscrew the nuts and remove the window lift motor (3).

5. Removing the outer handle.
  • Remove the door trim.
  • Remove the waterproof film.
  • Remove the glass guide.
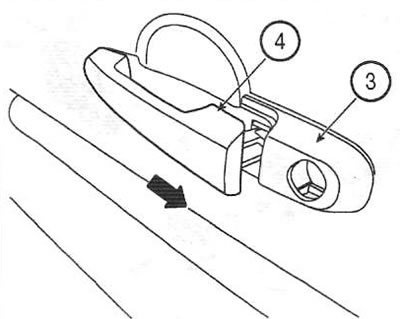
  • Disconnect the locking rod (1) and the release rod (2) of the lock. Unscrew the fastening screws.
  • Move the base (3) forward and remove the outer door handle (4).
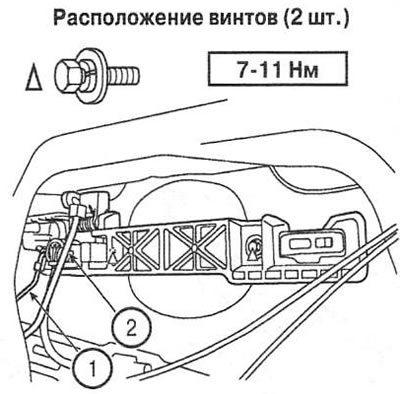
Move the base (3) forward and remove the outer door handle (4).

6. Removing the door lock.


  • Remove the inside door handle.
  • Remove the glass guide.
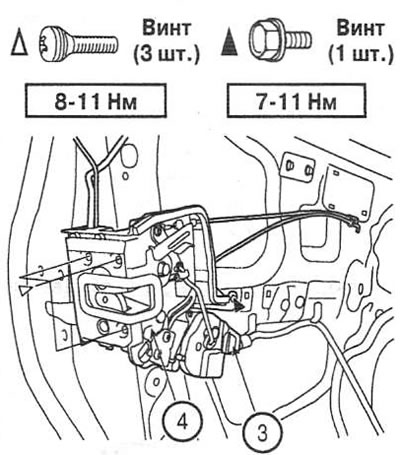
  • Disconnect the locking rod (1) and the unlocking rod (2) of the lock.
  • Disconnect the connector (3), unscrew the screws and remove the front door lock (4).
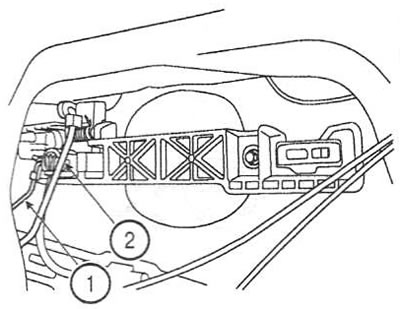
Disconnect the connector (3), unscrew the screws and remove the front door lock…

7. Removing the glass guide.
  • Remove the door glass.
  • Unscrew the nuts and remove the glass guide (A).
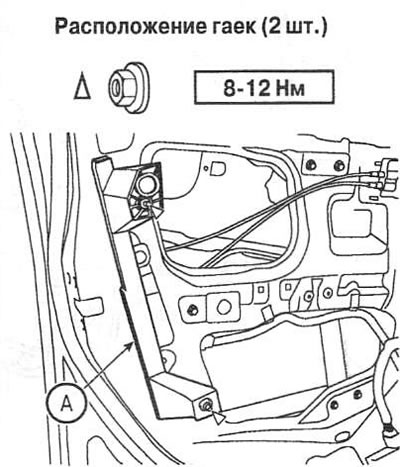
Unscrew the nuts and remove the glass guide (A).
This article is available at russian, bulgarian, belarusian, ukrainian, serbian, croatian, romanian, polish, slovak, hungarian
This article has been reviewed by: Konstantin Smirnov
Add to social network:

Previous
Accent 3: Exterior (external elements)
Next

Removal and installation the lock drive cables
Removal and installation the filler cap
Removal and installation the trunk lid lock cylinder
Removal and installation the trunk lid release lever
Removal and installation the trunk lid lock
Adjusting the position of the front door
Disassembling and assembling the rear door
Removal and installation the front mudguard
Removal and installation the rear mudguard
Removal and installation protective molding
We recommend other articles on the topic of Hyundai manuals:

Front door aperture lighting lamp Hyundai Elantra 3 (2000-2006)
Front door corner trim Hyundai Getz (2002-2011)
Front door — adjusting the position of the door, glass and handle Hyundai Sonata 3 (1993-1998)
Removal and installation front door components Hyundai Santa Fe 2 (2007-2012, petrol)
Front door — device Hyundai Tucson 1 (2005-2010)
Removal and installation the front door Hyundai Matrix (2001-2010, petrol)

Link in different formats to this article

Visitor comments
No comments yet


How much will 10 + 36 ?


Accent 3 (2005-2010) 
  • General information
  • User manual
  • Maintenance
  • Power unit
  • Engine repair
  • Cooling and lubrication system
  • Power and exhaust system
  • Engine electrical equipment
  • Engine management
  • Transmission
  • Clutch
  • Mechanical gearbox
  • Automatic gearbox
  • Chassis
  • Front suspension
  • Rear suspension
  • Wheels and tires
  • Steering
  • Brake system
  • Body
  • Exterior (external elements)
  • Interior (internal elements)
  • Heating and ventilation
  • Electrical equipment
  • Equipment and devices
  • Electrical circuits
Accent 2 (1999-2005) 
  • User manual
  • Control devices
  • Starting engine and driving
  • Troubleshooting
  • Power unit
  • SOHC engines
  • DOHC engines
  • Lubrication system
  • Cooling system
  • Decreased toxicity
  • Fuel system
  • Ignition system
  • Transmission
  • Clutch
  • Mechanical gearbox
  • Automatic gearbox
  • Axles and drive shafts
  • Chassis
  • Car suspension
  • Steering
  • Brake system
  • Body
  • Exterior (external elements)
  • Interior (internal elements)
  • Air conditioning system
  • Electrical equipment
  • Equipment and devices
  • Power devices
Accent 1 (1994-1999) 
  • General information
  • Maintenance
  • Power unit
  • SOHC engines
  • DOHC engines
  • Cooling system
  • Intake and exhaust systems
  • Fuel supply (1.3 l, injection)
  • Fuel supply (1.5 l, injection)
  • Fuel supply (carburetor)
  • Transmission
  • Clutch
  • Manual gearbox
  • Automatic gearbox
  • Drive shafts
  • Chassis
  • Car suspension
  • Steering
  • Brake system
  • Body
  • Body elements
  • Electrical equipment
  • Equipment and devices
  • Electrical circuits
HyundaiBook.ru © 2018-2026 · Mobile version · Sitemap: EN BG BY UA RS HR RO PL SK HU · Administration · Site search · Hyundai owners Accent 1 · Accent 2 · Accent 3 · Elantra 1 · Elantra 2 · Elantra 3 · Getz · Sonata 3 · Sonata 4 · Santa Fe 2 · Tucson 1 · Tucson 2 · Matrix ·
This site uses cookies to optimize its functionality. By continuing, you agree to our terms.