
HyundaiBook.ru
Repair Chevrolet Repair Honda Repair Toyota Repair Land Rover Repair VAZ Repair Renault Repair Nissan
English Русский
Български
Беларускі
Український
Српски
Hrvatski
Română
Polski
Slovenský
Magyar
ArticlesSitemapContacts  


  Accent   Elantra   Getz   Grandeur   Sonata   Santa Fe   Tucson   Others
Tucson 1 (2005-2010) Tucson 2 (2009-2015)
  • Main
  • Tucson
  • LM (2009-2015)
  • Body
  • Exterior (external elements)
  • General information about the body

General information about the body (Hyundai Tucson LM)

0
Contents: Car protection ⇓ Welding works ⇓ Frame straightening device ⇓ Electrical components ⇓ For best results ⇓

General information about the body

Car protection


1. Cover the seats before performing any procedures to prevent contamination.

2. Cover all glass, seats and mats with heat-resistant material when welding.

3. Protect moldings, seals and body trim.

Welding works


Observe the following conditions when carrying out welding work:

1. Use appropriate eye protection.

2. Strictly follow the operating instructions for welding machines supplied by the manufacturer.

3. Do not weld, smoke or use open flames near volatile chemicals, cleaning agents or solvents, or near areas where they have been applied.

Frame straightening device


When using a frame straightening device, observe the necessary safety rules and do not approach the body straightening area with the device chain.

Electrical components


1. Before removing and inspecting electrical parts or before starting electric welding, disconnect the negative terminal of the battery.

2. Do not expose control units to temperatures above 80°C.

Note: If there is a possibility that the ambient temperature will reach 80°C or more, remove the control units from the vehicle before starting work.


3. Be careful not to drop the control units or expose them to impacts.

4. When disconnecting electrical connectors, do not pull on the wires, but hold on to the connector body.
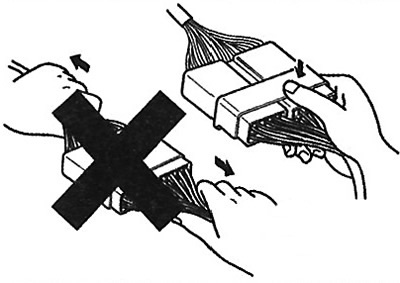
4. When disconnecting electrical connectors, do not pull on the wires, but hold…


5. When connecting, insert the connector until it clicks.

[This article is based on information from the website: www.hyundaibook.ru]

For best results


Disassembly


Before starting work on disassembling and repairing the body, measure the dimensions of the damaged area. If the body is deformed, correct its dimensions with a special straightening stand.

Select the most easily accessible area for cutting, which is least likely to be distorted by welding. Treat the area in such a way that it will allow the new part to overlap by 30 - 50 mm.

Secure the body with clamps and jacks to prevent damage to the body while working on it.

Removal individual parts


Use caution when removing moldings and trim from the body surface being treated. Apply adhesive tape to areas where it is necessary to prevent damage to the removed part or the car body. Before carrying out work, check for pipes, hoses or electrical wiring near the damaged area.
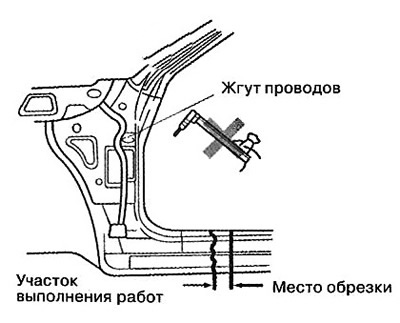


Use caution when removing moldings and trim from the body surface being…


Preparing for assembly


1. Remove the paint from the surface of the new part and the body to apply the sealant, then apply the sealant to seal.

2. If the thickness of the section to be welded with the superimposed panel exceeds 3mm, it is necessary to use a carbon dioxide arc welding machine.

3. Secure the body with clamps and jacks to prevent damage to the body while working with it.

4. Drill holes of approximately 5-6mm diameter in areas not suitable for spot welding.

5. The new part must overlap the area being repaired, with the overlap being 30-50 mm.
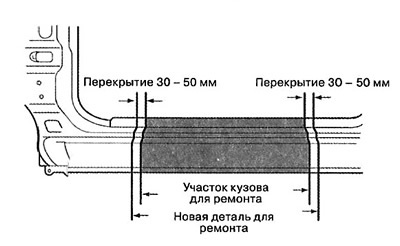
5. The new part must overlap the area being repaired, with the overlap being…


Assembly


When installing a new part, make sure to comply with the body dimensions. Start welding after checking for a gap between the adjacent parts.


The amount of spot welding should be selected according to the following criterion:
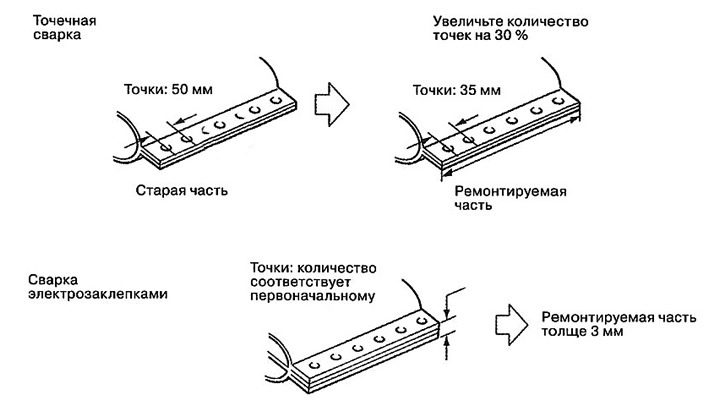
The amount of spot welding should be selected according to the following…


Attention.
  • The gap between the electrodes of the spot welding machine should not exceed 3 mm, as this significantly affects the strength of the welding current. If possible, the new welding point should be placed between the existing points.
  • Before and after spot welding, it is necessary to perform a test weld of the same material as the body panels and check the reliability of the weld.
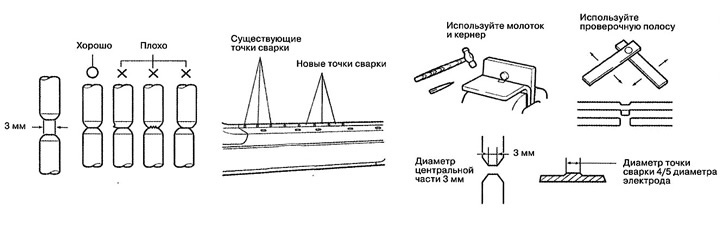

Before and after spot welding, it is necessary to perform a test weld of the…


Anti-corrosion treatment and sealing after assembly


Apply sealant to the car body where necessary. Apply corrosion protection material (wax, oil) to the welding areas. Apply primer to the body surfaces where necessary.
This article is available at russian, bulgarian, belarusian, ukrainian, serbian, croatian, romanian, polish, slovak, hungarian
This article has been reviewed by: Konstantin Smirnov
Add to social network:

Previous
Tucson 2: Exterior (external elements)
Next

Front wing
Hood — replacement and adjustment
Luggage compartment door
Front door — device
Adjusting the front door elements
We recommend other articles on the topic of Hyundai manuals:

Throttle body — removal and inspection Hyundai Accent 1 (1994-1999)
Throttle body — removal and installation Hyundai Elantra 1 (1990-1995, petrol)
Body specifications and dimensions Hyundai Getz (2002-2011)
Single Overhead Cam Engine — Throttle Body Hyundai Sonata 3 (1993-1998)
Table 8.1. Technical characteristics of body elements Hyundai Matrix (2001-2010, petrol)

Link in different formats to this article

Visitor comments
No comments yet


How much will 35 + 38 ?


Tucson 2 (2009-2015) 
  • General information
  • Faults en route
  • User manual
  • Maintenance
  • Power unit
  • Gasoline engines
  • Diesel engines
  • Engine cooling system
  • Engine lubrication system
  • Engine power system
  • Control system
  • Intake and exhaust systems
  • Engine electrical equipment
  • Transmission
  • Clutch
  • Mechanical gearbox
  • Automatic gearbox
  • Drive shafts
  • Chassis
  • Suspension and wheels
  • Brake system
  • Steering
  • Body
  • Exterior (external elements)
  • Interior (internal elements)
  • Security systems
  • Air conditioning and heater
  • Electrical equipment
  • Electrical circuits
Tucson 1 (2005-2010) 
  • General information
  • User manual
  • Maintenance
  • Power unit
  • Gasoline engine G6BA
  • Gasoline engine G4GC
  • Diesel engine D4EA
  • Fuel system (gasoline)
  • Fuel system (diesel)
  • Engine lubrication system
  • Engine cooling system
  • Engine electrical equipment
  • Transmission
  • Clutch
  • Car gearbox
  • Drive shafts and cardan
  • Chassis
  • Car suspension
  • Steering
  • Brake system
  • Body
  • Exterior (external elements)
  • Interior (internal elements)
  • Air conditioning and heater
  • Airbags
  • Electrical equipment
  • Equipment and devices
  • Electrical circuits
HyundaiBook.ru © 2018-2026 · Mobile version · Sitemap: EN BG BY UA RS HR RO PL SK HU · Administration · Site search · Hyundai owners Accent 1 · Accent 2 · Accent 3 · Elantra 1 · Elantra 2 · Elantra 3 · Getz · Sonata 3 · Sonata 4 · Santa Fe 2 · Tucson 1 · Tucson 2 · Matrix ·
This site uses cookies to optimize its functionality. By continuing, you agree to our terms.