Contents: Battery saving function ⇓ Headlight system for illuminating…⇓ Lighting control ⇓ Turning on high beam ⇓ Direction indicators and lane change…⇓ Front fog lights (if equipped) ⇓ Rear fog light (if equipped) ⇓ Daytime running lights (if equipped) ⇓
Battery saving function
This function is designed to prevent the battery from discharging. The system automatically turns off the parking lights when the driver removes the key from the ignition and opens the door on his side.
This feature will automatically turn off the parking lights if the driver parks the car on the side of the road at night. If you need to keep the lights on after removing the key from the ignition, do the following:
1. Open the driver's side door.
2. Turn the parking lights off and on again using the switch located on the steering column.
Headlight system for illuminating the path after leaving the vehicle (if available)
If you turn the ignition key to the ACC or OFF position with the headlights on, the headlights (and/or taillights) will remain on for approximately 20 minutes. However, if you open and close the driver's door, the headlights will turn off after 30 seconds. The headlights can be turned off by double-pressing the lock button on the key fob (or smart key) or by turning the light switch to the OFF or AUTO position. However, if you turn the light switch to the AUTO position in the dark, the headlights will not turn off.
Lighting control
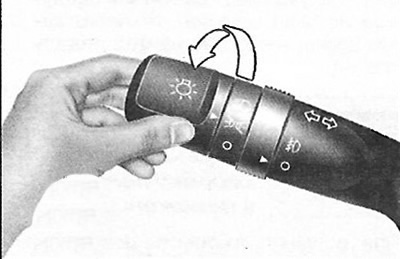
The lighting control switch has two positions: "Headlights" and "Parking lights". To control the lighting, turn the handle on the end of the control lever to one of the following positions:
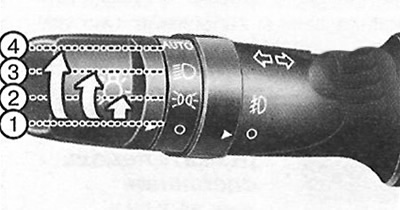
1. Off.
2. Parking lights.
3. Headlights.
4. Automatic switching on of lighting devices (if available).
Parking lights
When the lighting control switch is in this position, the parking lights, license plate lights and instrument panel lights will be turned on.
Headlights

When the lighting control switch is in this position, the headlights, parking lights, license plate lights and instrument panel lights will be turned on.
Note: The headlights only turn on when the ignition key is in the ON position.
Automatic switching on of lighting devices (if available)
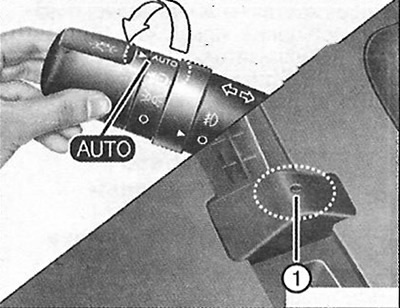
When the lighting control switch is in this position, the headlights and parking lights will turn on and off automatically depending on the light level outside the vehicle.
Attention.
- Never place any objects on sensor 1 located on the instrument panel; this will ensure more efficient operation of the automatic lighting control system.
- Do not clean the sensor with window cleaner as it may leave a thin film that will affect the sensor's performance.
- If the vehicle's windshield is darkened in any way, the automatic switching on of the lights may not occur correctly.
Turning on high beam
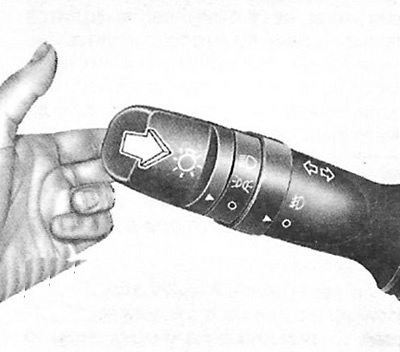
To turn on the high beam, move the lever away from you. Pull it back to turn on the low beam. When the high beam is turned on, the corresponding indicator lamp will light. To prevent battery discharge, do not leave the lights on for a long period of time when the engine is not running.
Flashing headlights
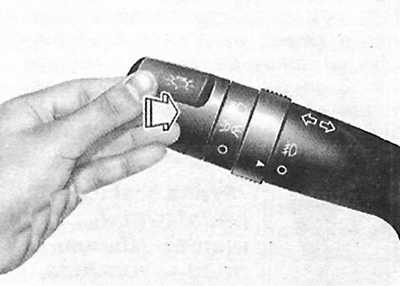
To flash the high beam headlights, pull the lever towards you. When you release it, the lever will return to the normal position (low beam). To use this function, the lighting control switch does not need to be turned on.
Direction indicators and lane change signals

The ignition must be on for the turn signals to operate. To turn on the turn signals, move the lever up or down (A). Green arrow-shaped indicators on the instrument panel will show which turn signal is working. Once the turn is completed, the indicators will automatically turn off. If the turn signal indicator continues to flash after the turn is completed, manually move the lever to the off position. To warn of a lane change, move the turn signal lever slightly and hold it in this position (B). When you release the lever, it will return to the off position. If the indicator light is constantly on or flashes at an abnormal rate, one of the turn signal bulbs may be burned out and needs to be replaced.
One-touch lane change alert (if equipped)
To activate the lane change signal, move the turn signal lever slightly and then release it. The lane change signal will flash three times.
Note: If the indicator light flashes too fast or too slow, it means that the indicator light may be burnt out or there is a poor connection in the electrical circuit.
Front fog lights (if equipped)
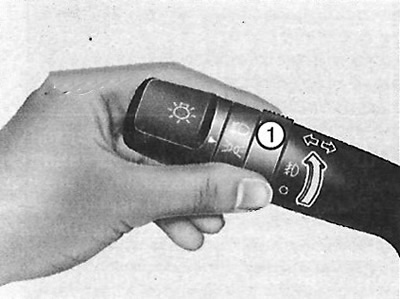
Fog lights are used to improve visibility and prevent traffic accidents in poor visibility conditions caused by fog, rain, snow, etc. The fog lights are turned on by moving the corresponding switch (1) to the on position after turning on the parking lights. To turn off the fog lights, move the switch (1) to the off position.
Caution: Fog lights consume a lot of electricity when in operation. Use them only in poor visibility conditions to avoid possible battery discharge and poor generator performance.
Rear fog light (if equipped)
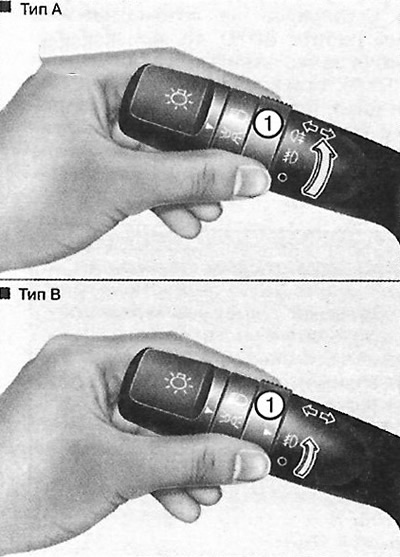
To turn on the rear fog lights, turn the main and rear fog light switches (1) to the ON position. To turn on the rear fog lights, with the front fog light switch in the ON position, turn the main headlight switch to the parking light position (PARKLIGHT) and then turn the rear fog light switch to the ON position. To turn off the rear fog lights, turn the rear fog light switch to the ON position again or turn off the headlights.
Note: To turn off the rear fog lights, turn the rear fog light switch to the ON position or turn off the headlight switch.
Daytime running lights (if equipped)
Daytime running lights (DRL) help make your car more visible from the front to other road users during the day. The DRL function can be useful in a variety of driving conditions, and is especially useful after dawn or before dusk. The lights will automatically turn off in the following cases:
1. When the parking lights are turned on.
2. When the engine is turned off.
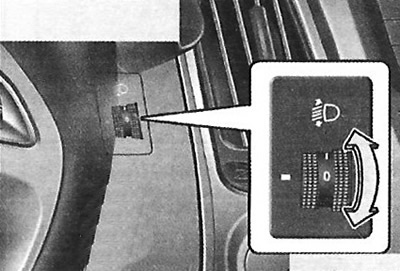
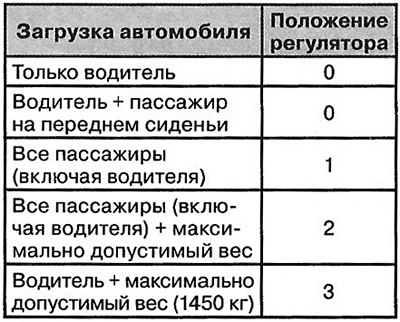
To adjust the headlight range angle according to the number of passengers and the weight of the cargo in the trunk, turn the headlight range adjuster knob. The higher the number on the scale, the lower the headlight beam is aimed. Always maintain the headlight range angle according to the vehicle load to prevent dazzling other road users. Below are examples of correct adjustment of the adjuster. For vehicle load cases not listed below, the adjuster should be set to the position that best matches the type of load listed.