HyundaiBook.ru
Repair Chevrolet Repair Honda Repair Toyota Repair Land Rover Repair VAZ Repair Renault Repair Nissan
English Русский
Български
Беларускі
Український
Српски
Hrvatski
Română
Polski
Slovenský
Magyar
ArticlesSitemapContacts  


  Accent   Elantra   Getz   Grandeur   Sonata   Santa Fe   Tucson   Others
Elantra 1 (1990-1995, petrol) Elantra 2 (1995-2000, petrol) Elantra 3 (2000-2006)
  • Main
  • Elantra
  • J2 (1995-2000)
  • Body
  • Body elements
  • Windshield

Windshield (Hyundai Elantra J2)

0
Contents: Removal ⇓ Installation ⇓
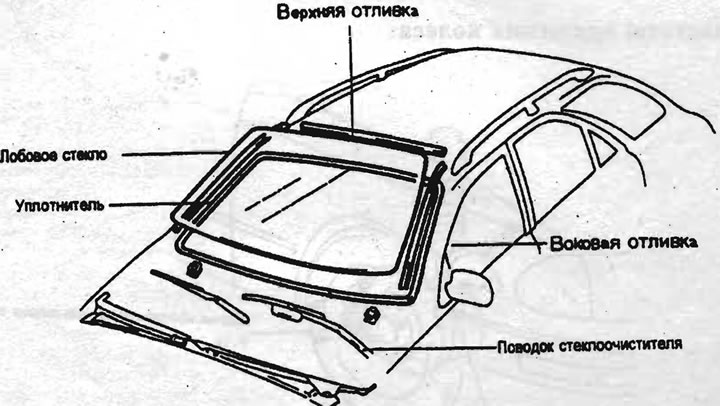
Windshield


Removal


1. Remove the clamps from inside the cabin.

2. Remove the trim panel near the front pillar.

3. Before removing the windshield, it is necessary to remove the wiper arms and air duct trim.

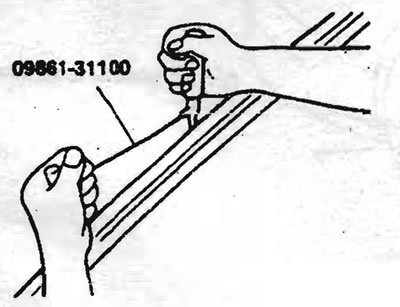
4. To remove the sealant holding the windshield, use a special tool (09861-31100).

4. To remove the sealant holding the…


5. If the same glass is to be installed again, installation marks (with chalk) should be applied to it and the body.

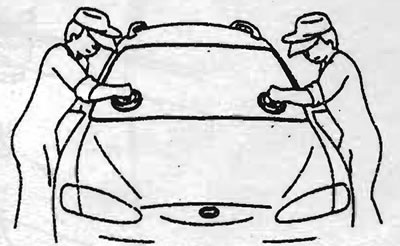
6. Using special holders (suction cups), remove the windshield.

6. Using special holders (suction…


Installation


1. Using a cutter (knife), cut off the remaining layer of sealant on the body opening to a thickness of approximately 2 mm along the entire perimeter of the opening.

Note: Do not damage the paintwork.


2. Wipe the seating surface of the opening with a sponge soaked in alcohol or a compound for removing grease stains.

3. Install the air duct cover retaining screws.

4. Center the new glass in the body opening. Apply alignment marks in four places on the body and glass.

5. Apply adhesive to the inner surface of the glass.

5. Apply adhesive to the inner surface…


6. Apply a thin coat of primer "Glass primer" on the outer surface of the seal.

6. Apply a thin coat of primer «Glass…


Note: Do not touch the damage with your hands.


7. Apply a thin layer of primer to the layer of the previous adhesive coating of the opening "Body primer". The glass should be installed 10 minutes after applying the specified composition.


8. Using a spatula, thoroughly mix the sealant with the hardener on a glass or metal plate.

Note: Before doing this, you should wipe the plate with alcohol.


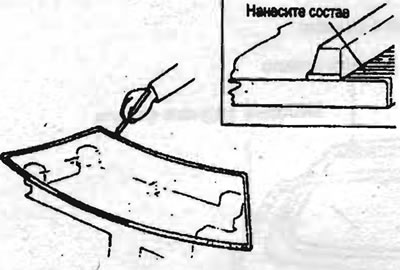
9. Load the adhesive into the cartridge, install it into the syringe and apply a layer of the adhesive around the perimeter of the glass, as shown in the figure.

9. Load the adhesive into the…


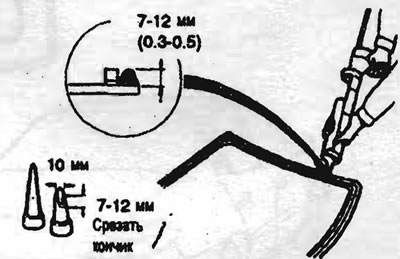
Note: The adhesive composition should be applied no more than 5 minutes after applying the primer.


10. Using vacuum suction cups or a special device (09861-31300) lower the glass into the opening, align it with the installation marks applied in accordance with point 4, and place the glass on the existing adhesive layer. To prevent the glass from sliding down, install two lower attachments.

11. Remove excess glue with a spatula. Fill all the cavities in the adhesive layer around the glass.

12. Check the glass for water resistance.

Run cold water over the glass so that the water flows over the edges of the glass, avoiding the water under pressure getting on the fresh layer of sealant.

13. If a leak is detected, apply sealant to these areas.
This article is available at russian, bulgarian, belarusian, ukrainian, serbian, croatian, romanian, polish, slovak, hungarian
This article has been reviewed by: Konstantin Smirnov
Add to social network:

Previous
Elantra 2: Body elements
Next

Body — tightening torque, Nm
Rear window
Front door
Back door
Front seat
Back seat
We recommend other articles on the topic of Hyundai manuals:

Windshield — Removal and Installation Hyundai Accent 1 (1994-1999)
Windshield wiper blades Hyundai Getz (2002-2011)
Windshield — Removal, Inspection and Installation Hyundai Sonata 3 (1993-1998)
Windshield de-icer Hyundai Santa Fe 2 (2007-2012, petrol)
Windshield Heating System Timer — Schematic Diagram Hyundai Tucson 1 (2005-2010)
Removal and installation the windshield Hyundai Matrix (2001-2010, petrol)

Link in different formats to this article

Visitor comments
No comments yet


How much will 25 + 38 ?


Elantra 3 (2000-2006) 
  • User manual
  • Control devices
  • Audio system
  • Starting the engine and driving
  • Faults en route
  • Maintenance and care
  • Technical information
  • Power unit
  • Gasoline engines
  • Diesel engines
  • Lubrication system
  • Cooling system
  • Fuel system (gasoline)
  • Fuel system (diesel)
  • Decreased toxicity
  • Ignition system
  • Transmission
  • Clutch
  • Mechanical gearbox
  • Automatic gearbox
  • Drive shafts and axles
  • Chassis
  • Car suspension
  • Steering
  • Brake system
  • Body
  • Exterior (external elements)
  • Interior (internal elements)
  • Air conditioning system
  • Electrical equipment
  • Equipment and devices
  • Headlights and lighting
  • Power devices
  • Electrical circuits
Elantra 2 (1995-2000, petrol) 
  • General information
  • Maintenance
  • Power unit
  • Engine repair
  • Cooling system
  • Intake and exhaust system
  • Fuel system
  • Transmission
  • Clutch
  • Manual gearbox
  • Automatic gearbox
  • Drive shafts and axles
  • Chassis
  • Front suspension
  • Rear suspension
  • Steering
  • Brake system
  • Body
  • Body elements
  • Electrical equipment
  • Equipment and devices
  • Electrical diagrams
Elantra 1 (1990-1995, petrol) 
  • General information
  • Introduction to the guide
  • Maintenance
  • Power unit
  • Minor engine repair
  • Engine overhaul
  • Lubrication system
  • Cooling system
  • Fuel injection system
  • Ignition system
  • Exhaust system
  • Transmission
  • Clutch
  • Manual gearbox
  • Automatic gearbox
  • Drive shafts
  • Chassis
  • Front suspension
  • Rear suspension
  • Steering
  • Wheels and tires
  • Troubleshooting
  • Brake system
  • Body
  • Body elements
  • Electrical equipment
  • Equipment and devices
  • Power devices
  • Heating and air conditioning
  • Electrical circuits
HyundaiBook.ru © 2018-2026 · Mobile version · Sitemap: EN BG BY UA RS HR RO PL SK HU · Administration · Site search · Hyundai owners Accent 1 · Accent 2 · Accent 3 · Elantra 1 · Elantra 2 · Elantra 3 · Getz · Sonata 3 · Sonata 4 · Santa Fe 2 · Tucson 1 · Tucson 2 · Matrix ·
This site uses cookies to optimize its functionality. By continuing, you agree to our terms.