
Removal
1. Turn the ignition key to the "OFF" position and disconnect the negative (-) cable from the battery.
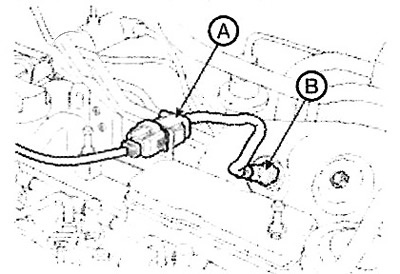
2. Disconnect the oxygen sensor connector (A).
3. Remove the oxygen sensor (B).
Note: Use the special tool (09392-2H100) to remove the heated oxygen sensor.
Installation
Attention.
- Tighten the component mounting bolts to the specified torque.
- Be careful not to drop the component. If dropped, the component must be carefully checked before installation.
- Avoid contact of the sensing element with liquid or aerosol cleaners or lubricants, as the oil contained in these substances may impair the performance of the sensor.
- Do not allow the sensor or its wiring to come into contact with components of the exhaust system (exhaust manifold, catalytic converter, etc.).
Installation is performed in the reverse order of removal.
Note: Tightening torque: Oxygen sensor mount: 40.2 - 59.8 Nm.
Replacement
Attention. After replacing the oxygen sensor, follow the "Component Change Routine" procedure. Otherwise, a malfunction related to engine performance or exhaust control may occur and persist until data about the new component is registered in the engine control unit.
1. Turn off the ignition.
2. [Connect the GDS scanner to the data link connector (DLC).
3. Turn on the ignition.
4. Select "Vehicle, Model year, Engine, System".
5. Select Vehicle S/W Management (Vehicle Software Management).
Original version of the article on the website: hyundaibook
6. Select Component Change Routine.
7. Select "LAMBDA SENSOR CHANGE" (Oxygen sensor replacement).
8. Follow the procedure according to the instructions on the screen.