HyundaiBook.ru
Repair Chevrolet Repair Honda Repair Toyota Repair Land Rover Repair VAZ Repair Renault Repair Nissan
English Русский
Български
Беларускі
Український
Српски
Hrvatski
Română
Polski
Slovenský
Magyar
ArticlesSitemapContacts  


  Accent   Elantra   Getz   Grandeur   Sonata   Santa Fe   Tucson   Others
Elantra 1 (1990-1995, petrol) Elantra 2 (1995-2000, petrol) Elantra 3 (2000-2006)
  • Main
  • Elantra
  • J2 (1995-2000)
  • Transmission
  • Manual gearbox
  • Differential — disassembly and assembly

Differential — disassembly and assembly (Hyundai Elantra J2)

0
Contents: Disassembly ⇓ Assembly ⇓
Tightening torque: Nm

Tightening torque: Nm


Disassembly


1. Clamp the differential housing in a vice.

2. Loosen the differential drive gear mounting bolts and remove the wheel.

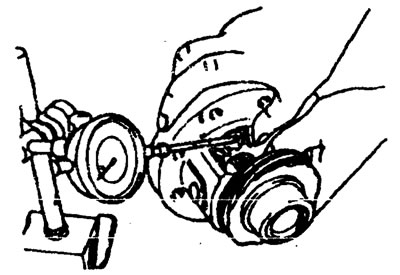
3. Using a special tool (09432-21000), remove the ball bearings.

3. Using a special tool (09432-21000),…


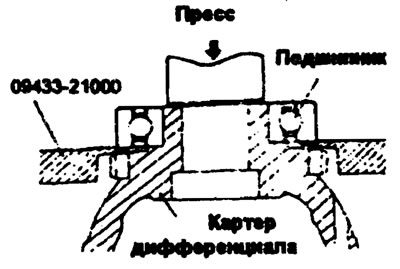
Note: Do not reuse removed bearings.


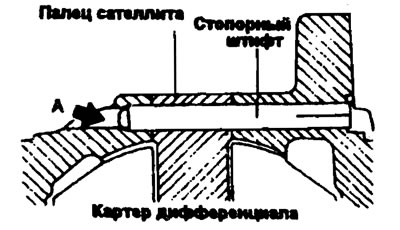
4. Using a punch, knock the locking pin out of hole A.

4. Using a punch, knock the locking pin…


5. Remove the satellite axle.


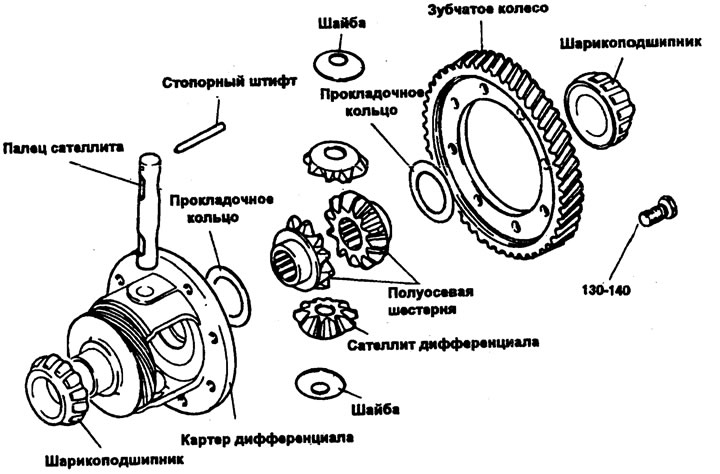
6. Remove the satellites, washers, axle gears and spacer washers.

Assembly


1. Install spacer washers behind the axle gears, then install them into the differential housing.

This article is based on information from the website HYUNDAIBOOK

Note:
  • 1. When installing new axle gears, use medium-thickness spacer washers (0.83-0.92 mm).
  • 2. Do not reuse the locking pin.
  • 3. The head of the locking pin must be located below the surface of the differential housing flange.


2. Place a washer on the back of each pinion and position both pinions so that they engage the axle gears by turning them.

2. Place a washer on the back of each…


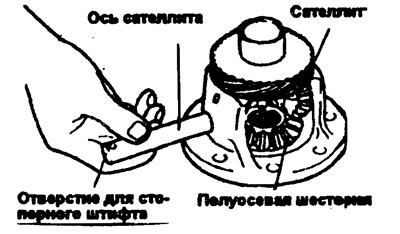
3. Enter the satellite axis.

4. Measure the clearance in the engagement of the axle gears with the satellites.

4. Measure the clearance in the…


Nominal value: 0.025-0.150 mm.


5. If the clearance is outside the specified limits, disassemble the differential, install spacer washers of the required thickness, reassemble the differential and check the clearance in the engagement.

Note: Adjust the clearance on both axle gears to the same value.


6. Align the locking pin hole in the planet axle® and the differential housing and install the locking pin.
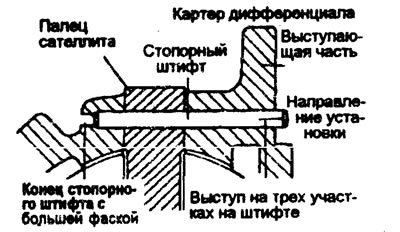
6. Align the locking pin hole in the…


Note:
  • 1. Do not reuse the locking pin.
  • 2. The head of the locking pin should not protrude more than 3 mm.


7. Using a special tool (09455-21100), install tapered roller bearings on both sides of the differential housing.

7. Using a special tool (09455-21100),…


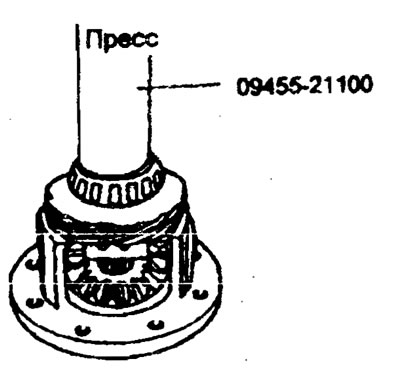
Note: When installing bearings with a press fit, apply pressure only to the inner ring.


8. Apply the specified lubricant to all bolt threads.


Tighten to specification in the sequence shown in the illustration.

Seal to specification: BM Stud Locking No. 2471.

Seal to specification: BM Stud Locking…


Warning. If the bolt is reused, remove the old seal from the threads.
This article is available at russian, bulgarian, belarusian, ukrainian, serbian, croatian, romanian, polish, slovak, hungarian
This article has been reviewed by: Konstantin Smirnov
Add to social network:

Previous
Elantra 2: Manual gearbox
Next

Shift Forks and Shift Rods
Secondary shaft
Drive shaft
5th gear synchronizer
Manual transmission — assembly
We recommend other articles on the topic of Hyundai manuals:

Differential — disassembly and assembly Hyundai Accent 1 (1994-1999)
Replacing the differential seal Hyundai Getz (2002-2011)
Differential — disassembly and assembly Hyundai Sonata 3 (1993-1998)

Link in different formats to this article

Visitor comments
No comments yet


How much will 22 + 14 ?


Elantra 3 (2000-2006) 
  • User manual
  • Control devices
  • Audio system
  • Starting the engine and driving
  • Faults en route
  • Maintenance and care
  • Technical information
  • Power unit
  • Gasoline engines
  • Diesel engines
  • Lubrication system
  • Cooling system
  • Fuel system (gasoline)
  • Fuel system (diesel)
  • Decreased toxicity
  • Ignition system
  • Transmission
  • Clutch
  • Mechanical gearbox
  • Automatic gearbox
  • Drive shafts and axles
  • Chassis
  • Car suspension
  • Steering
  • Brake system
  • Body
  • Exterior (external elements)
  • Interior (internal elements)
  • Air conditioning system
  • Electrical equipment
  • Equipment and devices
  • Headlights and lighting
  • Power devices
  • Electrical circuits
Elantra 2 (1995-2000, petrol) 
  • General information
  • Maintenance
  • Power unit
  • Engine repair
  • Cooling system
  • Intake and exhaust system
  • Fuel system
  • Transmission
  • Clutch
  • Manual gearbox
  • Automatic gearbox
  • Drive shafts and axles
  • Chassis
  • Front suspension
  • Rear suspension
  • Steering
  • Brake system
  • Body
  • Body elements
  • Electrical equipment
  • Equipment and devices
  • Electrical diagrams
Elantra 1 (1990-1995, petrol) 
  • General information
  • Introduction to the guide
  • Maintenance
  • Power unit
  • Minor engine repair
  • Engine overhaul
  • Lubrication system
  • Cooling system
  • Fuel injection system
  • Ignition system
  • Exhaust system
  • Transmission
  • Clutch
  • Manual gearbox
  • Automatic gearbox
  • Drive shafts
  • Chassis
  • Front suspension
  • Rear suspension
  • Steering
  • Wheels and tires
  • Troubleshooting
  • Brake system
  • Body
  • Body elements
  • Electrical equipment
  • Equipment and devices
  • Power devices
  • Heating and air conditioning
  • Electrical circuits
HyundaiBook.ru © 2018-2026 · Mobile version · Sitemap: EN BG BY UA RS HR RO PL SK HU · Administration · Site search · Hyundai owners Accent 1 · Accent 2 · Accent 3 · Elantra 1 · Elantra 2 · Elantra 3 · Getz · Sonata 3 · Sonata 4 · Santa Fe 2 · Tucson 1 · Tucson 2 · Matrix ·
This site uses cookies to optimize its functionality. By continuing, you agree to our terms.