HyundaiBook.ru
Repair Chevrolet Repair Honda Repair Toyota Repair Land Rover Repair VAZ Repair Renault Repair Nissan
English Русский
Български
Беларускі
Український
Српски
Hrvatski
Română
Polski
Slovenský
Magyar
ArticlesSitemapContacts  


  Accent   Elantra   Getz   Grandeur   Sonata   Santa Fe   Tucson   Others
Elantra 1 (1990-1995, petrol) Elantra 2 (1995-2000, petrol) Elantra 3 (2000-2006)
  • Main
  • Elantra
  • J1 (1990-1995)
  • Body
  • Body elements
  • Rope — removal and installation

Rope — removal and installation (Hyundai Elantra J1)

0
Contents: Removal ⇓ Installation ⇓

Removal


Open the hood and place a clean rag under the corners of the hood.

If there is an engine compartment light, disconnect the electrical connector from the light bulb.

Unscrew the three bolts and remove the hood lock.

In the car's interior, unscrew the two self-tapping screws and remove the hood release handle.

Remove the hood side seal by pulling up and turning.

Unscrew the buffer.

Loosen the bolt and remove the hood support.

Remove the hood sound insulation.

Remove the hood switch.

Disconnect the windshield washer hose.

Using a marker, mark the position of the hinges on the hood. Have an assistant support the hood, then remove the left and right hood hinge bolts and carefully remove the hood.

If necessary, remove the windshield wiper panel trim.

Loosen the bolts and remove the hood hinges.

If it is necessary to remove the hood lock drive cable, first remove the splash shield.

Using a screwdriver blade as a lever, remove the cable and its fastener.

While working inside the vehicle, disconnect the cable from the hood release lever and the cable housing from the bracket.

Remove the cable sealing ring from the engine compartment bulkhead and remove the cable into the engine compartment.

Installation


Installation is carried out in reverse order, taking into account the following:

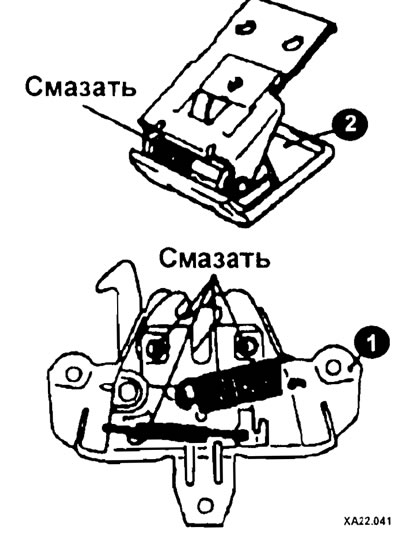
Before installing the lock (1) and the hood release handle (2), apply consistent grease to their moving parts.

Before installing the lock (1) and the…


If a new hood is to be installed, reinstall all removable parts onto it.


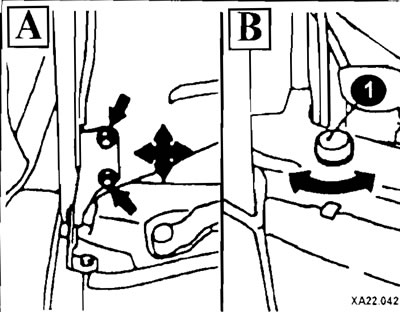
Close the hood and check its position relative to adjacent surfaces. Adjust the position of the hood so that when the hood is closed, the gap around the perimeter of the hood is the same on all sides. To adjust, loosen the hood hinge bolts and move the hood (A) to adjust its position. To adjust the front part of the hood in height (B), it is necessary to screw in or unscrew the rubber cushions (1).

Close the hood and check its position…


Adjust the position of the cable so that when the hood release lever is released, the cable has a slight sag. Check that the hood latch opens when an assistant pulls the hood release lever. If necessary, make adjustments by loosening the lock mounting bolts and moving it, then tighten the bolts to 9 Nm.
This article is available at russian, bulgarian, belarusian, ukrainian, serbian, croatian, romanian, polish, slovak, hungarian
This article has been reviewed by: Konstantin Smirnov
Add to social network:

Previous
Elantra 1: Body elements
Next

Side molding — removal and installation
Body damage repair
Car body/interior maintenance
Front wing — removal and installation
Doors — adjustment
Doors — removal and installation
Rear view mirror (side) — removal and installation
Front seats — removal and installation
Link in different formats to this article

Visitor comments
No comments yet


How much will 50 + 46 ?


Elantra 3 (2000-2006) 
  • User manual
  • Control devices
  • Audio system
  • Starting the engine and driving
  • Faults en route
  • Maintenance and care
  • Technical information
  • Power unit
  • Gasoline engines
  • Diesel engines
  • Lubrication system
  • Cooling system
  • Fuel system (gasoline)
  • Fuel system (diesel)
  • Decreased toxicity
  • Ignition system
  • Transmission
  • Clutch
  • Mechanical gearbox
  • Automatic gearbox
  • Drive shafts and axles
  • Chassis
  • Car suspension
  • Steering
  • Brake system
  • Body
  • Exterior (external elements)
  • Interior (internal elements)
  • Air conditioning system
  • Electrical equipment
  • Equipment and devices
  • Headlights and lighting
  • Power devices
  • Electrical circuits
Elantra 2 (1995-2000, petrol) 
  • General information
  • Maintenance
  • Power unit
  • Engine repair
  • Cooling system
  • Intake and exhaust system
  • Fuel system
  • Transmission
  • Clutch
  • Manual gearbox
  • Automatic gearbox
  • Drive shafts and axles
  • Chassis
  • Front suspension
  • Rear suspension
  • Steering
  • Brake system
  • Body
  • Body elements
  • Electrical equipment
  • Equipment and devices
  • Electrical diagrams
Elantra 1 (1990-1995, petrol) 
  • General information
  • Introduction to the guide
  • Maintenance
  • Power unit
  • Minor engine repair
  • Engine overhaul
  • Lubrication system
  • Cooling system
  • Fuel injection system
  • Ignition system
  • Exhaust system
  • Transmission
  • Clutch
  • Manual gearbox
  • Automatic gearbox
  • Drive shafts
  • Chassis
  • Front suspension
  • Rear suspension
  • Steering
  • Wheels and tires
  • Troubleshooting
  • Brake system
  • Body
  • Body elements
  • Electrical equipment
  • Equipment and devices
  • Power devices
  • Heating and air conditioning
  • Electrical circuits
HyundaiBook.ru © 2018-2026 · Mobile version · Sitemap: EN BG BY UA RS HR RO PL SK HU · Administration · Site search · Hyundai owners Accent 1 · Accent 2 · Accent 3 · Elantra 1 · Elantra 2 · Elantra 3 · Getz · Sonata 3 · Sonata 4 · Santa Fe 2 · Tucson 1 · Tucson 2 · Matrix ·
This site uses cookies to optimize its functionality. By continuing, you agree to our terms.