Contents: General information ⇓ Comprehensive battery check ⇓ Charging the battery ⇓ Checking the density of the…⇓
General information
The new car is equipped with a maintenance-free battery, which is completely sealed (except for a small ventilation hole in the cover), has no battery cell vent plugs and is maintenance-free (there is no need to add water to the battery electrolyte).
- Battery type - MF 68Ah
Comprehensive battery check
Note:
- Do not disconnect the battery while the engine and/or accessories are running. Turn the ignition switch to the "OFF" position and turn off all auxiliary electrical equipment.
- When checking, disconnect the cable from the negative terminal first and connect it last.
- Be careful not to short circuit with tools.
- Be careful not to let any cleaning solution get into the battery when cleaning it.
1. Visually check for cracks or other damage to the battery case that could cause electrolyte leakage. Determine the cause of the defect and eliminate it if necessary. Clean off rust with a solution of soda and water.
Caution: Use extreme caution if the battery case has cracks or other sources of electrolyte leakage, avoid contact of electrolyte with skin, clothing or painted parts of the body. Always wear suitable rubber gloves when removing the battery (do not use household gloves).
- a) If the cause of the defect cannot be determined and eliminated, replace the battery.
- b) If there are no cracks or other damage to the battery case, measure the battery voltage and check the density of the electrolyte.
2. Determine the density of the electrolyte in the battery.
3. Check the output voltage of the battery.
- a) Within 20 minutes after turning off the engine (after driving), turn the ignition key to the "ON" position and turn on the electrical load (headlights, heater fan, rear window defogger, etc.). Wait 60 seconds for the battery voltage to stabilize.
- b) Turn the ignition key to the "OFF" position and turn off the electrical load.
- c) Disconnect the wires from the battery terminals and measure the open circuit voltage (measure the voltage between the battery terminals using a tester).
- Nominal value - 12.5-12.9 V (at 20°)
- d) If the voltage does not correspond to the nominal value, charge the battery with a current of 5 amperes. Then check the battery again.
Caution: Please pay special attention to the battery charging process and charging safety precautions.
4. Check the battery under load. To do this, turn on a 300 A load for 15 seconds, measure the battery voltage and compare the readings with the values below.
Attention:
- The voltage values are given taking into account that measurements are made at a temperature of 20°C.
- If necessary, adjust the voltage value according to the temperature in the table provided.
| Voltage, V | Temperature,°C |
| 9,6 | 20 or higher |
| 9,5 | 16 |
| 9,4 | 10 |
| 9,3 | 4 |
| 9,1 | -1 |
| 8,9 | -7 |
| 8,7 | -12 |
| 8,5 | -18 |
- a) If the voltage is above 9.6 V, the battery is normal.
- b) If the voltage is within 6.5-9.6 V, quickly charge the battery and check the battery again under load.
Note: If the battery voltage remains less than 9.6V after performing fast charging and load testing again, the battery should be replaced.
- c) If the voltage is below 6.5 V, the battery is faulty and must be replaced.
Charging the battery
1. When charging the battery, flammable and explosive gas is released under the battery cover. Do not smoke or use open flame near the battery that is being charged or has recently been charged.
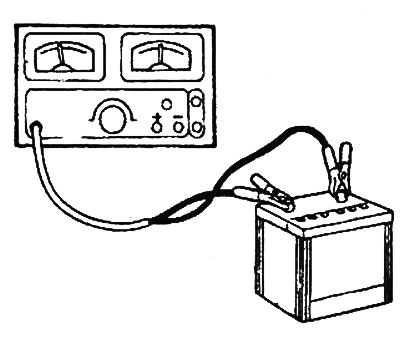
2. Do not disconnect any live circuits near the terminals of a battery being charged. A spark may occur between the disconnected wires (in the open circuit) and cause an explosion. Keep flammable objects away from an open battery.
Table. Battery charging time.
| Density of electrolyte in battery | Charging method | |
| Slow (current 5A) | Fast (current 20 A) | |
| Below 1.10 | 14 hours | 4.0 hours |
| 1,10-1,13 | 12 hours | 3.0 hours |
| 1,13-1,16 | 10 hours | 2.5 hours |
| 1,16-1,19 | 8 hours | 2.0 hours |
| 1,19-1,22 | 6 hours | 1.5 hours |
| Above 1.22 | 4 hours | 1.0 hour |
Checking the density of the electrolyte
1. Checking the level and density of electrolyte in a conventional (serviced) battery.
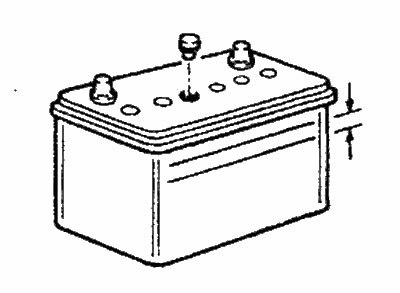
- a) Check the electrolyte level, it should be between the minimum and maximum level marks. If necessary, add distilled water.
- b) Do not measure the specific gravity of the electrolyte with a hydrometer immediately after adding distilled water to the electrolyte. To ensure that the distilled water and electrolyte mix and achieve uniform specific gravity, either slowly charge the battery (at 5 A) for several minutes or leave the battery stationary for about an hour.
Note: If after charging the battery the electrolyte density does not meet the specifications, replace the battery.
- c) Using a hydrometer and a thermometer, measure the density of the electrolyte in each cell of the battery.
- Nominal value - 1.22-1.29 g/cm³ (at a temperature of 20°C)
Note: When the battery is fully charged, the electrolyte density should be 1.260-1.280 g/cm³ at a temperature of 26.7°C.
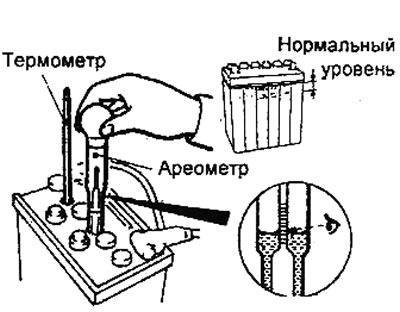
- d) Determine the difference in density between the battery banks. If the electrolyte density in any battery bank (one or more) differs from the average value by 50 points (0.05 g/cm³) or more, this is a sign of internal damage. In this case, the battery should be replaced.
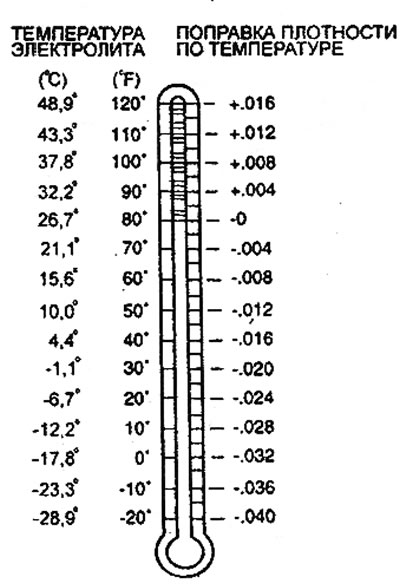
2. Determination of the density correction based on the electrolyte temperature.
- a) The density of the battery electrolyte changes with temperature. Heating liquefies the solution and reduces the density of the electrolyte. Cooling thickens the solution and increases the density of the electrolyte.
- b) If the actual temperature of the electrolyte deviates from the standard value, a correction must be made: 4 points (0.004 g/cm³) must be added to the density value for every 5.56°C of temperature above 26.7°C, or 4 points (0.004 g/cm³) must be subtracted for every 5.56°C of temperature below 26.7°C.
Example: The hydrometer shows a density value of 1.280 g/cm³ and the thermometer shows an electrolyte temperature of -12.2°C (10°F). According to the figure provided, the measured density value should be reduced by 7 points (0.028 g/cm³). Thus, the given value of the electrolyte density at 26.7°C will be 1.252 g/cm³.
1.280 - 0.028 = 1.252 g/cm³