
Attention:
- To avoid burns, it is recommended to remove spark plugs on a cold engine.
- (2.7L engine) Access to the spark plugs of the right cylinder head is difficult due to the design features of the engine (requires removal of the intake manifold receiver), therefore it is recommended to install only spark plugs with platinum or iridium electrodes in this cylinder head, since frequent scheduled inspection and replacement of spark plugs may result in breakdowns (for example, breakage of the receiver mounting studs).
1. Before removing the spark plugs, perform the following operations:
- a) Remove the engine noise protection cover (if installed).
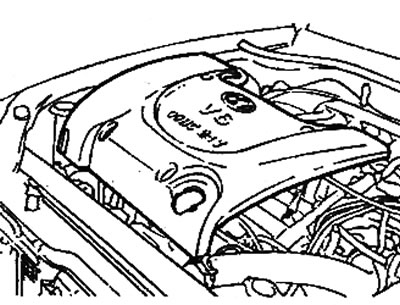
Engine 2.7 l.
- b) (2.0L/2.4L engines, models without soundproofing shell) Remove the cylinder head center cover.
- c) (2.7L engine) To access the spark plugs of the right cylinder head, remove the intake manifold receiver (see the corresponding section in the chapter "Intake and exhaust systems").
2. Removing the spark plugs.
- a) (2.0L / 2.4L engines) Disconnect the wiring connectors from the ignition coils.
- b) Disconnect the high tension wires from the spark plugs and ignition coils and remove the spark plug guide tubes with the ignition coils as an assembly (2.0L / 2.4L engines).
Caution: When removing and installing wires, be sure to hold only the rubber tip of the wire, not the wire itself. Improper handling of high-voltage wires can cause internal breaks in the wires.
Note: Before removing the wires, mark their relative positions to avoid confusion during installation.

- c) Use a clean cloth to remove any dirt from around the spark plugs that may get into the spark plug mounting holes.
- d) Using a spark plug remover, remove the spark plugs from the cylinder head.
3. Check for burnt electrodes or damage to the spark plug insulator. Also check for significant carbon deposits on the central electrode, damage or cracks in the sealing washer, and the condition of the insulator enamel at the end of the spark plug. Replace the spark plugs if necessary.
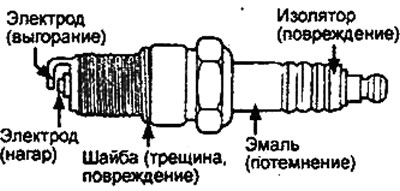
Note: The condition of the engine can be assessed by the type of deposits on the central electrode insulator:
- If the deposits are dark, either the air-fuel mixture is too rich or the amount of air entering the engine is restricted.
- If the deposits are light, then either the air-fuel mixture is too lean, or the ignition timing is incorrect, or the spark plug tightening torque is insufficient.
4. (For conventional spark plugs) If there is carbon deposits (electrodes are black), remove them with a steel brush or a spark plug cleaner (sandblasting). Use compressed air to clean sand from the threaded part of the spark plug.
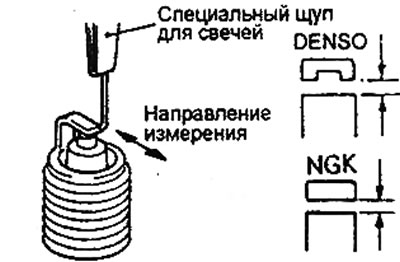
5. Using a spark plug feeler gauge, check that the spark plug gap is within the specified range.
- Nominal value: 1.0-1.1 mm
- Maximum permissible value: 1.3 mm
Recommended spark plugs:
- 2.0L Engine:
- NGK — BPR6ES-11
- Champion — RN9YC4
- 2.4L Engine:
- NGK — PGR5C-11
- Champion — RN10PYP4
- 2.7L Engine:
- NGK — PFR5N-11
- Champion — RC10PYPB4
- NIPPON DENSO — SK20PR-A8
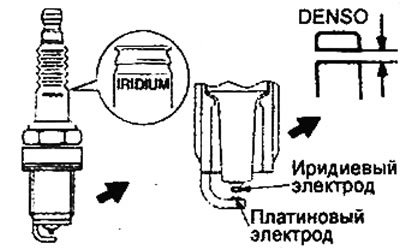
Note: NGK (or Nippon Denso) spark plug markings: the first character "P" means a spark plug with platinum electrodes, and "I" or "S" means a spark plug with iridium electrodes.
For conventional spark plugs.
For spark plugs with platinum or iridium electrodes.
[The original can be read on the resource: HyundaiBook]
Caution: (For spark plugs with platinum or iridium electrodes)
- Replace the spark plug if the gap limit is exceeded.
- Do not attempt to adjust the gap on these spark plugs.
- Cleaning these spark plugs may damage the electrode coating. Therefore, use a spark plug cleaner to remove carbon deposits and clean the spark plug completely for no more than 20 seconds to avoid damaging the electrode coating. Do not use a wire brush.
6. (For conventional spark plugs) If the gap does not match the nominal value, adjust it by bending the side electrode.
7. Installing spark plugs.
- a) Clean the spark plug mounting holes.
Caution: Be careful not to allow foreign particles to enter the engine cylinder through the spark plug hole.
- b) Install and tighten the spark plugs to the specified torque.
- Tightening torque: 20-30 Nm
Caution: Exceeding the specified spark plug tightening torque may damage the spark plug mounting hole threads in the cylinder head. Tightening the spark plug too little may cause the spark plug to overheat and damage the engine.
- c) If necessary, apply silicone grease to the spark plug insulators.
- d) (2.0L/2.4L engines) Install the spark plug guide tubes with the ignition coils and tighten their mounting bolts to the specified tightening torque.
- Tightening torque 8-12 Nm
- d) Securely connect the high tension spark plug wires to the spark plugs and ignition coils.
- e) (2.0L/2.4L engines) Connect the wiring connectors to the ignition coils.
8. After installing the spark plugs, perform the following operations:
- a) (2.7L Engine - Right Cylinder Head) Install the intake manifold receiver.
- b) (2.0L / 2.4L engines) Install the cylinder head center cover and tighten its mounting bolts.
- Tightening torque: 4-5 Nm
- c) Install the engine noise protection cover.
- Tightening torque: 8-12 Nm