HyundaiBook.ru
Repair Chevrolet Repair Honda Repair Toyota Repair Land Rover Repair VAZ Repair Renault Repair Nissan
English Русский
Български
Беларускі
Український
Српски
Hrvatski
Română
Polski
Slovenský
Magyar
ArticlesSitemapContacts  


  Accent   Elantra   Getz   Grandeur   Sonata   Santa Fe   Tucson   Others
Sonata 3 (1993-1998) Sonata 4 (2001-2012, petrol)
  • Main
  • Sonata
  • EF (2001-2012)
  • Power unit
  • MFI fuel injection system
  • Fuel lines and fuel vapor recovery system lines — removal and installation

Fuel lines and fuel vapor recovery system lines — removal and installation (Hyundai Sonata EF)

0
Contents: Removal ⇓ Examination ⇓ Installation ⇓
Caution: When performing operations to remove and install parts, refer to the "Fuel tank" figure.


Removal


1. Remove the fuel filler cap to relieve pressure inside the fuel tank. Raise the vehicle on a lift and disconnect the fuel pump connector.

Attention:
  • To prevent fuel splashing, relieve any residual pressure in the fuel system before disconnecting fuel lines or hoses.
  • Due to the presence of residual pressure in the high-pressure fuel line, cover the pipe connections with rags to prevent fuel from splashing.


2. Loosen the fuel pump mounting screws, then remove the fuel pump assembly from the fuel tank.

3. Disconnect the fuel return hose and pipe.

4. Disconnect the fuel vapor recovery system hose and tube.

Examination


1. Check fuel lines and hoses for cracks, kinks, deformations, damage and clogging.

2. Check the purge solenoid valve of the adsorber for blockage.

3. Check the fuel pump assembly for clogging or damage.

Installation


1. Connect the fuel vapor recovery system hose and the fuel return hose.
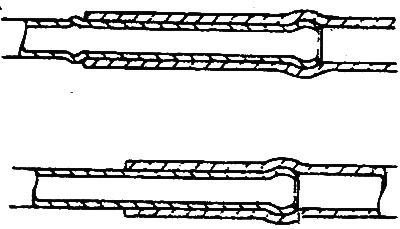
  • a) If there is a flange on the fuel pipe, connect the fuel hose to the pipe until it stops against the flange, as shown in the figure.
  • b) If there is no flange on the fuel pipe, securely connect the fuel hose to the pipe (connect so that there is sufficient distance between the edge of the hose and the edge of the pipe).

b) If there is no flange on the fuel…


2. Install the fuel pump assembly and tighten its mounting screws.


  • Tightening torque: 2-3 Nm

3. Connect the fuel hoses.

Tightening torque:
  • High pressure fuel hose to main fuel supply pipe: 30-40 Nm
  • High pressure fuel hose to fuel filter (modifications): 25-35 Nm
This article is available at russian, bulgarian, belarusian, ukrainian, serbian, croatian, romanian, polish, slovak, hungarian
This article has been reviewed by: Konstantin Smirnov
Add to social network:

Previous
Sonata 4: MFI fuel injection system
Next

Fuel tank — removal, inspection, installation
Fuel manifold — removal and installation
Checking ignition coils
Checking the purge solenoid valve of the adsorber
Checking the pressure switch sensor for the fluid in the hydraulic system of the power steering
Accelerator Pedal Cable and Accelerator Pedal — Removal
Toxicity Reduction System — General Information
Forced crankcase ventilation system
Fuel vapor recovery system
Emissions reduction system — troubleshooting by their signs
We recommend other articles on the topic of Hyundai manuals:

Checking the fuel vapor recovery system Hyundai Accent 3 (2005-2010)
Fuel vapor recovery system Hyundai Elantra 3 (2000-2006)
Fuel vapor recovery system Hyundai Getz (2002-2011)
Removal, inspection and installation of fuel lines and fuel… Hyundai Santa Fe 2 (2007-2012, petrol)
Characteristics of the fuel system of gasoline engines (G4GC,… Hyundai Tucson 1 (2005-2010)
Fuel vapor recovery system Hyundai Matrix (2001-2010, petrol)

Link in different formats to this article

Visitor comments
No comments yet


How much will 36 + 45 ?


Sonata 4 (2001-2012, petrol) 
  • General information
  • User manual
  • Maintenance
  • Power unit
  • 2.0 and 2.4 liter engines
  • 2.7 liter engines
  • Engine overhaul
  • Cooling system
  • Intake and exhaust systems
  • Lubrication system
  • MFI fuel injection system
  • Engine electrical equipment
  • Transmission
  • Clutch
  • Mechanical gearbox
  • Automatic gearbox
  • Drive shafts
  • Chassis
  • Front suspension
  • Rear suspension
  • Steering
  • Brake system
  • Body
  • Exterior
  • Interior
  • Heater and air conditioner
  • Security systems
  • Electrical equipment
  • Troubleshooting
  • Electrical circuits
Sonata 3 (1993-1998) 
  • General information
  • Maintenance
  • Power unit
  • Engine repair I4 DOHC
  • Engine repair I4 SOHC
  • Engine repair V6 SOHC
  • Cooling system
  • Intake and exhaust system
  • Exhaust gas treatment
  • Fuel system
  • Transmission
  • Clutch
  • Mechanical gearbox
  • Automatic transmission KM-175
  • Automatic transmission F4A33
  • Chassis
  • Front suspension
  • Rear suspension
  • Steering
  • Brake system
  • Body
  • Body elements
  • Electrical equipment
  • Equipment and devices
HyundaiBook.ru © 2018-2026 · Mobile version · Sitemap: EN BG BY UA RS HR RO PL SK HU · Administration · Site search · Hyundai owners Accent 1 · Accent 2 · Accent 3 · Elantra 1 · Elantra 2 · Elantra 3 · Getz · Sonata 3 · Sonata 4 · Santa Fe 2 · Tucson 1 · Tucson 2 · Matrix ·
This site uses cookies to optimize its functionality. By continuing, you agree to our terms.