Contents: Verification procedure ⇓ The presence of a small amount of…⇓ The presence of a significant amount…⇓ Thermal switch malfunction ⇓ Thermal switch defective ⇓ Insufficient amount of refrigerant…⇓ There is very little refrigerant…⇓ Expansion valve blocked (closed) ⇓ Clogged high pressure pipes ⇓ Compressor failure ⇓ Abnormal capacitor condition…⇓ Presence of air and moisture in the…⇓ Expansion valve stuck open ⇓
Verification procedure
1. Connect the measuring manifold to the air conditioning system.
2. Check the system status under the following conditions:
- a) Air temperature at the evaporator inlet 30-35°C.
- b) Engine crankshaft speed is 2000 rpm.
- c) The air conditioner is on.
- d) Temperature control switch: in the maximum cooling position.
- d) Heater electric fan switch: in the high speed position.
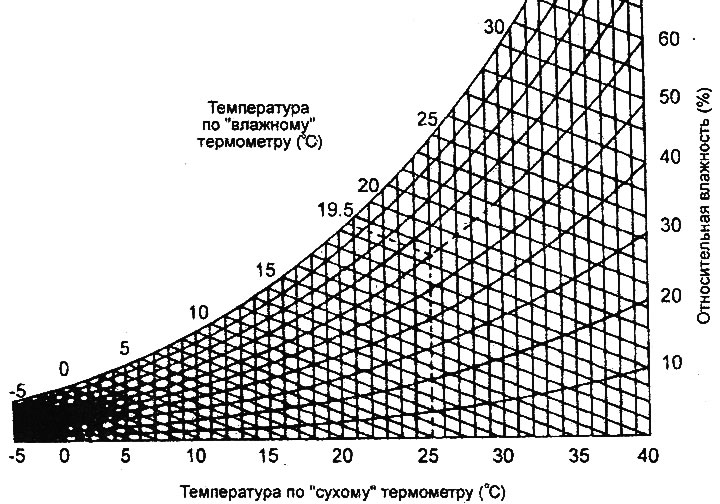
Method for determining relative air humidity.
The presence of a small amount of moisture and air in the system
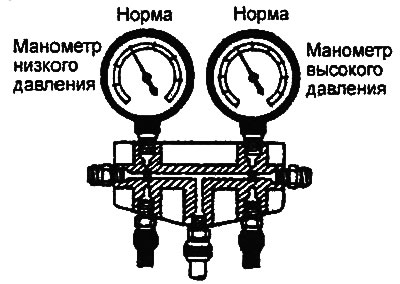
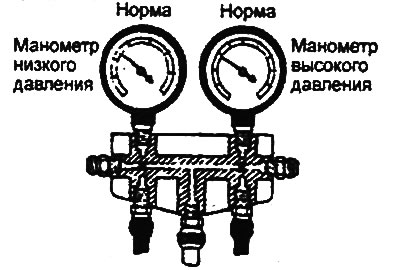
The pressure in the low-pressure line and the high-pressure line is normal (slight air cooling). The pressure in the low-pressure line does not change in the operating range of the thermal switch (position "ON" and "OFF").
Reason: presence of air or moisture in the system.
Solution:
- a) Check the system for leaks.
- b) Pump the refrigerant out of the system.
- c) Repair areas where leaks were found.
- d) Replace the receiver-drier.
- d) Evacuate the system for 30 minutes or more.
- e) Charge the system with refrigerant.
- g) Check the efficiency of the system.
The presence of a significant amount of moisture in the system
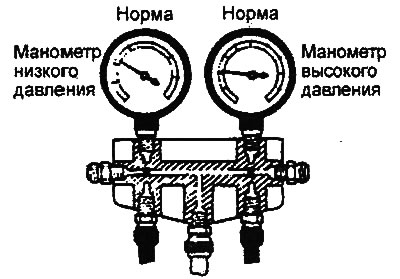
The pressure in the low pressure line and the high pressure line is normal. Hot air is supplied to the cabin at a high ambient temperature.
Reason: moisture accumulation in the system.
Solution:
- a) Pump the refrigerant out of the system.
- b) Replace the receiver-drier.
- c) Evacuate the system for 30 minutes or more.
- d) Check the refrigerant level in the system (overcharge).
- d) Check the efficiency of the system.
Thermal switch malfunction
The pressure in the low pressure line and the high pressure line is normal. The compressor turns on and off at a high frequency when there is no appropriate condition in the low pressure line.
Reason: faulty thermal switch.
Solution:
- a) Turn off the engine and the air conditioner.
- b) Replace the thermal switch. Make sure that the position of the new thermal switch is exactly the same as the position of the thermal switch that was replaced (relative to the evaporator fins).
- c) Check the efficiency of the system.
Thermal switch defective
The pressure in the low and high pressure line is normal. The pressure in the low pressure line increases (switch-on pressure is too high).
Reason: faulty thermal switch.
Solution:
- a) Turn off the air conditioner and stop the engine.
- b) Replace or repair the thermal switch (make sure the wiring is correct to avoid short circuits).
- c) Check the efficiency of the system.

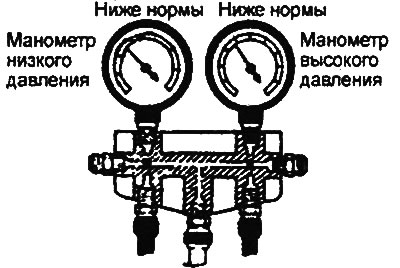
Insufficient amount of refrigerant in the system
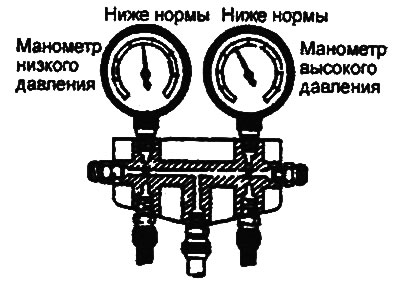
The pressure in the low pressure line and the high pressure line is slightly below normal (slight cooling of the air).
Reason: There is little refrigerant in the system.
Solution:
- a) Check the system for leaks.
- b) Pump the refrigerant out of the system.
- c) Repair areas where leaks were found.
- d) Check the compressor oil level.
- d) Evacuate the system for 30 minutes or more.
- e) Charge the system with refrigerant.
- g) Check the efficiency of the system.
There is very little refrigerant left in the system (leaks)
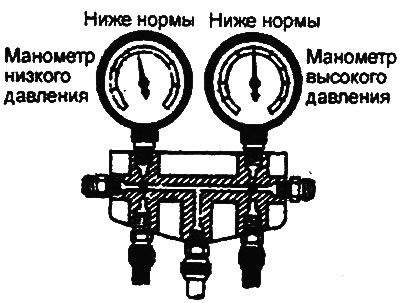
The pressure in the low and high pressure lines is below normal. Hot air is supplied to the passenger compartment.
Reason: There is very little refrigerant in the system.
Solution:
- a) Check the system for leaks.
- b) Carefully check the compressor sealing ring surface for leaks.
- c) Pump the refrigerant out of the system.
- d) Check the compressor oil level.
- d) Evacuate the system for 30 minutes or more.
- e) Charge the system with refrigerant.
- g) Check the efficiency of the system.
Expansion valve blocked (closed)
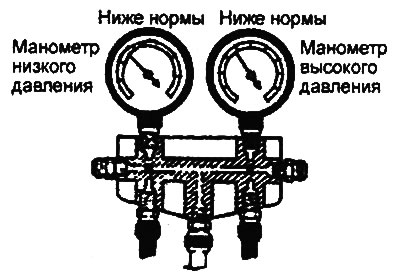
The pressure in the low pressure and high pressure lines is below normal (slight cooling of the air, frost or dew on the expansion valve tubes).
Reason: expansion valve is clogged, filter is clogged or sight glass of receiver-dryer is defective.
Solution:
- a) Pump the refrigerant out of the system.
- b) Disconnect the supply pipe from the expansion valve, remove and check the filter.
- c) Clean or replace the filter, connect the supply pipe.
- d) Evacuate the system for 30 minutes or more.
- d) Fill the system with refrigerant.
Clogged high pressure pipes
The pressure in the low pressure and high cooling line is below normal (slight cooling of the air, frost or dew on the high pressure tubes and the tubes are cold).
Reason: narrowing of the cross-section of the high-pressure line tubes.
Solution:
- a) Pump the refrigerant out of the system.
- b) Replace the receiver-dryer, high pressure tubes or other faulty parts.
- c) Evacuate the system for 30 minutes or more.
- d) Fill the system with refrigerant.
- d) Check the efficiency of the system.
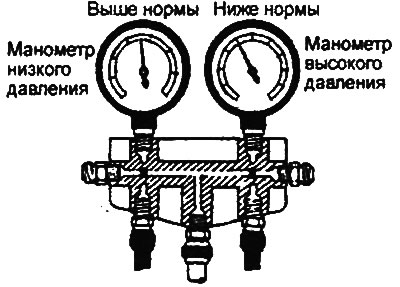
Compressor failure
The pressure in the low-pressure line is higher than normal, the pressure in the high-pressure line is lower than normal. The compressor makes strange sounds when operating.
Reason: compressor malfunction.
Solution:
- a) Remove the compressor and install plugs on its fittings.
- b) Disassemble the compressor and check its parts.
- c) Check the compressor oil level.
- d) Replace the receiver-drier.
- d) Check the efficiency of the system.
Abnormal capacitor condition (overload)
The pressure in the low and high pressure lines is higher than normal. Hot air is supplied to the cabin. The high pressure pipes are very hot.
Reason: defective capacitor or its electric fan.
Solution:
- a) Check the condition and fastening of the condenser fan.
- b) Check the condenser tube fins for damage or blockage.
- d) Check that the capacitor is installed correctly.
- c) Check the refrigerant level in the system (overcharge).
- d) Check the efficiency of the system.
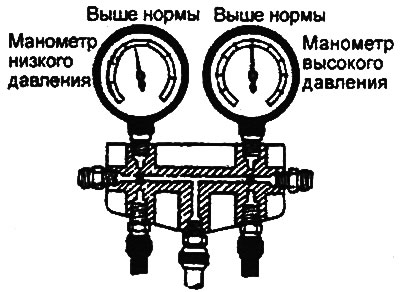
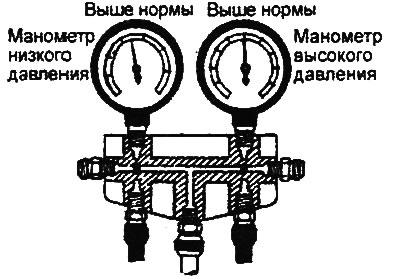
Presence of air and moisture in the system
The pressure in the low pressure line and the high pressure line is higher than normal (slight cooling of the air).
Reason: large amount of air and moisture in the system.
Solution:
- a) Pump the refrigerant out of the system.
- b) Replace the receiver-drier.
- c) Evacuate the system for 30 minutes or more.
- d) Fill the system with refrigerant.
- d) Check the efficiency of the system.
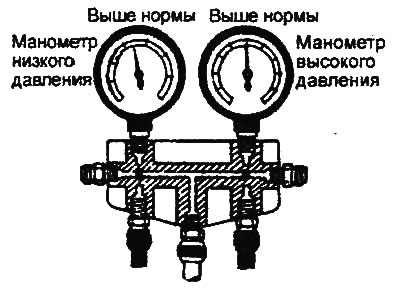
Expansion valve stuck open
The pressure in the low and high pressure lines is higher than normal (hot air is supplied to the passenger compartment, frost or dew on the evaporator tubes).
Reason: expansion valve malfunction.
Solution:
- a) Pump the refrigerant out of the system.
- b) Replace the expansion valve, making sure that there is no contamination on the contact surface.
After installation, check that the valve is securely fastened.
- c) Evacuate the system for 30 minutes or more.
- d) Fill the system with refrigerant.
- d) Check the efficiency of the system.