HyundaiBook.ru
Repair Chevrolet Repair Honda Repair Toyota Repair Land Rover Repair VAZ Repair Renault Repair Nissan
English Русский
Български
Беларускі
Український
Српски
Hrvatski
Română
Polski
Slovenský
Magyar
ArticlesSitemapContacts  


  Accent   Elantra   Getz   Grandeur   Sonata   Santa Fe   Tucson   Others
Getz (2002-2011)
  • Main
  • Getz
  • 1 (2002-2011)
  • Chassis
  • Brake system
  • Front Brake Caliper — Removal and Installation

Front Brake Caliper — Removal and Installation (Hyundai Getz 1)

0
Contents: Removal ⇓ Examination ⇓ Notes ⇓ Disassembly ⇓ Installation ⇓

Removal


1. Remove the front wheel.

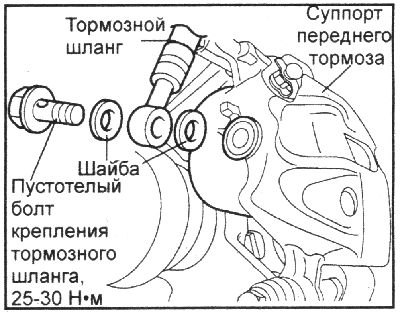
2. Remove the hollow bolt and disconnect the brake hose from the caliper.

2. Remove the hollow bolt and…


Attention!
  • Brake fluid dissolves paint, plastic and wire insulation, so if the fluid accidentally gets on the paintwork or its components, wash them with plenty of water.
  • To prevent brake fluid leakage, wrap the hose connections with rags or napkins.


3. Loosen the caliper cylinder mounting bolt.

4. Remove the caliper and brake pads.

4. Remove the caliper and brake pads.


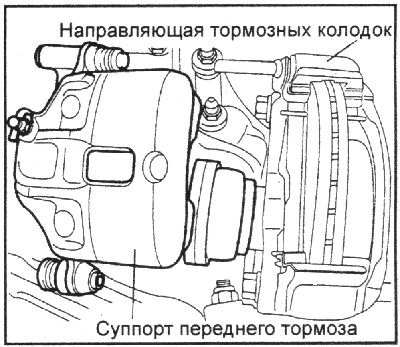
5. Loosen the bolts securing the shoe guide to the steering knuckle.

6. Remove the brake shoe guide.

Examination


1. Check the caliper for wear, damage, cracks and rust.


2. Check the piston for rust, damage, cracks and wear on the outer surface.

3. Check the bushing and guide pin for damage and rust.

4. Check the springs and protective covers for damage.

5. Check the brake shoe guide for wear, damage, cracks and rust.

Attention!
  • 1. Do not use sandpaper to clean the piston surface.
  • 2. All rubber parts must be replaced with new ones.


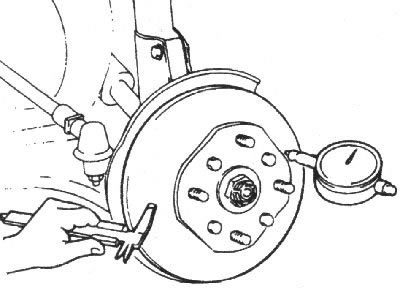
6. Measure the thickness of the brake disc. Using a dial indicator, measure the runout of the brake disc at a short distance from the outer edge.

Brake disc thickness:
  • Nominal: 19 mm
  • Minimum allowable: 17 mm
  • Maximum permissible runout: 0.04 mm
  • Maximum permissible difference in brake disc thickness: 0.01 mm

Maximum permissible difference in brake…


Notes


1. Using a micrometer, measure the thickness of the disc in eight places, approximately every 45° at a distance of 10 mm from the outer edge of the disc.

2. Use a dial indicator to check the runout of the brake disc. Attach the dial indicator to any convenient place and, by turning the brake disc, determine its runout at a distance of 5 mm from the outer edge.

7. Determine the value of axial runout of the working surface of the disk as the difference between the largest and smallest runout values.


Disassembly


1. Remove the piston dust cover.

2. Use compressed air to push the piston out of the caliper cylinder.

Note.
  • 1. When pushing the piston out with compressed air, do not place your fingers in front of the piston.
  • 2. Be careful, as the brake fluid will be blown out of the channel by compressed air along with the piston.


2. Be careful, as the brake fluid will…


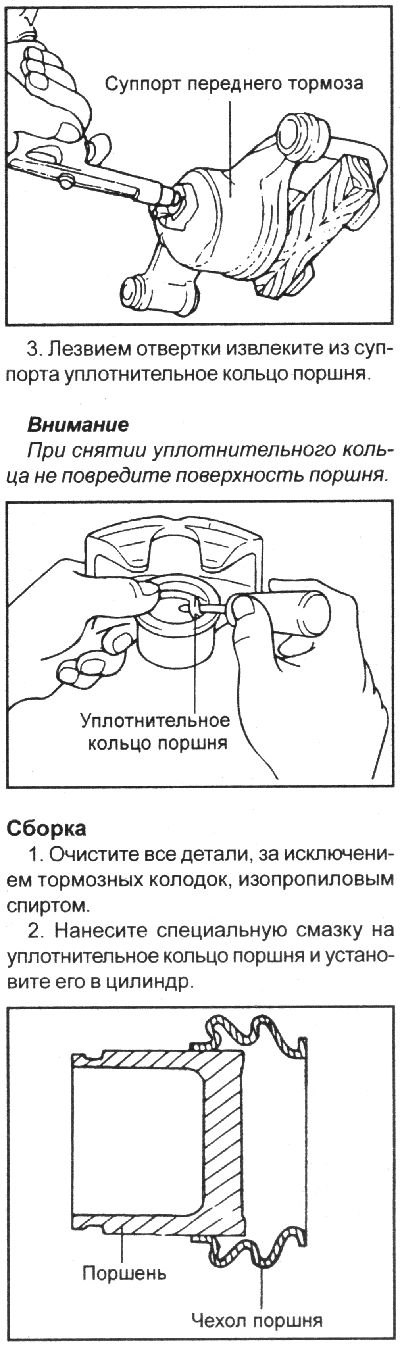
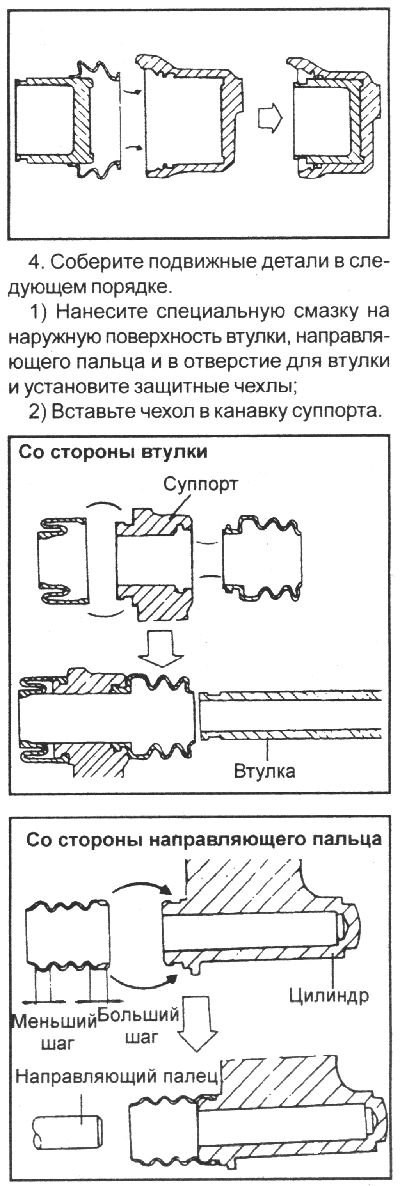
3. Assemble the piston and piston boots in the following order.
  • 1) Apply special grease to the walls of the caliper cylinder, the outer surface of the piston and the piston boot;
  • 2) Install the piston boot as shown in the figure;
  • 3) Insert the piston boot into the inner groove of the caliper and push the piston into the caliper.

3) Insert the piston boot into the…


5. Install the brake pads.

Note: Never apply grease to the brake disc or brake pads.


Installation


Installation is carried out in the reverse order of removal, taking into account the following.

1. Install the brake pads and caliper. Never apply grease to the brake disc or brake pads.

2. Screw in and tighten the caliper mounting bolt to the required tightening torque.

3. Screw in and tighten the hollow brake hose mounting bolt to the required tightening torque.
This article is available at russian, bulgarian, belarusian, ukrainian, serbian, croatian, romanian, polish, slovak, hungarian
This article has been reviewed by: Konstantin Smirnov
Add to social network:

Previous
Getz: Brake system
Next

Replacing the front brake pads
Brake pedal — removal and installation
Brake pipes — removal and installation
Pressure regulator — check
Master brake cylinder
Replacing rear brake pads (drum brakes)
Replacing the working brake cylinder
Parking handbrake — removal and installation
Anti-lock braking system (ABS) controls
Error codes using the Hi-Scan (pro) device
We recommend other articles on the topic of Hyundai manuals:

Front brake caliper Hyundai Accent 2 (1999-2005)
Front Disc Brake Caliper — Disassembly and Assembly Hyundai Elantra 1 (1990-1995, petrol)
Front disc brake pads Hyundai Sonata 3 (1993-1998)
Removal, checking and installation front brake pads Hyundai Santa Fe 2 (2007-2012, petrol)
Checking the condition of the front disc brake pads Hyundai Tucson 1 (2005-2010)
Removal, checking and installation front brake pads Hyundai Matrix (2001-2010, petrol)

Link in different formats to this article

Visitor comments
No comments yet


How much will 24 + 21 ?


Getz (2002-2011) 
  • User manual
  • Control devices
  • Heating and ventilation
  • Audio system
  • Car driving
  • Faults en route
  • Maintenance
  • Technical information
  • Power unit
  • Engine repair 1.1/1.3 l
  • Engine repair 1.5/1.6 l
  • Lubrication system
  • Cooling system
  • Fuel system
  • Exhaust system
  • Ignition system
  • Transmission
  • Clutch
  • Mechanical gearbox
  • Automatic gearbox
  • Drive shafts and axles
  • Chassis
  • Suspension and wheels
  • Steering
  • Brake system
  • Body
  • Exterior (external elements)
  • Interior (internal elements)
  • Air conditioning and heater
  • Electrical equipment
  • Equipment and devices
  • Power devices
  • Electrical circuits
HyundaiBook.ru © 2018-2026 · Mobile version · Sitemap: EN BG BY UA RS HR RO PL SK HU · Administration · Site search · Hyundai owners Accent 1 · Accent 2 · Accent 3 · Elantra 1 · Elantra 2 · Elantra 3 · Getz · Sonata 3 · Sonata 4 · Santa Fe 2 · Tucson 1 · Tucson 2 · Matrix ·
This site uses cookies to optimize its functionality. By continuing, you agree to our terms.