HyundaiBook.ru
Repair Chevrolet Repair Honda Repair Toyota Repair Land Rover Repair VAZ Repair Renault Repair Nissan
English Русский
Български
Беларускі
Український
Српски
Hrvatski
Română
Polski
Slovenský
Magyar
ArticlesSitemapContacts  


  Accent   Elantra   Getz   Grandeur   Sonata   Santa Fe   Tucson   Others
Sonata 3 (1993-1998) Sonata 4 (2001-2012, petrol)
  • Main
  • Sonata
  • Y3 (1993-1998)
  • Power unit
  • Engine repair V6 SOHC
  • Oil pump and crankcase — removal and installation

Oil pump and crankcase — removal and installation (Hyundai Sonata Y3)

0
Contents: Removal ⇓ Examination ⇓ Installation ⇓
Oil pump and crankcase — removal and installation


Removal


1. Using a special key (0926032000), remove the oil pressure sensor.

2. Remove the oil filter and crankcase.

3. Remove the oil receiver and its gasket.

4. Remove the three bracket bolts and remove the oil filter bracket and its gasket.

5. Unscrew the plug of the pressure relief valve from the oil pump housing.

6. Remove the oil pump housing.

Examination


Oil pump


1. Visually inspect the oil pump housing parts for cracks and damage.

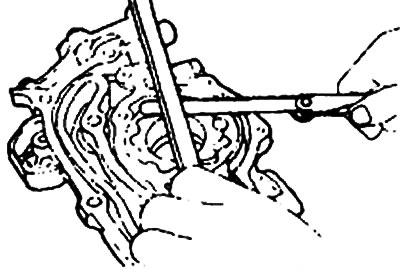
2. Install the rotor into the oil pump, then use a feeler gauge to check the clearance.
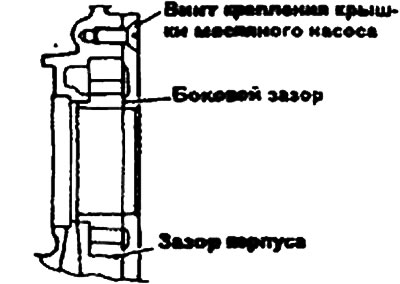
2. Install the rotor into the oil pump, then use a feeler gauge to check the…

Plunger and spring of the pressure reducing valve


1. Check the smooth movement of the pressure reducing valve plunger.


2. Check the pressure reducing valve spring for deformations and breaks.

Oil filter bracket


1. Check the oil filter bracket for damage and leaks.

Oil pressure sensor


1. Using an ohmmeter, check the electrical conductivity of the circuit between the terminal and the sensor body. If there is none, replace the sensor.

2. Check the electrical conductivity between the terminal and the sensor body when inserting a thin wire. If there is electrical conductivity even when pressing the thin wire, replace the sensor.

3. If there is no electrical conductivity when creating a vacuum of 50 kPa in the oil hole, the sensor works normally. Check for air leakage. If there is air leakage, which means a break in the sensor circuit, replace the sensor.

Installation


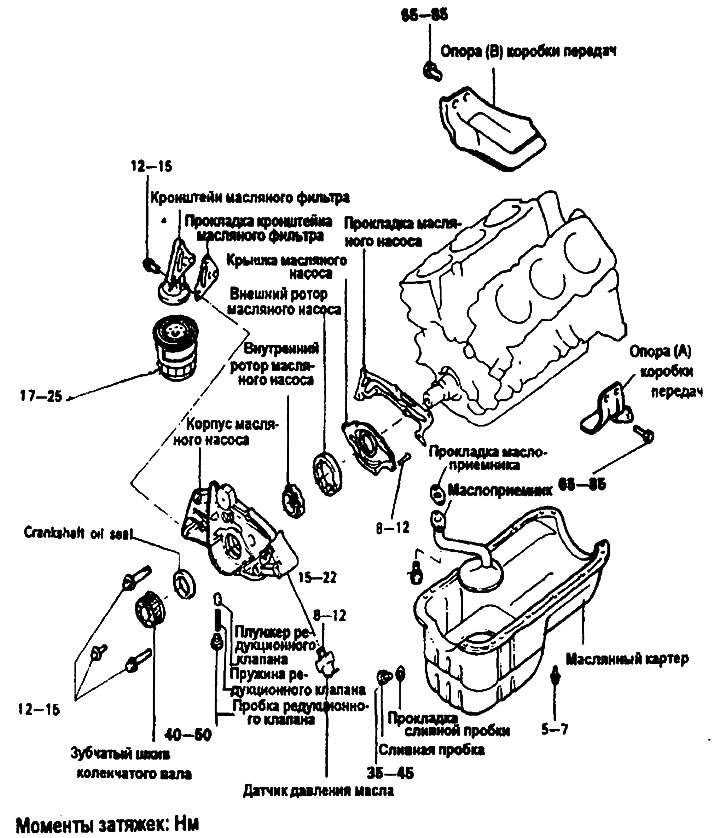
1. Install the oil pump housing with gasket.

Tightening torques:
  • Oil pump housing bolts - 12-15 Nm.
  • Oil pump cover screws - 8-12 Nm.

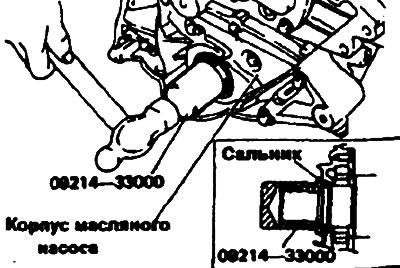
2. Using a special tool (09214—33000), install the oil seal as deep as possible into the oil pump housing.
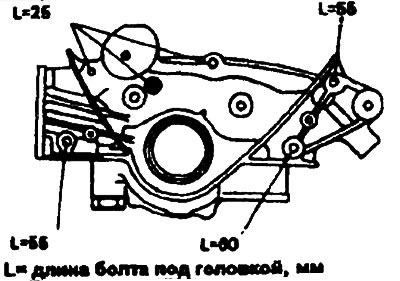
2. Using a special tool (09214—33000), install the oil seal as deep as possible…

3. Install the plunger and spring of the pressure reducing valve, then tighten the plug to the required torque.


  • Tightening torque: Pressure reducing valve plug - 40-50 Nm.

4. Install the oil pan and new gasket.
  • Tightening torque: Oil receiver bolts - 15-22 Nm.

5. Clean the mating surface of the cylinder block and oil pan.

6. Insert the sealing material into the groove of the oil pan flange.

Note:
  • 1. Make the first cut from the end of the tube tip filled with sealant, approximately 4 mm long. After applying the sealant, the oil filter must be installed.
  • 2. Do not apply sealing material to the oil pan flange area shown in the figure.
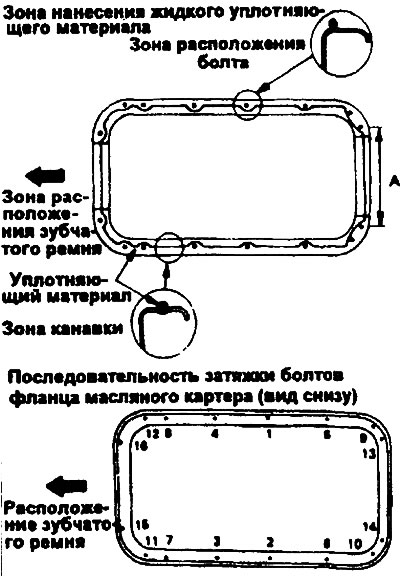

2. Do not apply sealing material to the oil pan flange area shown in the figure.


7. Install the oil pan and tighten the bolts to the specified torque.
  • Tightening torque: Oil pan bolts - 5-7 Nm.

8. Install the oil filter bracket with a new gasket.
  • Tightening torque: Oil filter bracket bolt - 12-15 Nm.

9. Clean the oil filter mounting surface on the bracket side. Apply a thin layer of engine oil to the oil filter gasket. Secure the oil filter.
  • Tightening torque: Oil filter - 17-25 Nm.
Tightening torque: Oil filter - 17-25 Nm.


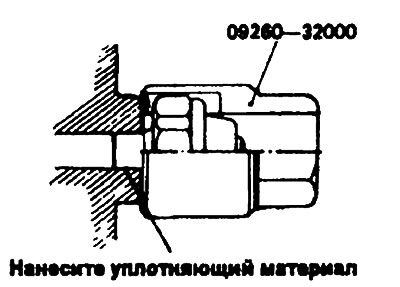
10. Using a special key (09260—3200), install the oil pressure sensor, having first applied sealing material to its threaded part.


  • Sealing material - Threebond 1104 or equivalent

Note: Do not tighten the oil pressure sensor too much.

  • Tightening torque: Oil pressure sensor - 8-12 Nm.


Information is taken from a thematic website HyundaiBook.ru
This article is available at russian, bulgarian, belarusian, ukrainian, serbian, croatian, romanian, polish, slovak, hungarian
This article has been reviewed by: Konstantin Smirnov
Add to social network:

Previous
Sonata 3: Engine repair V6 SOHC
Next

Cylinder Heads, Valves and Valve Springs — Removal and Installation
Rocker arms and their shafts
Rocker arms, their shafts and camshafts
Timing Belt — Removal and Inspection
Engine and gearbox assembly — removal
Pistons and connecting rods — removal and installation
Crankshaft — removal, inspection, installation
Cylinder block — removal, inspection, installation
We recommend other articles on the topic of Hyundai manuals:

Power Steering Pump Belt Hyundai Accent 1 (1994-1999)
Oil pump — removal and installation Hyundai Elantra 1 (1990-1995, petrol)
Oil pump for 1.1 and 1.3 l engines — removal and installation Hyundai Getz (2002-2011)
Adjusting the power steering and air conditioning pump drive belt Hyundai Santa Fe 2 (2007-2012, petrol)
Fuel pump — removal and installation Hyundai Tucson 1 (2005-2010)
Centrifugal pump of the cooling system Hyundai Matrix (2001-2010, petrol)

Link in different formats to this article

Visitor comments
No comments yet


How much will 40 + 12 ?


Sonata 4 (2001-2012, petrol) 
  • General information
  • User manual
  • Maintenance
  • Power unit
  • 2.0 and 2.4 liter engines
  • 2.7 liter engines
  • Engine overhaul
  • Cooling system
  • Intake and exhaust systems
  • Lubrication system
  • MFI fuel injection system
  • Engine electrical equipment
  • Transmission
  • Clutch
  • Mechanical gearbox
  • Automatic gearbox
  • Drive shafts
  • Chassis
  • Front suspension
  • Rear suspension
  • Steering
  • Brake system
  • Body
  • Exterior
  • Interior
  • Heater and air conditioner
  • Security systems
  • Electrical equipment
  • Troubleshooting
  • Electrical circuits
Sonata 3 (1993-1998) 
  • General information
  • Maintenance
  • Power unit
  • Engine repair I4 DOHC
  • Engine repair I4 SOHC
  • Engine repair V6 SOHC
  • Cooling system
  • Intake and exhaust system
  • Exhaust gas treatment
  • Fuel system
  • Transmission
  • Clutch
  • Mechanical gearbox
  • Automatic transmission KM-175
  • Automatic transmission F4A33
  • Chassis
  • Front suspension
  • Rear suspension
  • Steering
  • Brake system
  • Body
  • Body elements
  • Electrical equipment
  • Equipment and devices
HyundaiBook.ru © 2018-2026 · Mobile version · Sitemap: EN BG BY UA RS HR RO PL SK HU · Administration · Site search · Hyundai owners Accent 1 · Accent 2 · Accent 3 · Elantra 1 · Elantra 2 · Elantra 3 · Getz · Sonata 3 · Sonata 4 · Santa Fe 2 · Tucson 1 · Tucson 2 · Matrix ·
This site uses cookies to optimize its functionality. By continuing, you agree to our terms.