
Contents: Checking the idle speed ⇓ Checking the operation of the fuel…⇓ Checking fuel pressure ⇓ Replacing the fuel level sensor ⇓ Replacing the fuel filter ⇓
Checking the idle speed
Note: Before starting the adjustment, check the spark plugs, injectors and idle speed control servo drive for serviceability and make sure that the compression in the cylinders is within the range from the nominal to the maximum permissible value, and that the difference in compression between the cylinders does not exceed the maximum permissible value, etc.
1. Prepare the vehicle for inspection:
- a) The engine is warmed up to a coolant temperature of 80-95°C.
- b) Lighting, electric cooling fan and all additional equipment: off.
- c) Gearbox: neutral gear (selector lever in position "P" or "N" for models with automatic transmission).
- d) Steering wheel: in the straight-ahead position.
2. Connect a test tachometer to the primary winding side of the ignition coil or connect a tester to the diagnostic connector.
3. Start the engine and let it idle.
4. Let the engine run at approximately 2000-3000 rpm for 5 seconds or more.
5. Then let the engine idle for 2 minutes.
6. Read the idle speed value.
Idle speed:
- 2.0L Engine:
- Models with automatic transmission: 750±100 rpm
- Models with manual transmission: 800±100 rpm
- 2.4L Engine: 700±100 rpm
- Engine 2.7L: 850±100 rpm
7. Check the ignition timing.
Basic ignition timing angle:
- 2.0L Engine: 5°±2°before TDC
- 2.4L Engine: 7°±5°before TDC
- 2.7L Engine: 12°±5°before TDC
Checking the operation of the fuel pump
1. Turn the ignition switch to the "OFF" position.
2. Connect power (battery voltage) to the fuel pump service connector to check the pump's functionality.
Note: Since the fuel pump is submerged in the fuel tank, it is difficult to hear the pump running without removing the fuel filler cap.
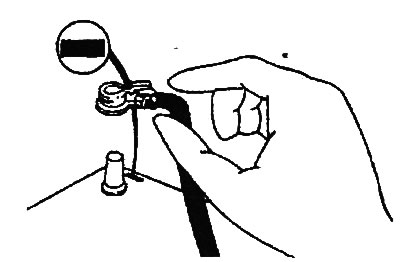
3. Lightly pinch the high pressure fuel hose and check that fuel pressure can be felt.
Engines 2.0 l / 2.4 l. |
Engine 2.7 l. |
Checking fuel pressure
1. Release residual pressure from the fuel lines and high-pressure hoses as follows:
(The original text is published on the website: HyundaiBook)
- a) Disconnect the fuel pump wiring harness connector.
- b) Start the engine and let it run. After the engine stalls on its own, turn the ignition key to the "OFF" position.
- c) Disconnect the cable from the negative terminal of the battery.
- d) Connect the fuel pump wiring harness connector.
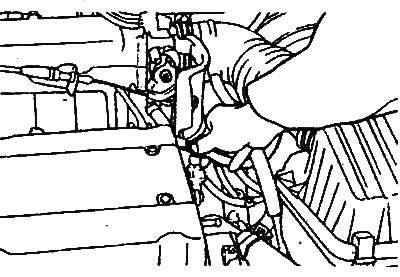
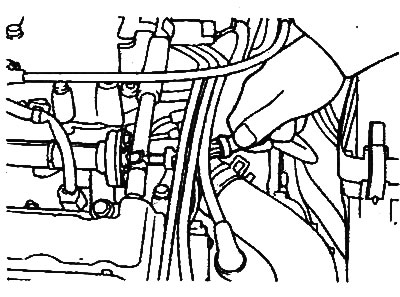
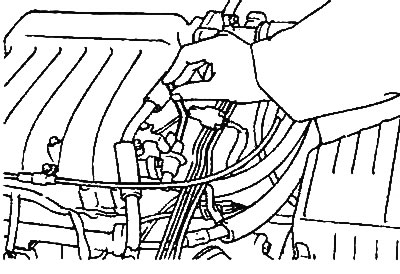
2. Loosen the mounting bolts and disconnect the fuel pipe from the fuel manifold.
Caution: Due to residual pressure in the high-pressure fuel line, cover the connection point of the hose to the fuel rail with a rag to prevent fuel from splashing.
Engine 2.7 l.
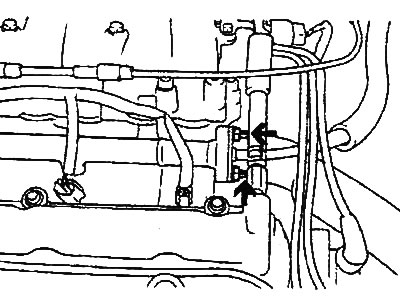
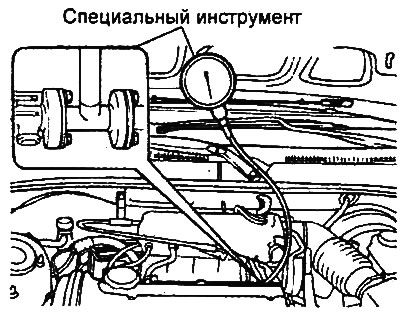
3. Using a special device (pressure gauge adapter), connect the pressure gauge to the fuel manifold. Tighten the bolts securing the pressure gauge adapter to the fuel manifold to the rated torque.
- Tightening torque: 25-35 Nm
Engines 2.0 l / 2.4 l. |
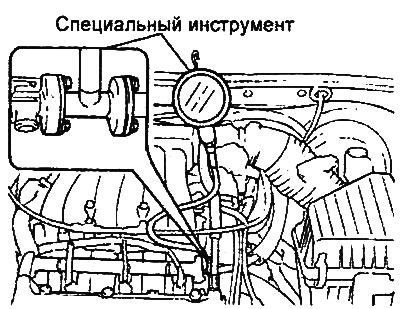
Engine 2.7 l. |
4. Connect the wire to the negative terminal of the battery.
5. Connect the power supply (battery voltage) to the fuel pump service connector and turn on the fuel pump. Then, after making sure that there is fuel pressure, check for fuel leaks at the connection points of the pressure gauge and the special device elements.
6. Start the engine and let it idle.
7. Disconnect the vacuum hose from the fuel pressure regulator and plug the hose. Measure the fuel pressure in the system with the engine idling.
- Nominal value: 320-350 kPa

Engines 2.0 l / 2.4 l. |
Engine 2.7 l. |
8. Measure the fuel pressure with the vacuum hose connected to the fuel pressure regulator.
- Nominal value: approximately 255 kPa
9. If the fuel pressure values measured in points "7" and "8" do not correspond to the nominal values, then determine the possible cause of the malfunction and perform the necessary repairs.
- a) Low fuel pressure.
- Clogged fuel filter (replace fuel filter).
- Fuel leaks into the fuel return line due to a loose fuel pressure regulator valve (replace the fuel pressure regulator).
- b) Increased fuel pressure.
- The valve in the fuel pressure regulator is stuck (replace the fuel pressure regulator).
- Fuel return hose or tube is clogged or kinked (clean or replace hose or tube).
- c) The same fuel pressure with the vacuum hose connected and disconnected from the fuel pressure regulator.
- Clogged or damaged fuel pressure regulator vacuum hose or fitting (replace or clean vacuum hose or fitting).
- Fuel pressure regulator valve is sticking or loose (replace fuel pressure regulator).
10. Turn off the engine and check for changes in the fuel pressure gauge readings. The fuel system is in good condition if the pressure in the fuel line does not drop within 5 minutes. If the pressure drops, determine the rate of pressure drop (gradually/instantly) and troubleshoot and eliminate them.
- a) If the fuel pressure drops gradually after the engine stops, the injector is leaking. Replace the injectors.
- b) If the fuel pressure drops immediately after the engine stops, the check valve in the fuel pump remains open.
- Replace the fuel pump.
11. Release residual pressure from the high-pressure fuel line.
12. Disconnect the hose, remove the pressure gauge and special device.
Caution: Due to residual pressure in the high-pressure fuel line, cover the connection point of the hose to the fuel rail with a rag to prevent fuel from splashing.
13. Replace the O-ring on the end of the fuel hose.
14. Connect the fuel hose to the fuel manifold and tighten the mounting bolts to the specified torque.
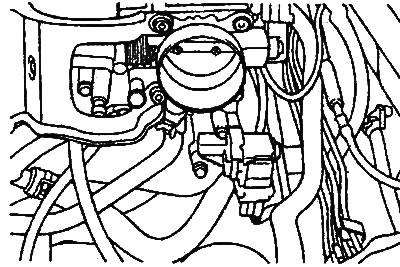
15. Check for fuel leaks. Cleaning the throttle body (throttle area)
Note: Disconnect the air intake hose from the throttle body and check the inside surface of the throttle body for contamination. Spray cleaning solvent inside the throttle body to remove any contamination.
1. Start the engine, warm it up to the operating temperature of the coolant, and then turn off the engine.
2. Disconnect the air intake hose from the throttle body.
3. Plug the bypass hole in the throttle body.
Note: Do not allow the cleaning agent to enter the bypass channel.
4. Spray the cleaning solvent into the throttle body through the intake manifold and wait for about 5 minutes. Then open the throttle valve and wipe it dry with a clean soft cloth.
Caution: When spraying cleaning solvent, keep the throttle valve closed to prevent solvent from entering the intake manifold.
5. Start the engine. Press the accelerator pedal several times and let the engine idle for 1 minute.
6. Repeat operations from points "4" and "5".
7. Open the bypass channel hole of the throttle body.
8. Connect the air inlet hose.
9. Disconnect the cable from the negative terminal of the battery for more than 10 seconds.
Replacing the fuel level sensor
1. Remove the fuel tank filler cap to relieve the pressure inside the fuel tank.
2. Remove the floor access panel under the rear seat cushion.
3. Disconnect the fuel pump connector, then disconnect the fuel feed pipe and fuel return pipe from the fuel pump.
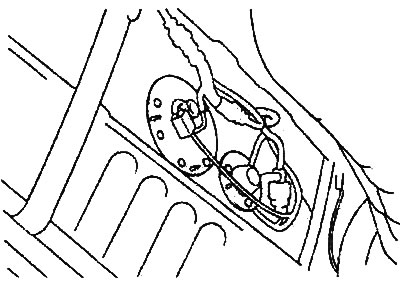
4. Loosen the fuel pump mounting screws, then remove the fuel pump assembly from the fuel tank.
5. Remove the fuel level sensor from the fuel pump.
6. Check and, if necessary, replace the fuel level sensor.
Replacing the fuel filter
Note: on some vehicle modifications, the fuel pump is located in the fuel tank and is an integral part of the fuel pump unit. In this case, disassembling the fuel pump unit is necessary to replace the fuel filter.
1. Remove the fuel tank filler cap to relieve the pressure inside the fuel tank.
2. Raise the car on a lift.
3. Release residual pressure from the high-pressure fuel line.
- a) Remove the floor access panel under the rear seat cushion.
- b) Disconnect the fuel pump connector.
- c) Start the engine and let it run. After the engine stalls on its own, turn the ignition key to the "OFF" position.
- d) Disconnect the cable from the negative terminal of the battery.
- d) Connect the fuel pump wiring harness connector.
4. Unscrew the fuel filter bracket mounting bolts.
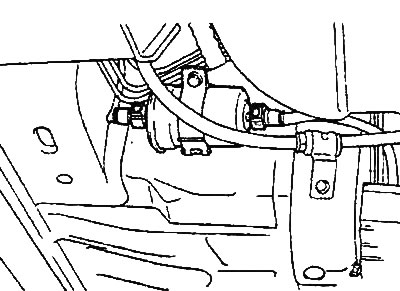
5. Separate the bracket from the fuel filter.
6. Check and replace the fuel filter if necessary.
7. Install the bracket onto the fuel filter.
8. Install the fuel filter in place and tighten the fuel filter bracket bolts to the specified torque.
- Tightening torque: 25-35 Nm
9. Connect the cable to the negative terminal of the battery and check for fuel leaks through the fuel line connections.
10. Install the floor access hatch.
11. Install the fuel tank filler cap.