HyundaiBook.ru
Repair Chevrolet Repair Honda Repair Toyota Repair Land Rover Repair VAZ Repair Renault Repair Nissan
English Русский
Български
Беларускі
Український
Српски
Hrvatski
Română
Polski
Slovenský
Magyar
ArticlesSitemapContacts  


  Accent   Elantra   Getz   Grandeur   Sonata   Santa Fe   Tucson   Others
Getz (2002-2011)
  • Main
  • Getz
  • 1 (2002-2011)
  • Power unit
  • Engine repair 1.1/1.3 l
  • Camshaft — Removal and Installation

Camshaft — Removal and Installation (Hyundai Getz 1)

0
Contents: Removal ⇓ Examination ⇓ Installation ⇓

Removal


1. Disconnect the crankcase ventilation hose and the positive crankcase ventilation hose.

2. Remove the water pump pulley and crankshaft.

3. Remove the timing belt cover.

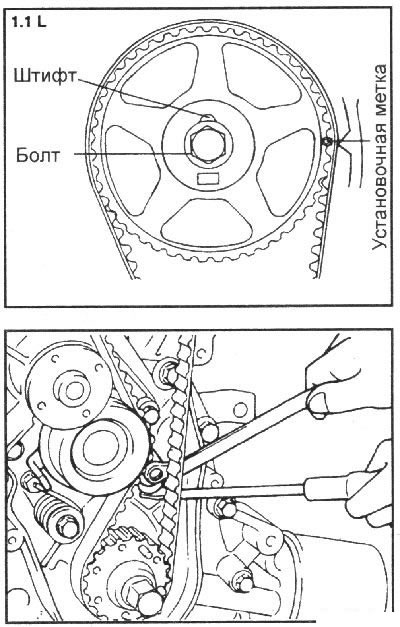
4. Move the timing belt tension roller towards the water pump and temporarily secure it in this position.

5. Remove the timing belt from the camshaft pulley.

6. Remove the camshaft pulley.

7. Remove the ignition coil (1.1L engine only).

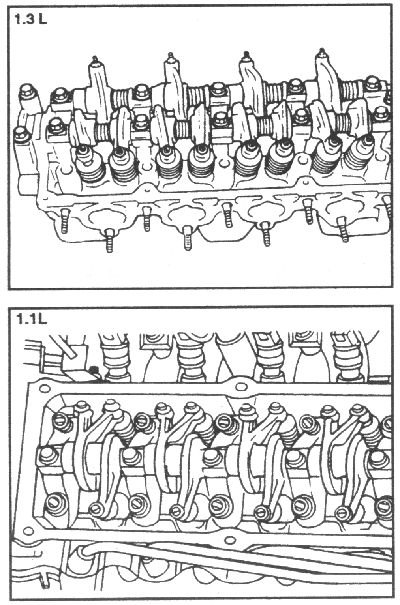
8. Remove the cylinder head cover.

9. Remove the rocker arm shaft assembly.

9. Remove the rocker arm shaft assembly.


9. Remove the rocker arm shaft assembly.


9. Remove the rocker arm shaft assembly.


10. Remove the camshaft by moving it towards the front of the engine (1.1L engine).


11. Remove the camshaft.

Examination


Camshaft


1. Inspect the camshaft for uneven wear, cracks or damage.

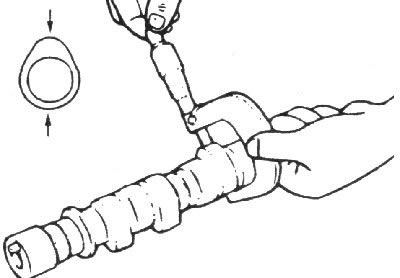
2. Measure the height of each camshaft lobe at two points.

Height of camshaft lobes, mm:

nominal:
  • intake cams:
    • 1.3L engine: 42.8575
    • 1.1L engine: 34.8729
  • exhaust cams:
    • 1.3L engine: 42.7354
    • 1.1L engine: 35.1258

minimum acceptable:
  • intake cams:
    • 1.3L engine: 42.3575
    • 1.1L engine: 34.8729
  • exhaust cams:
    • 1.3L engine: 42.2353
    • 1.1L engine: 35.0258

1.1L engine: 35.0258


3. Check the cam surfaces for uneven wear and damage.

4. Check each camshaft bearing for damage. If the bearing running surface is excessively damaged, replace the cylinder head or camshaft bearing cap.

Front camshaft seal ring


1. Check the sealing ring lips for wear. If the lips are worn or damaged, replace the sealing ring.

2. Check the surface of the camshaft that contacts the sealing ring. If this surface is uniformly worn, replace the camshaft.

Axial clearance of the camshaft, mm:
  • 1.3L engine: 0.07–0.28
  • 1.1L engine: 0.07–0.19

Installation


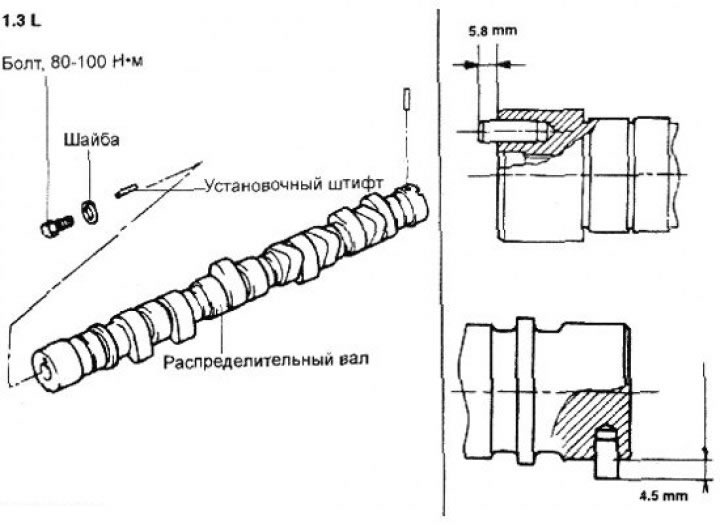
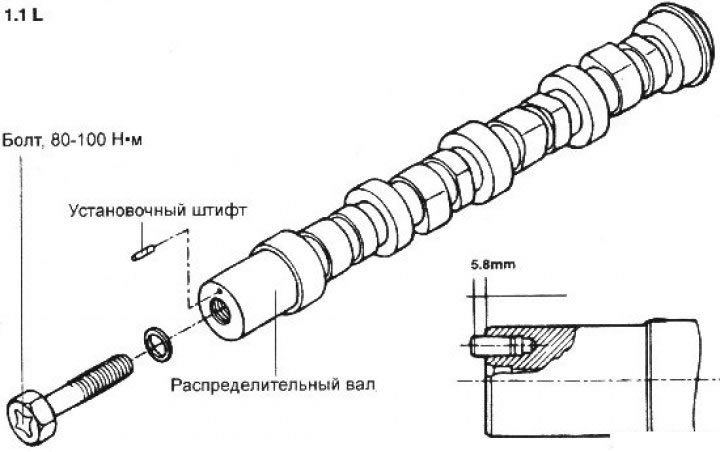
1. Before installation, apply a thin layer of clean engine oil to all sliding surfaces of the camshaft. Install the camshaft.

2. Install the camshaft bearing caps (1.3L engine). Install the ignition coil (1.1L engine).


3. Install the rocker shaft and rocker arms.

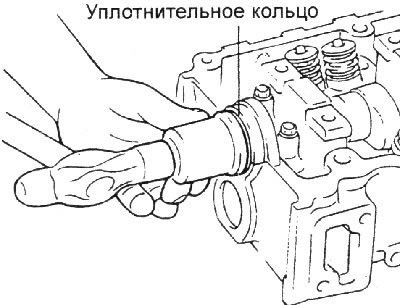
4. Lubricate the working edges and the outer surface of the sealing ring with engine oil and use special tool 09221–21000 to install the sealing ring onto the front of the camshaft.

Using a hammer, tap the sealing ring into the socket using special tool 09221–21000 until it stops.

5. Install the camshaft pulley and secure it with the bolt.

Tightening torque: 80–100 Nm.

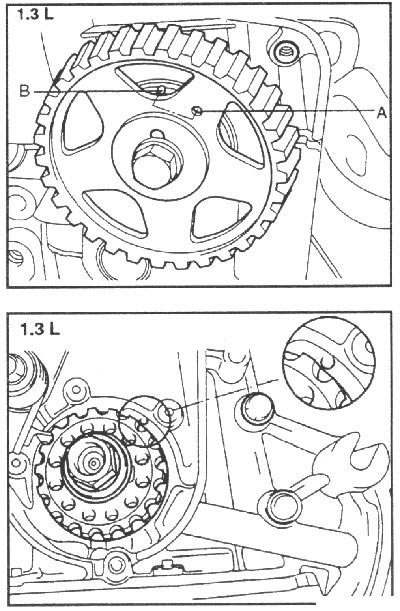
6. Align the timing mark of the camshaft and the timing mark of the crankshaft pulley with the pointers, while the piston of the 1st cylinder will be at TDC in the compression stroke.

6. Align the timing mark of the…


6. Align the timing mark of the…

7. Install the gasket into the recess of the cylinder head cover.


8. Temporarily install the cylinder head cover.

9. Start the engine and let it run at idle speed.

10. Tighten the cover mounting bolts to the specified torque.

Tightening torque: 8–10 Nm.

11. Install the timing belt covers.

12. Install the water pump pulley and crankshaft pulley.
This article is available at russian, bulgarian, belarusian, ukrainian, serbian, croatian, romanian, polish, slovak, hungarian
This article has been reviewed by: Konstantin Smirnov
Add to social network:

Previous
Getz: Engine repair 1.1/1.3 l
Next

Rocker arms — removal and installation
Hydraulic valve clearance compensators
Air filter — removal and installation
Engine Mounts — Removal and Installation
Adjusting the alternator drive belt tension
Cylinder head — removal and installation
Cylinder head repair
Exhaust manifold — check
Intake manifold — removal and installation
Removal and installation of engine and gearbox
We recommend other articles on the topic of Hyundai manuals:

Camshaft — removal, inspection and installation Hyundai Accent 1 (1994-1999)
Camshaft drive belt 1.6 l engine 1992 release — removal and… Hyundai Elantra 1 (1990-1995, petrol)
Single Overhead Camshaft Engines — Specifications Hyundai Sonata 3 (1993-1998)
Gasoline engine camshaft position sensor Hyundai Tucson 2 (2009-2015)
Camshaft Position Sensor Hyundai Matrix (2001-2010, petrol)

Link in different formats to this article

Visitor comments
No comments yet


How much will 30 + 34 ?


Getz (2002-2011) 
  • User manual
  • Control devices
  • Heating and ventilation
  • Audio system
  • Car driving
  • Faults en route
  • Maintenance
  • Technical information
  • Power unit
  • Engine repair 1.1/1.3 l
  • Engine repair 1.5/1.6 l
  • Lubrication system
  • Cooling system
  • Fuel system
  • Exhaust system
  • Ignition system
  • Transmission
  • Clutch
  • Mechanical gearbox
  • Automatic gearbox
  • Drive shafts and axles
  • Chassis
  • Suspension and wheels
  • Steering
  • Brake system
  • Body
  • Exterior (external elements)
  • Interior (internal elements)
  • Air conditioning and heater
  • Electrical equipment
  • Equipment and devices
  • Power devices
  • Electrical circuits
HyundaiBook.ru © 2018-2026 · Mobile version · Sitemap: EN BG BY UA RS HR RO PL SK HU · Administration · Site search · Hyundai owners Accent 1 · Accent 2 · Accent 3 · Elantra 1 · Elantra 2 · Elantra 3 · Getz · Sonata 3 · Sonata 4 · Santa Fe 2 · Tucson 1 · Tucson 2 · Matrix ·
This site uses cookies to optimize its functionality. By continuing, you agree to our terms.