HyundaiBook.ru
Repair Chevrolet Repair Honda Repair Toyota Repair Land Rover Repair VAZ Repair Renault Repair Nissan
English Русский
Български
Беларускі
Український
Српски
Hrvatski
Română
Polski
Slovenský
Magyar
ArticlesSitemapContacts  


  Accent   Elantra   Getz   Grandeur   Sonata   Santa Fe   Tucson   Others
Getz (2002-2011)
  • Main
  • Getz
  • 1 (2002-2011)
  • Electrical equipment
  • Power devices
  • Stator Elements — Checking and Adjusting

Stator Elements — Checking and Adjusting (Hyundai Getz 1)

0
Contents: Adjusting the clearance between the…⇓ Checking the starter traction relay…⇓ Checking the holding winding of the…⇓ Checking the return of the traction…⇓

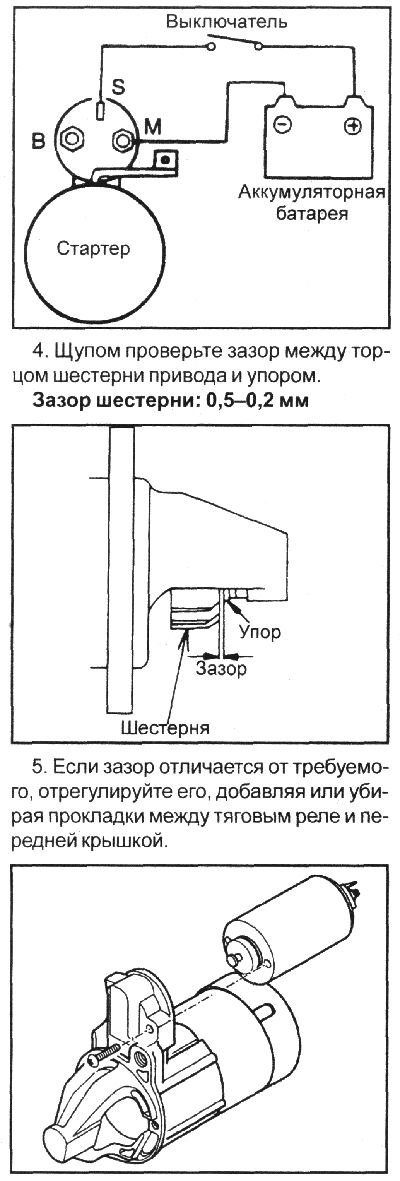
Adjusting the clearance between the end of the gear and the stop


1. Disconnect the starter motor excitation winding wire from the "M" terminal of the traction relay.

2. Using additional wires, connect the battery terminals to terminals "S" and "M".

3. The drive gear should move to the engaged position.

Warning! This test must be performed within 10 seconds, otherwise the traction relay solenoid may burn out.


Warning! This test must be performed…


Checking the starter traction relay pull-in winding


1. Disconnect the starter motor excitation winding wire from the "M" terminal of the traction relay.

2. Using additional wires, connect the battery terminals to terminals "S" and "M".

Warning! This test must be performed within 10 seconds, otherwise the traction relay coil may burn out.


3. If the starter pinion moves forward, the relay pull-in winding is OK. If the pinion does not move forward, replace the traction relay.

3. If the starter pinion moves forward,…


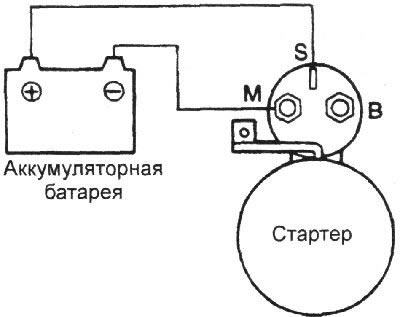
Checking the holding winding of the traction relay


1. Disconnect the starter motor excitation winding wire from the "M" terminal of the traction relay.

2. Using additional wires, connect the battery terminals to the "S" terminal and the traction relay housing.

Warning! This test must be performed within 10 seconds, otherwise the traction relay coil may burn out.


3. If the drive gear extends to the engagement position, the traction relay is in good condition. If the gear extends and returns to its original position multiple times, this indicates a break in the holding winding and the traction relay must be replaced.

3. If the drive gear extends to the…


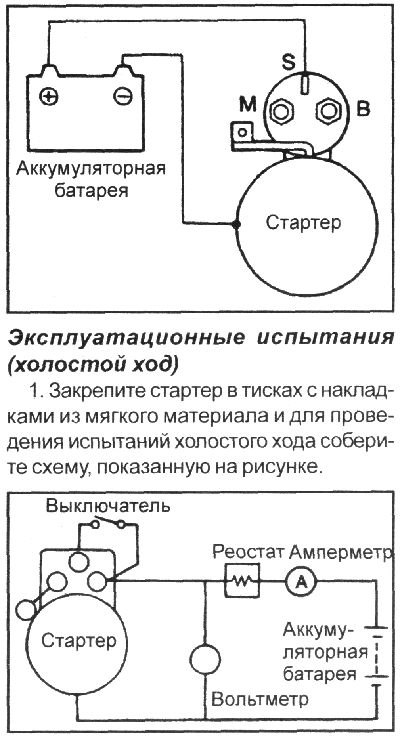
2. Connect the control ammeter (with a 100 A scale) and the carbon rheostat as shown in the figure.

3. Connect a voltmeter with a 15 V scale in parallel to the starter.

4. Set the carbon rheostat to the off position.

5. Connect the wire from the negative terminal of the battery to the starter housing.

6. Set the rheostat slider to a position where the voltmeter shows a voltage of 11.5 V.

(The full version is located on the website: «www.HyundaiBook.ru»)

7. Turn on the starter and check the current consumed by the starter and make sure that the starter shaft turns easily and smoothly.


Current consumption: no more than 90 A Anchor rotation frequency, min⁻¹: no less than 2800

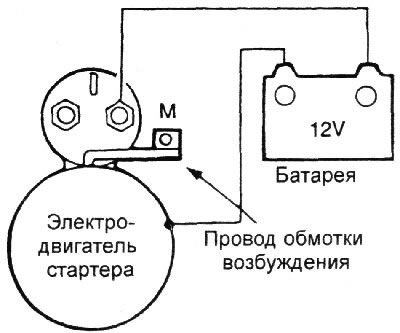
Checking the return of the traction relay plunger


1. Disconnect the starter motor excitation winding wire from the "M" terminal of the traction relay.

2. Using additional wires, connect the battery terminals to the "M" terminal and the traction relay housing.

Warning! This test must be performed within 10 seconds, otherwise the traction relay coil may burn out.


3. Extend and retract the drive pinion. If the pinion quickly returns to its original position, the traction relay is OK.

3. Extend and retract the drive pinion.…
This article is available at russian, bulgarian, belarusian, ukrainian, serbian, croatian, romanian, polish, slovak, hungarian
This article has been reviewed by: Konstantin Smirnov
Add to social network:

Previous
Getz: Power devices
Next

Ignition system — removal, installation and testing
Engine starting system
Battery — Checking, Charging and Precautions
Generator — removal, disassembly and installation
Checking the regulated voltage
Starter — checking, removal and installation
We recommend other articles on the topic of Hyundai manuals:

Checking and replacing stator elements Hyundai Accent 2 (1999-2005)
2.0L Engine Timing Belt — Checking Tension/Adjusting Hyundai Elantra 1 (1990-1995, petrol)
Checking and adjusting belt tension Hyundai Sonata 3 (1993-1998)
Checking and adjusting the brake pedal Hyundai Santa Fe 2 (2007-2012, petrol)
Checking and adjusting valve clearances Hyundai Tucson 1 (2005-2010)
Checking and adjusting the valve drive clearance Hyundai Matrix (2001-2010, petrol)

Link in different formats to this article

Visitor comments
No comments yet


How much will 26 + 33 ?


Getz (2002-2011) 
  • User manual
  • Control devices
  • Heating and ventilation
  • Audio system
  • Car driving
  • Faults en route
  • Maintenance
  • Technical information
  • Power unit
  • Engine repair 1.1/1.3 l
  • Engine repair 1.5/1.6 l
  • Lubrication system
  • Cooling system
  • Fuel system
  • Exhaust system
  • Ignition system
  • Transmission
  • Clutch
  • Mechanical gearbox
  • Automatic gearbox
  • Drive shafts and axles
  • Chassis
  • Suspension and wheels
  • Steering
  • Brake system
  • Body
  • Exterior (external elements)
  • Interior (internal elements)
  • Air conditioning and heater
  • Electrical equipment
  • Equipment and devices
  • Power devices
  • Electrical circuits
HyundaiBook.ru © 2018-2026 · Mobile version · Sitemap: EN BG BY UA RS HR RO PL SK HU · Administration · Site search · Hyundai owners Accent 1 · Accent 2 · Accent 3 · Elantra 1 · Elantra 2 · Elantra 3 · Getz · Sonata 3 · Sonata 4 · Santa Fe 2 · Tucson 1 · Tucson 2 · Matrix ·
This site uses cookies to optimize its functionality. By continuing, you agree to our terms.