HyundaiBook.ru
Repair Chevrolet Repair Honda Repair Toyota Repair Land Rover Repair VAZ Repair Renault Repair Nissan
English Русский
Български
Беларускі
Український
Српски
Hrvatski
Română
Polski
Slovenský
Magyar
ArticlesSitemapContacts  


  Accent   Elantra   Getz   Grandeur   Sonata   Santa Fe   Tucson   Others
Sonata 3 (1993-1998) Sonata 4 (2001-2012, petrol)
  • Main
  • Sonata
  • Y3 (1993-1998)
  • Power unit
  • Engine repair I4 DOHC
  • Camshafts and rocker arms — removal and installation

Camshafts and rocker arms — removal and installation (Hyundai Sonata Y3)

0
Contents: Removal ⇓ Examination ⇓ Installation ⇓

Removal


1. Disconnect the negative battery terminal.

2. Drain the coolant from the engine.

3. Remove the suction hose between the air cleaner and the valve cover.

4. Remove the air cleaner.

5. Remove the timing belt cover.

6. Remove the valve cover and crankshaft angle sensor.

7. Loosen the camshaft timing gear bolt and remove the timing gear.

8. Loosen the bearing cap mounting bolts and remove them, as well as the camshafts, rocker arms and adjusting bolts.

Examination


Rocker arms


1. Check the roller rotation. If it does not rotate freely or if there is a lot of play, replace the rocker arm.

2. Check the roller. If there are dents, damage or sticking, replace the roller.

3. Check the valve contact surface and replace if damaged.
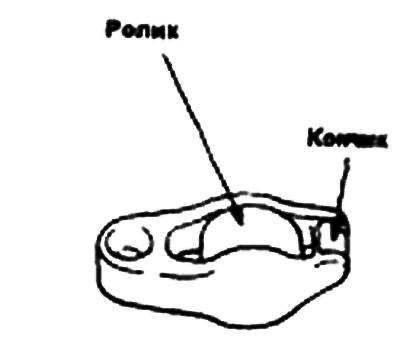
3. Check the valve contact surface and replace if damaged.


Camshafts


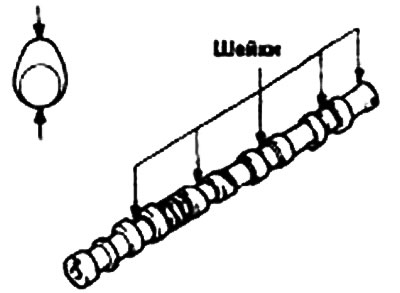
1. Check the camshaft journals for wear. If the journals are heavily worn, replace the camshaft.

2. Check the cam lobe for damage. If the lobe is damaged or severely worn, replace the camshaft.

Cam height (normal)
Inlet valve35,493 mm
Exhaust valve35,200 mm
Cam height (maximum)
Inlet valve34,993 mm
Exhaust valve34,700 mm


Camshafts and rocker arms — removal and installation


Installation


1. Install the camshafts into the cylinder head.
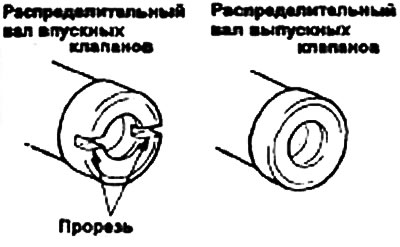
1. Install the camshafts into the cylinder head.


Note.
  • 1. Lubricate the camshaft journals and cams with engine oil.
  • 2. The intake camshaft has a slot on the rear end to drive the crankshaft position sensor.


2. Install the bearing caps. Observe the markings on the caps to identify the intake and exhaust camshafts.

L: Intake camshaft
R: exhaust camshaft
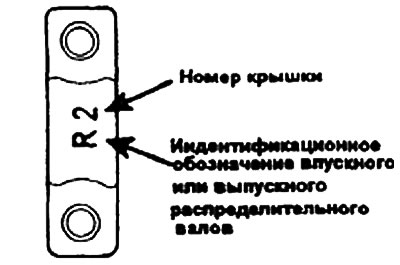

R: exhaust camshaft


3. Make sure the camshaft rotates easily by hand. After checking, remove the bearing caps and camshafts


shafts, then install the valve rocker arms.

4. Make sure that the dowel pins on the ends of the camshafts are facing upward.
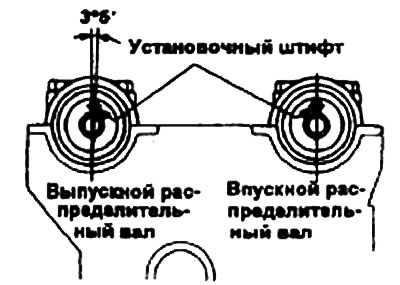
4. Make sure that the dowel pins on the ends of the camshafts are facing upward.


5. Tighten the bearing caps to the specified torque in two or three steps in the sequence shown in the figure.
  • Tightening torque of rocker arm bolts: 19-21 Nm
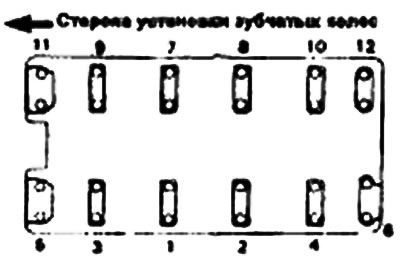
Tightening torque of rocker arm bolts: 19-21 Nm


6. Using a special device for installing camshaft seals and guides (09221-21000, 09221-21100) press the camshaft oil seal into place. Apply engine oil to the outside of the oil seal. Position the oil seal on the front end of the camshaft and install it by moving the seal installer with a hammer until the seal is fully seated.
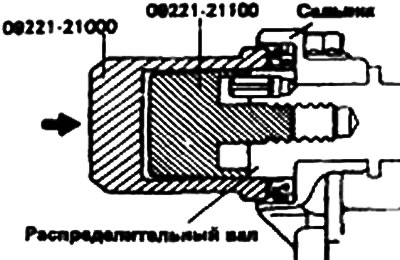
6. Using a special device for installing camshaft seals and guides…


7. Install the camshaft timing gears and tighten the bolts to the specified torque.


  • Tightening torque of camshaft gear bolts: 80-100 Nm

8. Install the valve cover. Use the sealing material as shown in the figure.
  • The tightening torque of the valve cover bolts is 2.5-3.5 Nm.

Sealing material:
  • part A: Threebond No.10 or equivalent
  • part B: Threebond No.1212D or equivalent
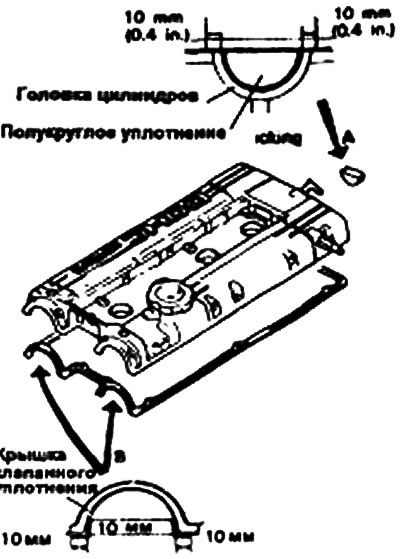
part B: Threebond No.1212D or equivalent


Bolt length x diameter
: 25mm x 6mm
: 20mm x 6mm
: 15mm x 6mm
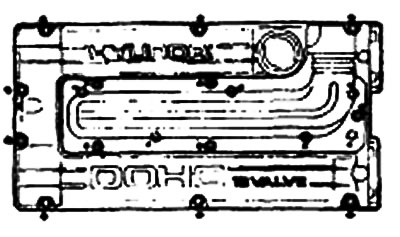
: 15mm x 6mm


9. Install the spark plugs, center spring and rubber as shown in the figure.
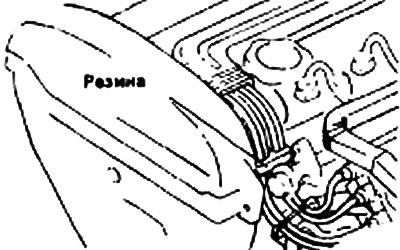
9. Install the spark plugs, center spring and rubber as shown in the figure.


10. Position the intake camshaft so that the timing pin for the timing gear faces up.
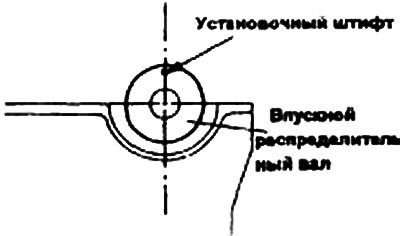


10. Position the intake camshaft so that the timing pin for the timing gear…


11. Align the mark stamped on the crankshaft position sensor housing with the slot in the plate.

12. Install the crankshaft sensor on the cylinder head.
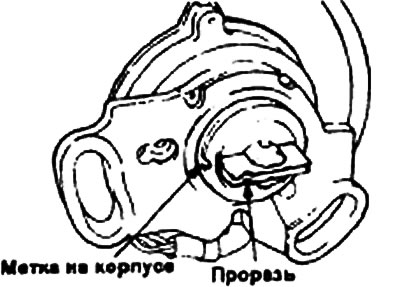
12. Install the crankshaft sensor on the cylinder head.


Note: The crankshaft position sensor can be installed even if the mark on the housing is located on the opposite side from the slot, however, this will result in incorrect fuel injection and ignition timing.
This article is available at russian, bulgarian, belarusian, ukrainian, serbian, croatian, romanian, polish, slovak, hungarian
This article has been reviewed by: Konstantin Smirnov
Add to social network:

Previous
Sonata 3: Engine repair I4 DOHC
Next

Camshafts and rocker arms — components
Toothed Belt — Checking and Installing
Timing Belt — Removal
Timing Belt — Components
Engine and gearbox assembly — removal and installation
Cylinder head and valves — components
Cylinder head and valves — removal and installation
Front cover, oil pump and balance shafts — components
Front Cover, Oil Pump and Balance Shafts — Removal and Installation
Piston and connecting rod — components
We recommend other articles on the topic of Hyundai manuals:

Rocker arms, shafts and hydraulic clearance compensator Hyundai Accent 1 (1994-1999)
Camshafts of 1.6 and 1.8 liter engines — removal and installation Hyundai Elantra 1 (1990-1995, petrol)
Rocker arms — removal and installation Hyundai Getz (2002-2011)
Disassembly, inspection and assembly of camshafts and tappets Hyundai Santa Fe 2 (2007-2012, petrol)
Rear suspension arms — device Hyundai Tucson 1 (2005-2010)
Removal, inspection and installation of camshafts Hyundai Matrix (2001-2010, petrol)

Link in different formats to this article

Visitor comments
No comments yet


How much will 31 + 20 ?


Sonata 4 (2001-2012, petrol) 
  • General information
  • User manual
  • Maintenance
  • Power unit
  • 2.0 and 2.4 liter engines
  • 2.7 liter engines
  • Engine overhaul
  • Cooling system
  • Intake and exhaust systems
  • Lubrication system
  • MFI fuel injection system
  • Engine electrical equipment
  • Transmission
  • Clutch
  • Mechanical gearbox
  • Automatic gearbox
  • Drive shafts
  • Chassis
  • Front suspension
  • Rear suspension
  • Steering
  • Brake system
  • Body
  • Exterior
  • Interior
  • Heater and air conditioner
  • Security systems
  • Electrical equipment
  • Troubleshooting
  • Electrical circuits
Sonata 3 (1993-1998) 
  • General information
  • Maintenance
  • Power unit
  • Engine repair I4 DOHC
  • Engine repair I4 SOHC
  • Engine repair V6 SOHC
  • Cooling system
  • Intake and exhaust system
  • Exhaust gas treatment
  • Fuel system
  • Transmission
  • Clutch
  • Mechanical gearbox
  • Automatic transmission KM-175
  • Automatic transmission F4A33
  • Chassis
  • Front suspension
  • Rear suspension
  • Steering
  • Brake system
  • Body
  • Body elements
  • Electrical equipment
  • Equipment and devices
HyundaiBook.ru © 2018-2026 · Mobile version · Sitemap: EN BG BY UA RS HR RO PL SK HU · Administration · Site search · Hyundai owners Accent 1 · Accent 2 · Accent 3 · Elantra 1 · Elantra 2 · Elantra 3 · Getz · Sonata 3 · Sonata 4 · Santa Fe 2 · Tucson 1 · Tucson 2 · Matrix ·
This site uses cookies to optimize its functionality. By continuing, you agree to our terms.